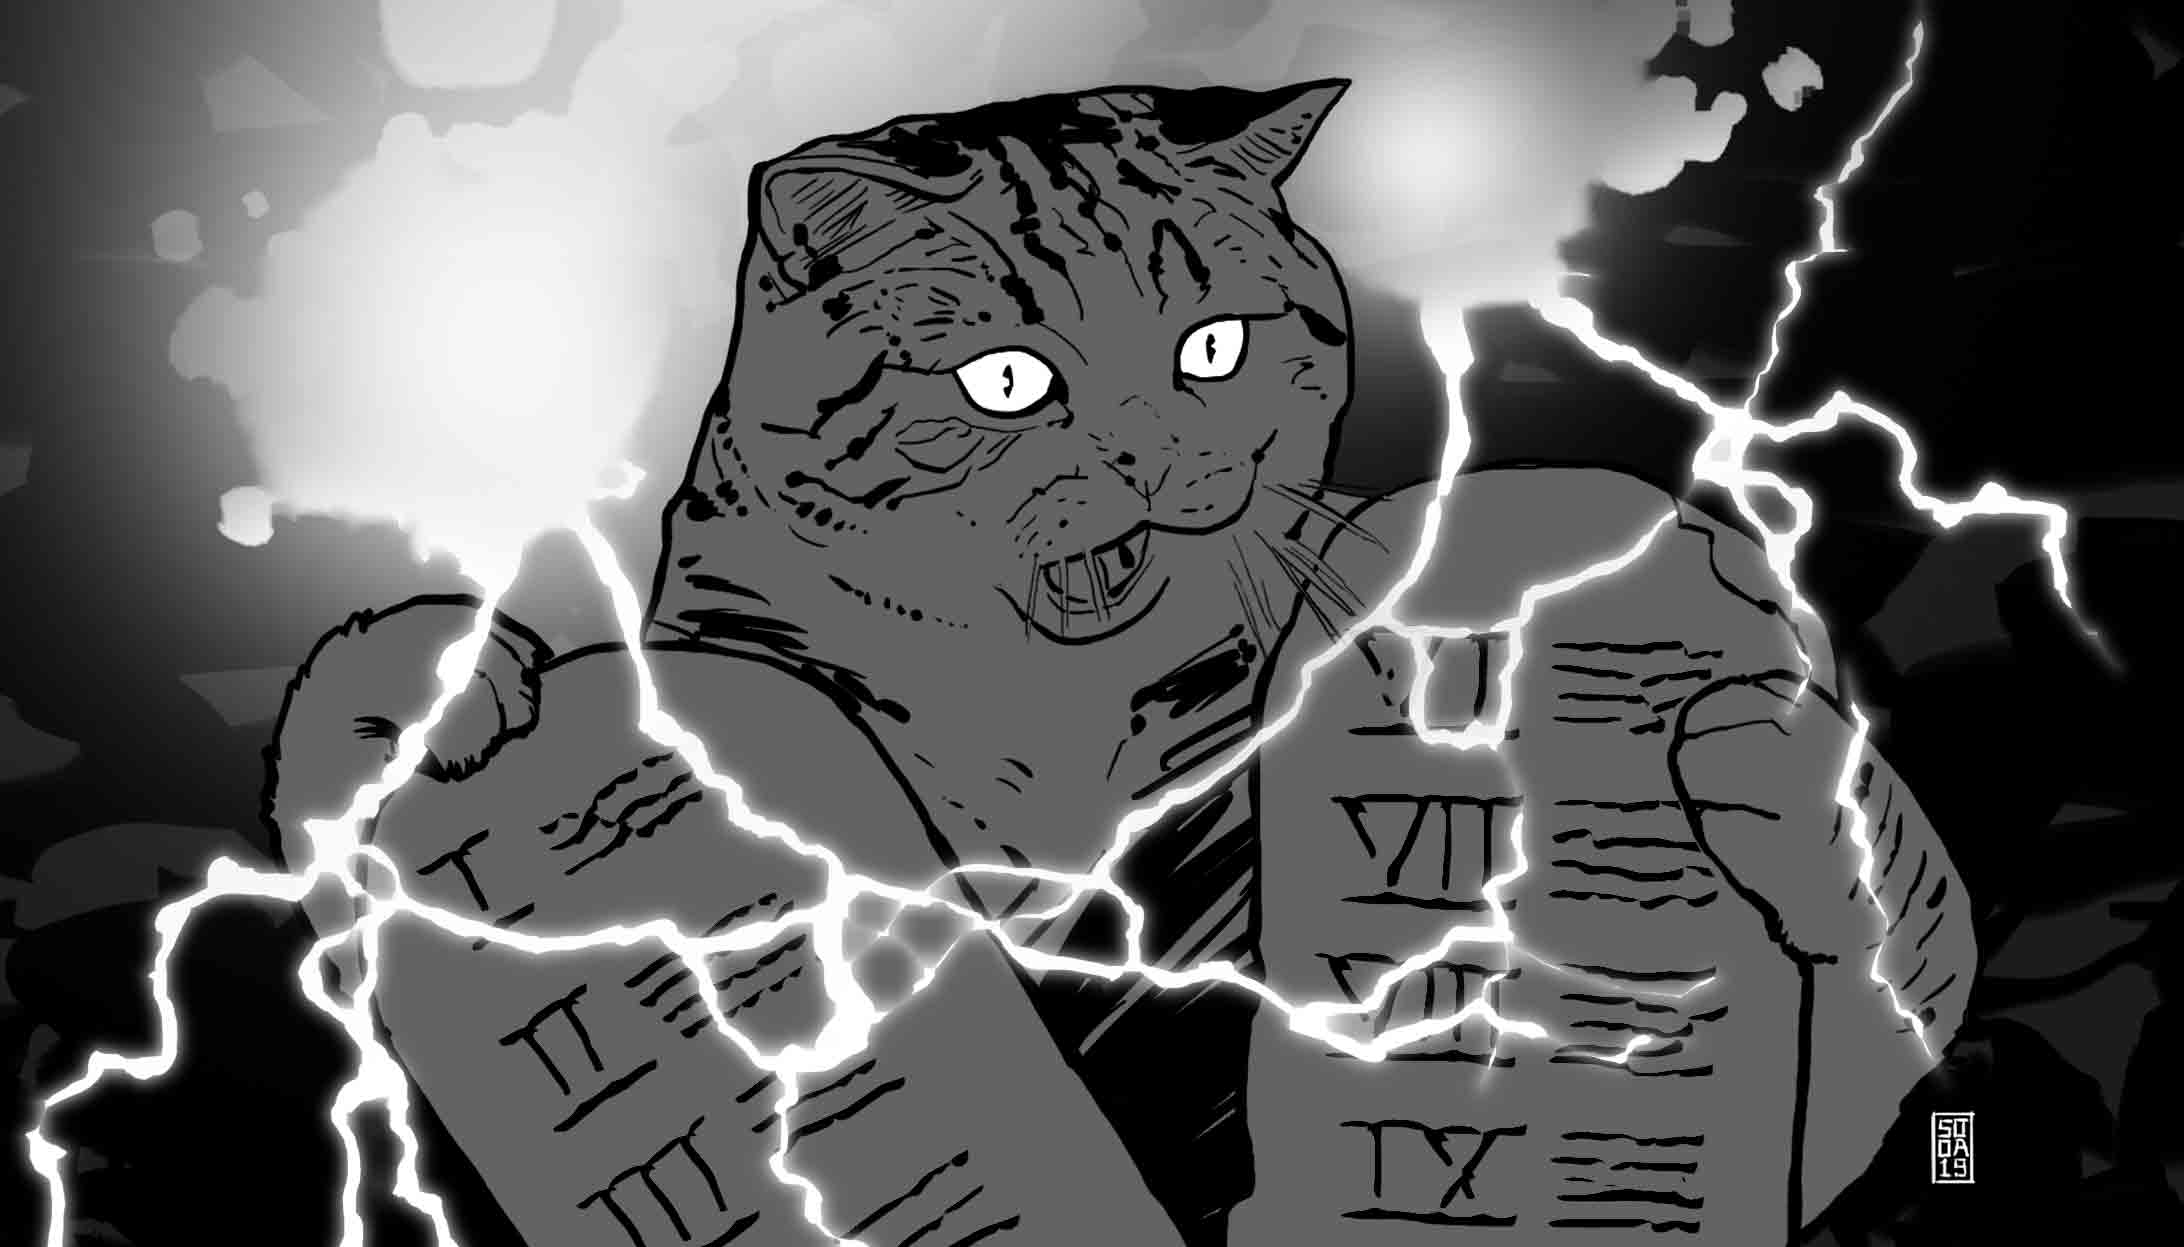
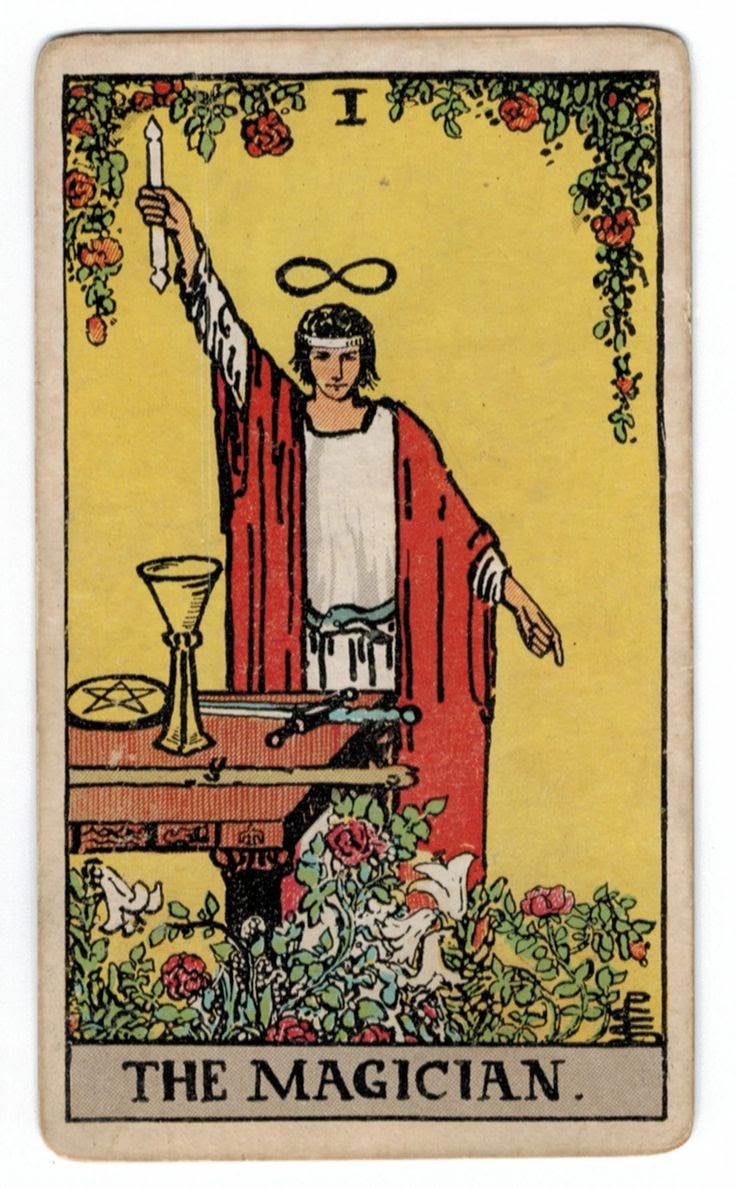
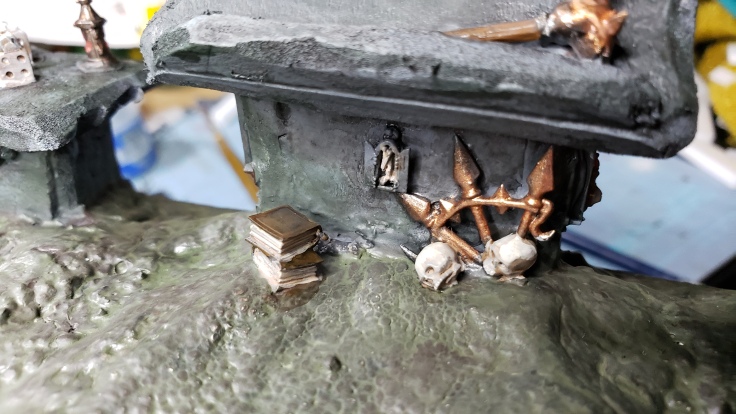
Both Red and Magician! Magic appears in the strangest places and often times among the junk and forgotten things around us. Put them to use or honor them once more and be surprised at what will come from it!
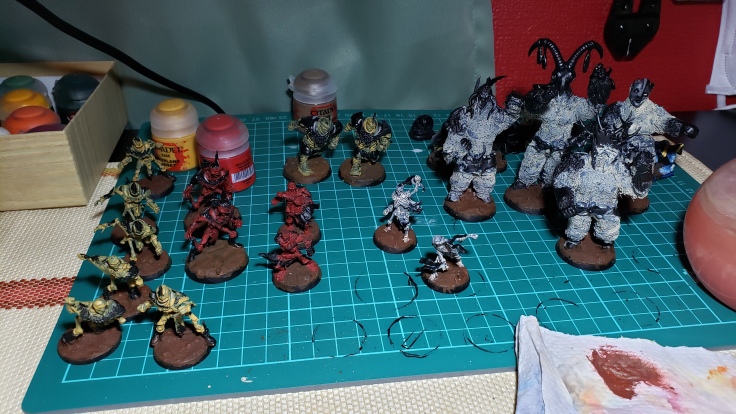
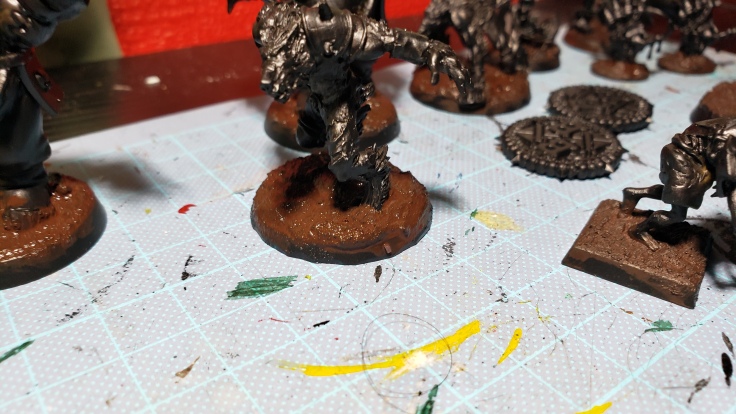
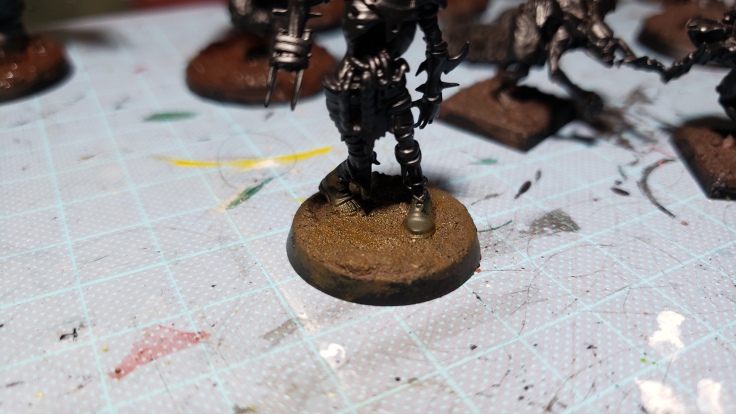
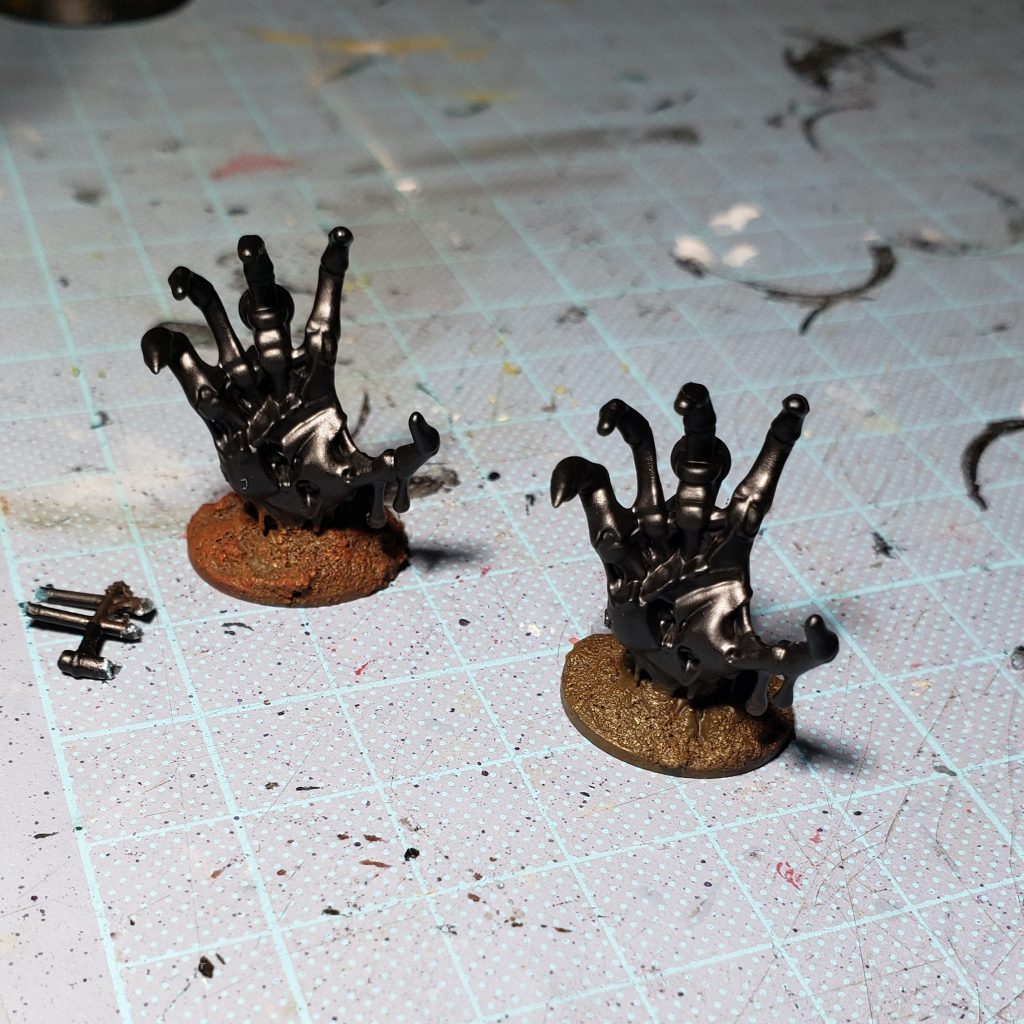
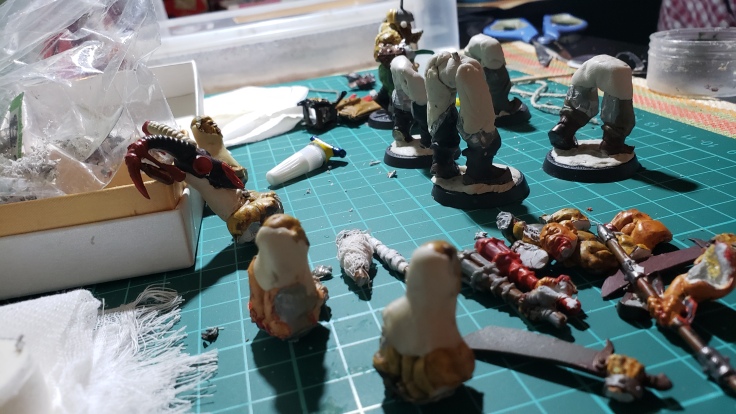
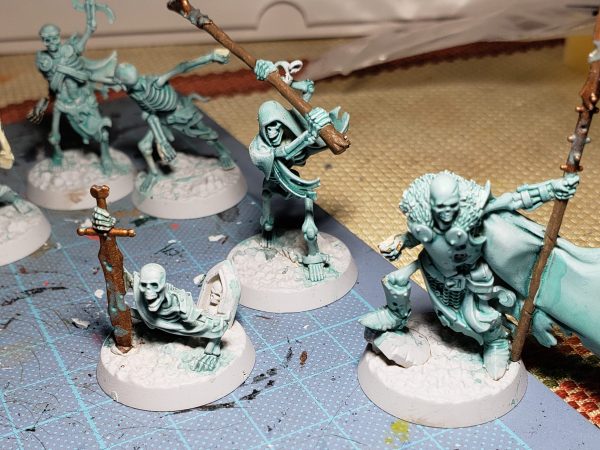
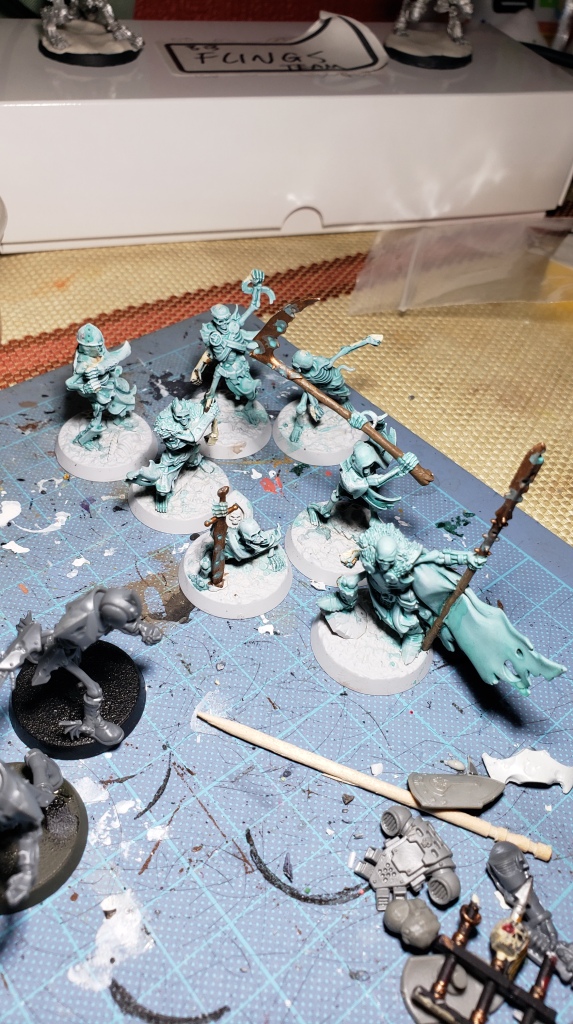
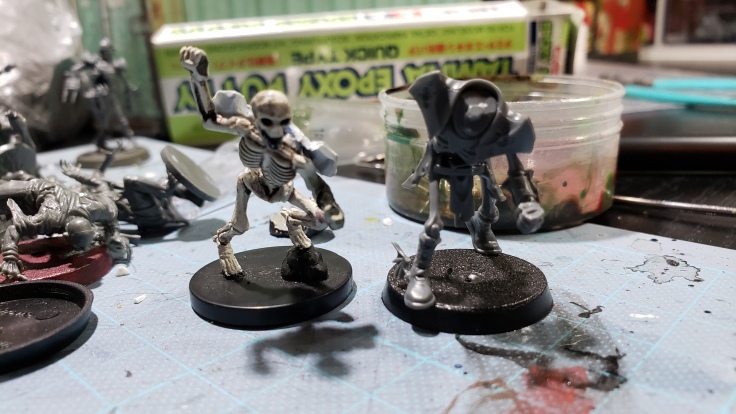
We are back baby! Fresh off getting the Necromantic painted up last week, I decided to jump right into the Shambling Undead and Khemri Tomb King Section of the job. I started the back half of the painting just like the first and got the bases done. Realizing they will need touch ups and work anyway, I didn’t spend as much time as I had initially on them and only brushed them a single slightly lighter brown and then a drybrush of reddish muddy color to finish them off. I want to get them done and realize I spend a fair amount of time touching up anyway, so the base coats can be messy.
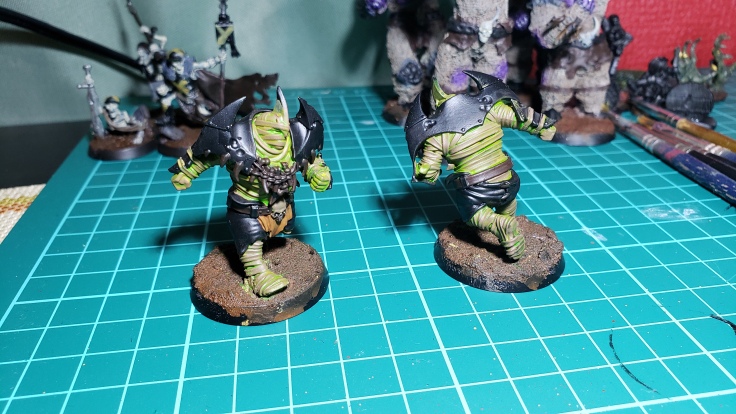
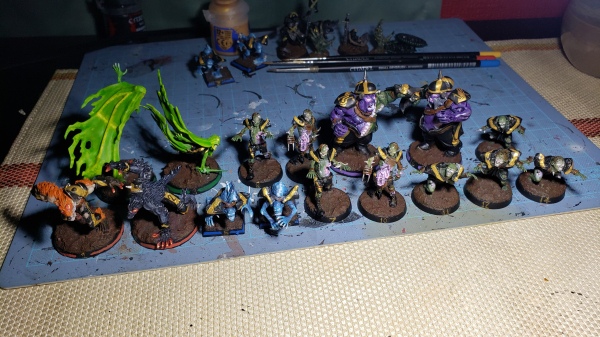
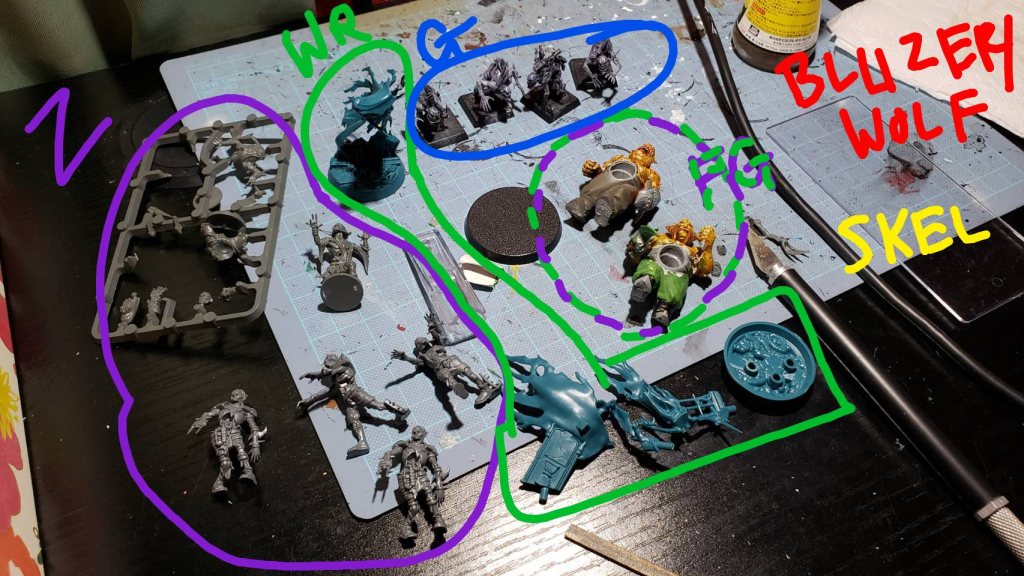
I actually followed my previously written plan regarding the glowy goodness this time around a bit more closely which worked out well I think. After the first session I also laid down a few base colors. I have five main groupings of models currently, yellow line skeletons, red wights/blitz-ras, my (currently white but soon to be) green throw-ras, (currently yellow) mummies, and the four tomb guardians. I guess 6 groups if you count all the coaches and stuff who I am still wondering what color to do them up as color-wise.
Boom! Got some work done!
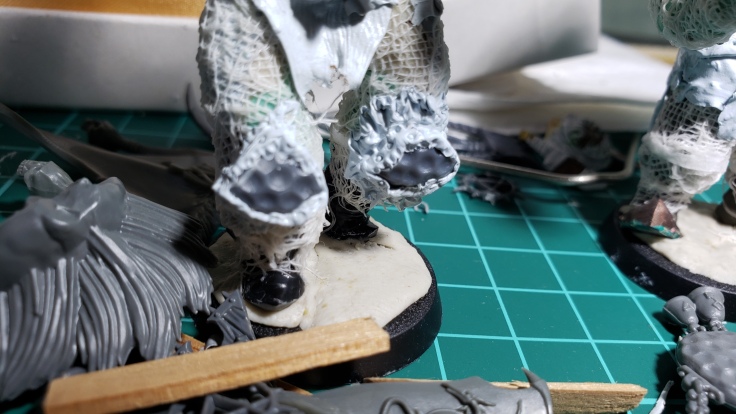
Lesson #1 is this: Painting gauze is like painting a sponge regardless how much glue water you daoused it with. I undercoated it and it drank watered down paint like sand in the desert. Damn. No big deal, but I had to water stuff down to conserve paint, but also use enough paint to have enough pigment to color the model! I’d say one or two full brushloads of watered down paint covered about a 1/3 of the model. Silly.
Let the light within you shine bright!
I laid down the base colors and immediately did another layer of brighter color on top of them on the skeleton party and mummies. Tomb guardians are kind of a different kettle of fish for this project for a lot of it, so they are going to get slightly different commentary.
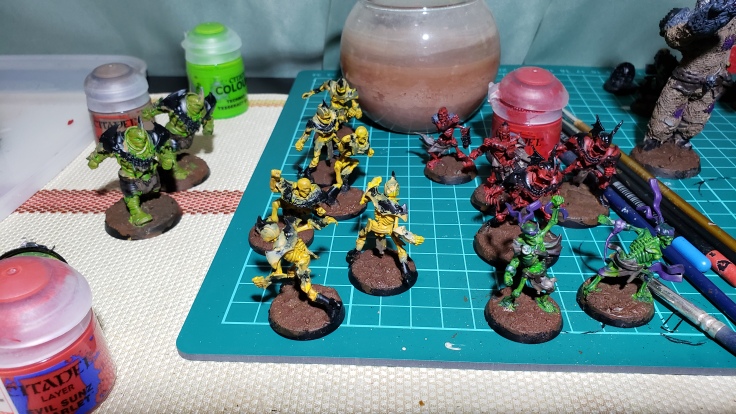
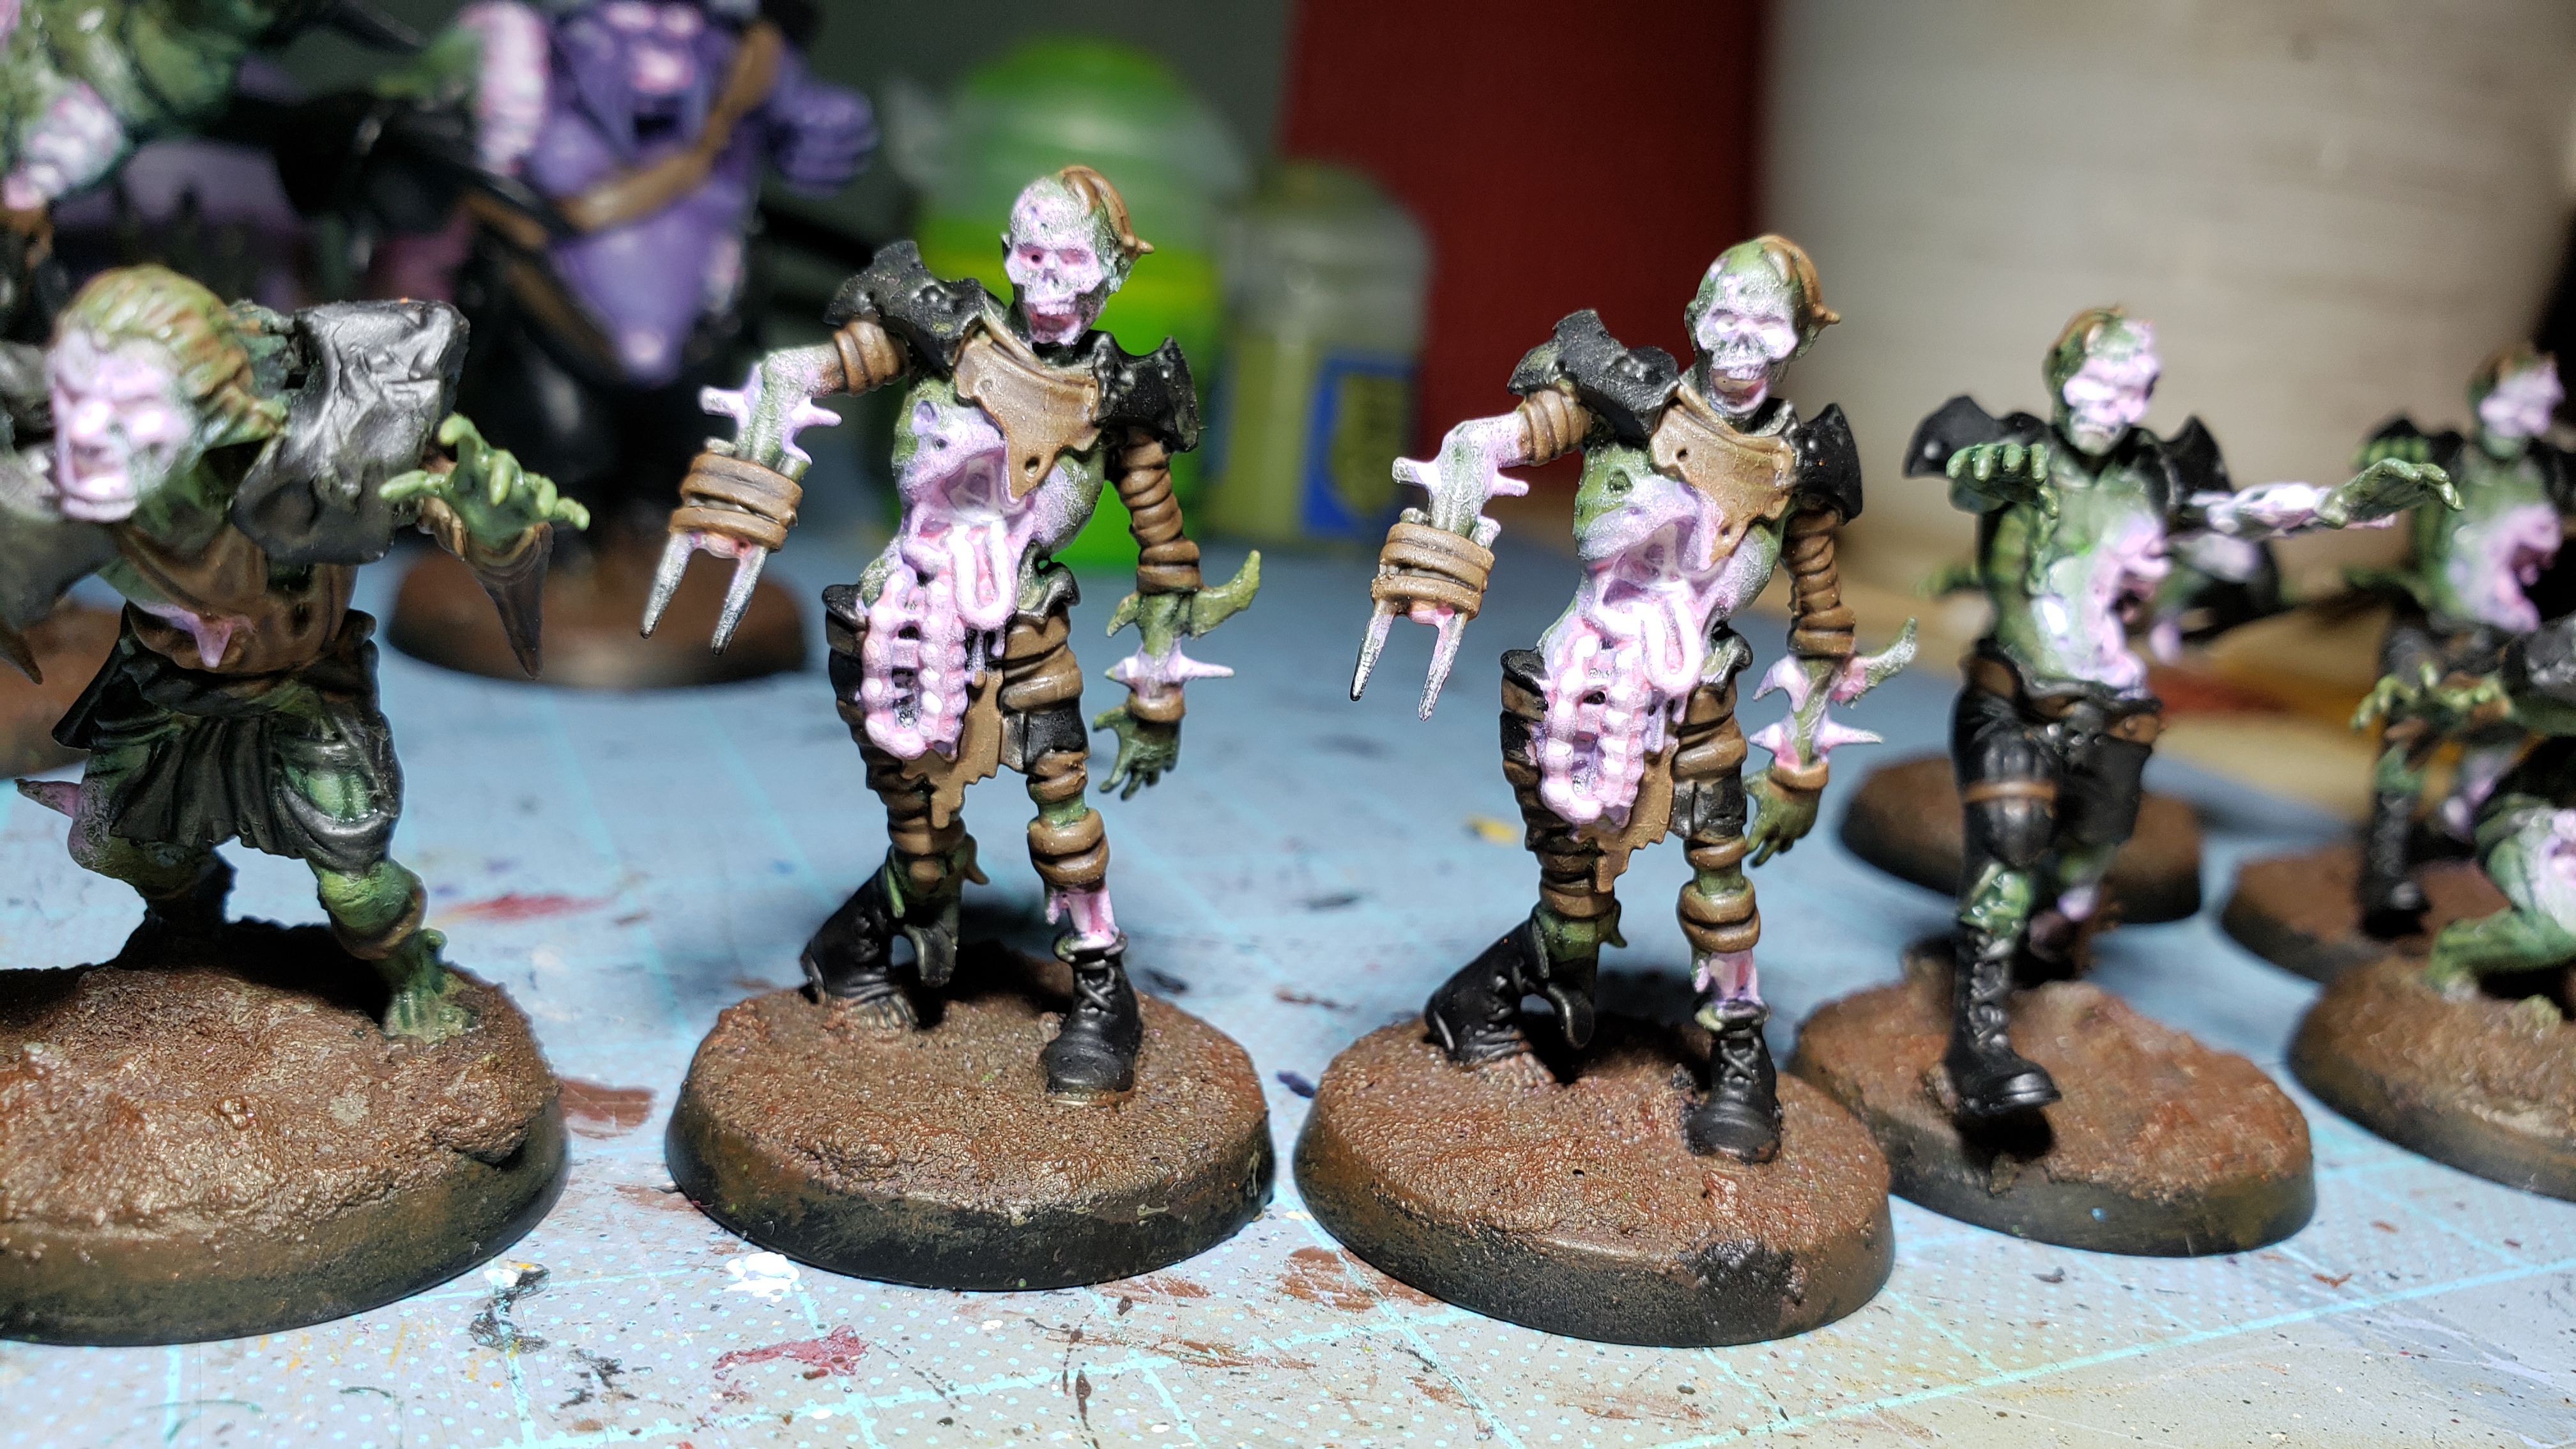
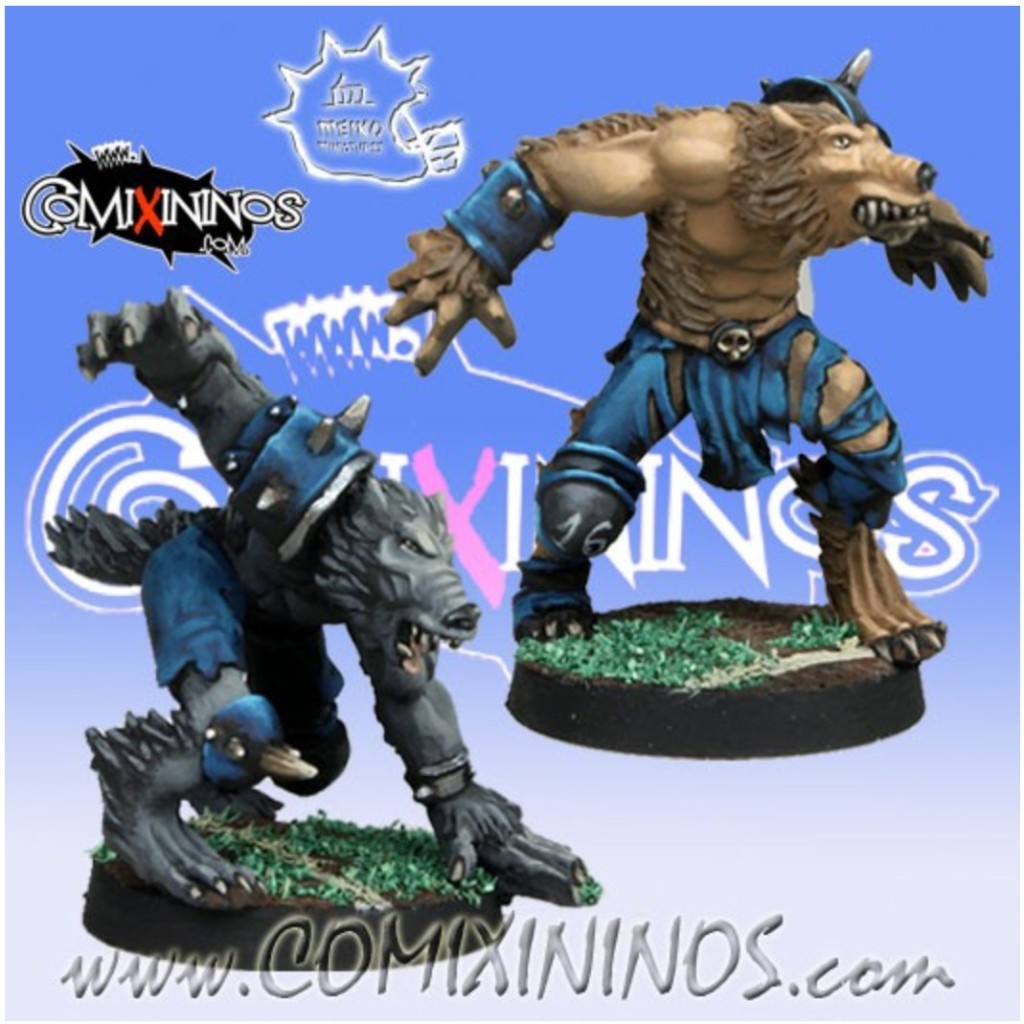
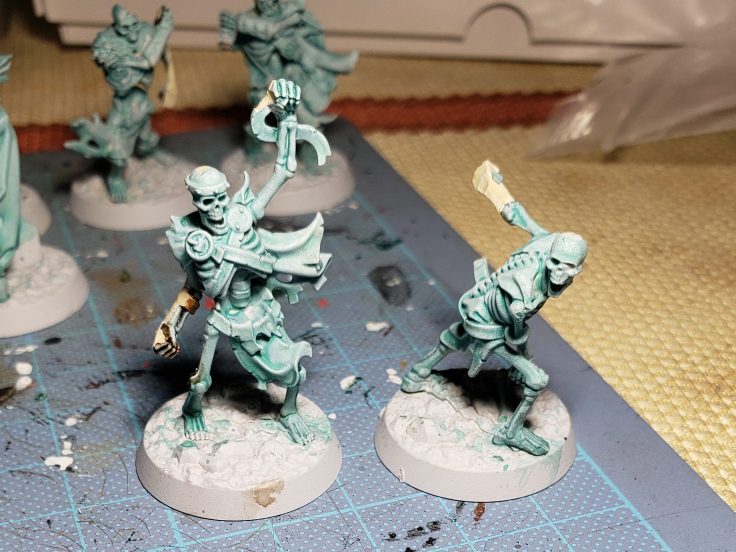
Skeletons in multiple colors looking like a diablo 2 boss battle or something and the mummies on the left.
The skeletons were straight forward as I had hoped. They are basically a highlighting obstacle course and using watered down paint sinks into the recesses and shows where the highlights are supposed to be very very clearly. Its great. After brightening them up they really started looking good.
You can see its still early on, but the colors are bright.
I did some of the throw-ra cloth in purple and realized they looked like a grateful dead t-shirt or something, then noticed they have literally no clothing or armor on besides their belts and loin cloths. I will paint the ceremonial cloth black and give it a nice gold trim to match team colors and potentially be where I write a number, ah that is a nightmare waiting to happen.
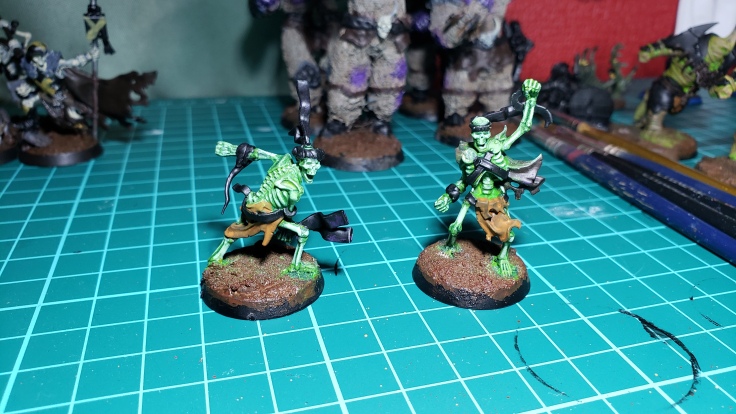
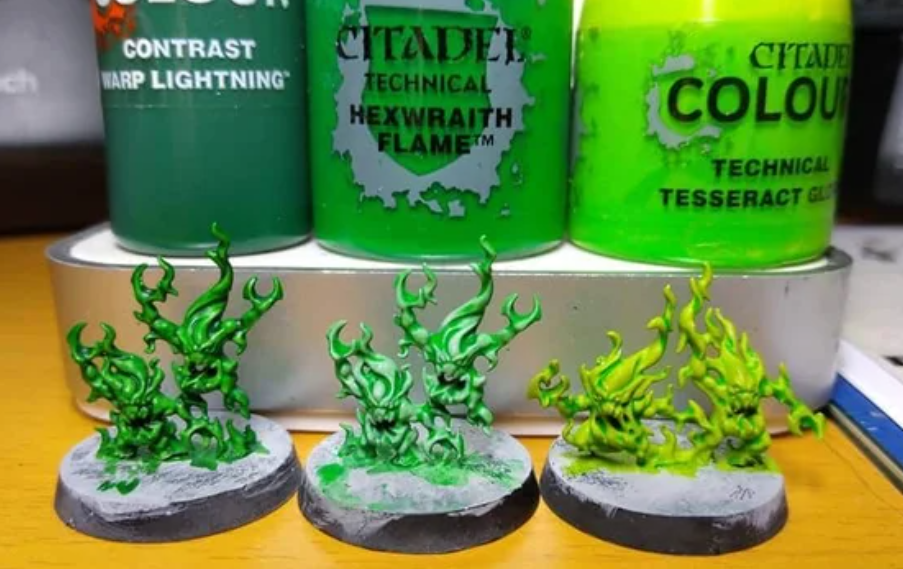
I gave the yellows a drab yellow then a brighter yellow and they were in a good spot. Gave them a yellow/ochre/brown wash to get in the recesses. Red got the same treatment and I gave them a red wash. Did green in bone color, then tesseract glowing green, and then a wash of darker green. Green and Red look the best so far.
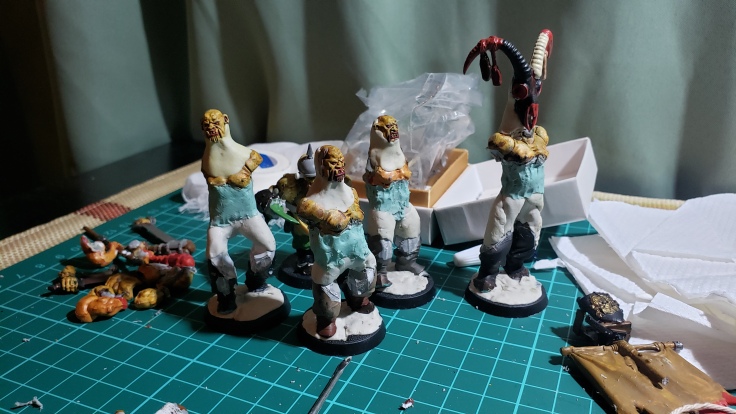
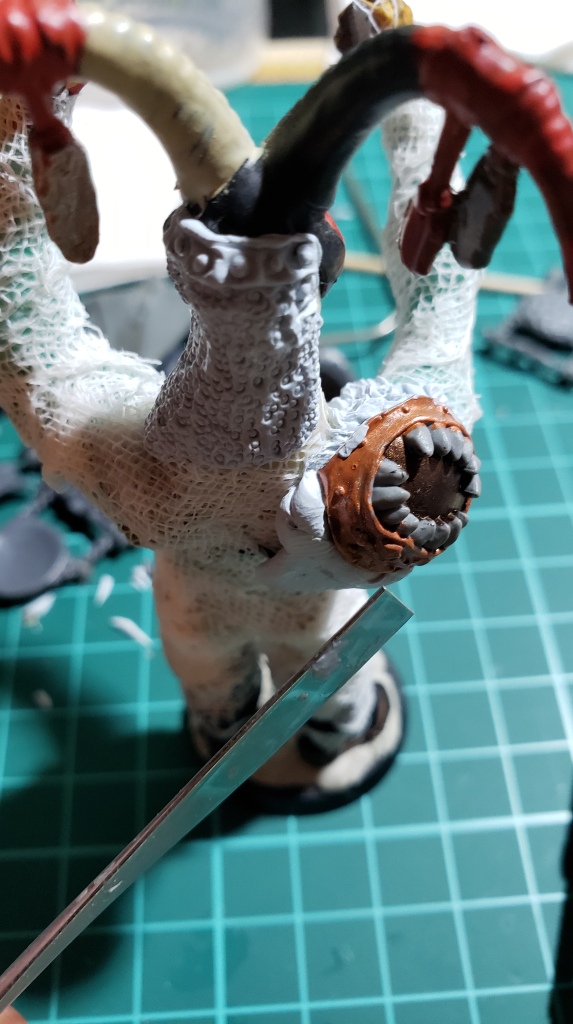
Mummies exhibiting the perfect lighting effect.
The MUMMIES y’all! I did a drab tan color over the black undercoat and then brightened them up with another thin coat and on top of that gave a really nice watered down coverage of the tesseract glow and it seeped into the edges between the wrapping perfectly giving an amazing effect. This is exactly what I had in mind for all my models and I am glad it came through on this one so far.
Progress & Glow Highlights
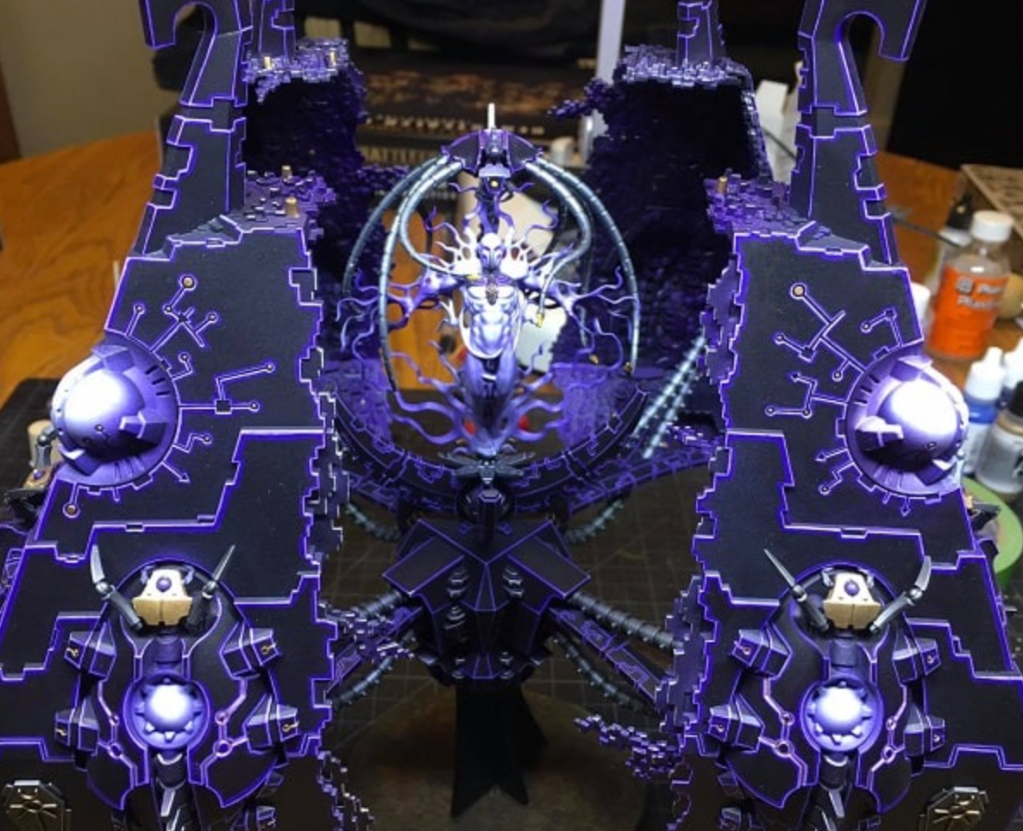
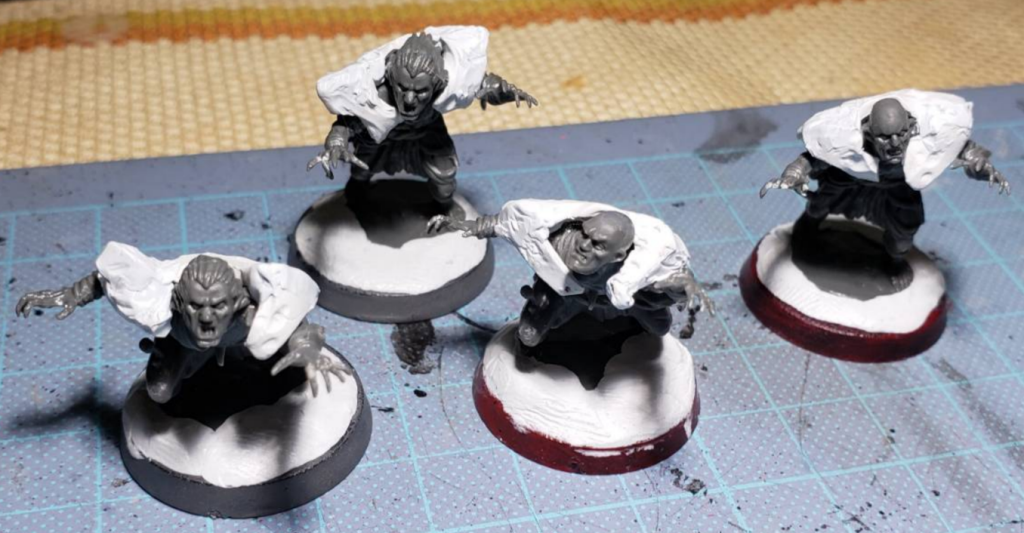
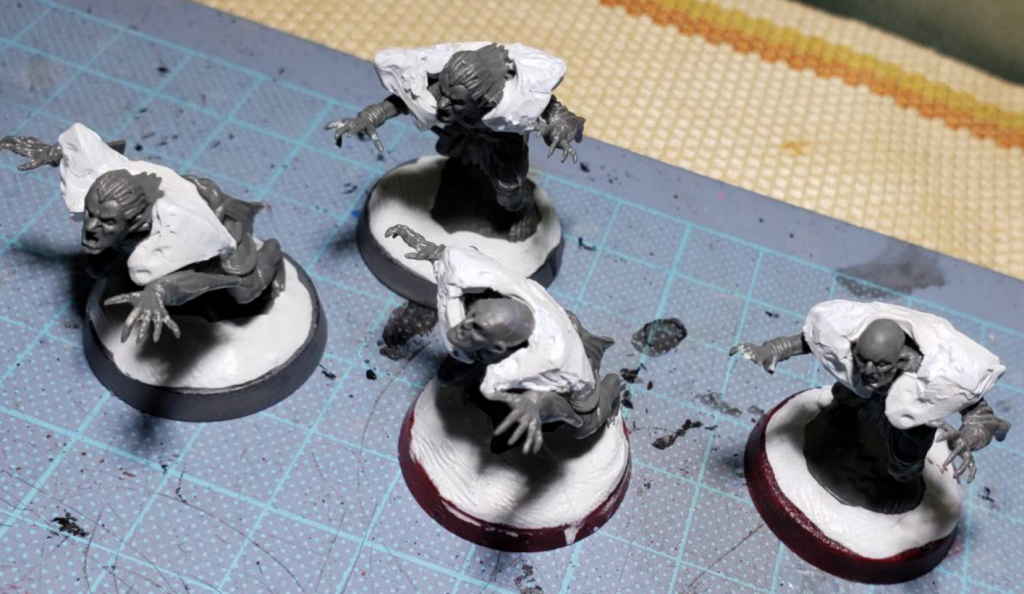
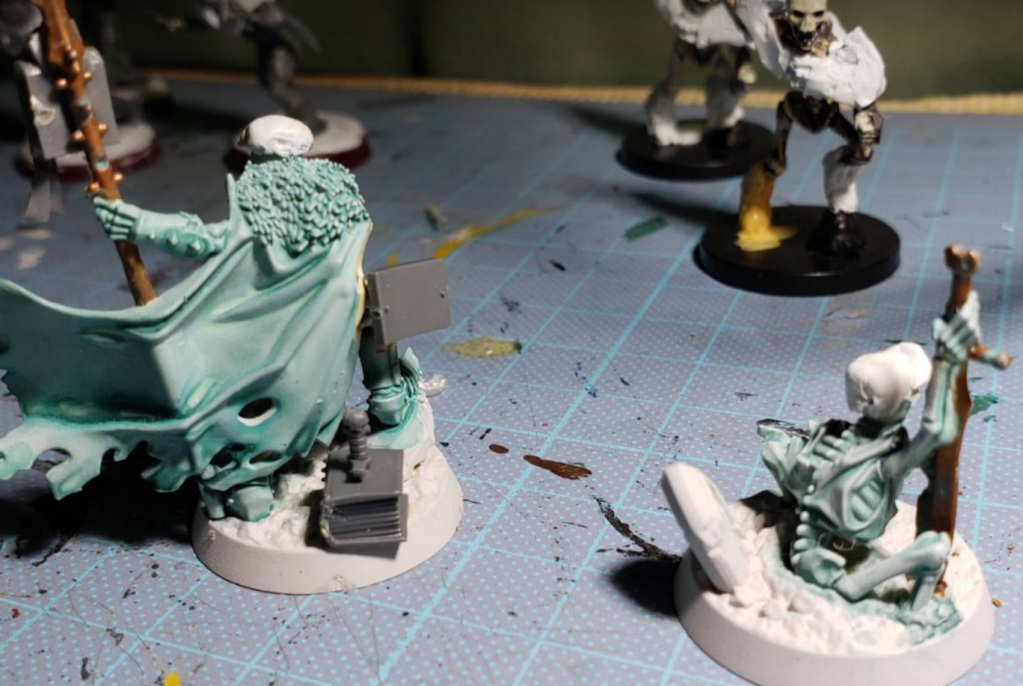
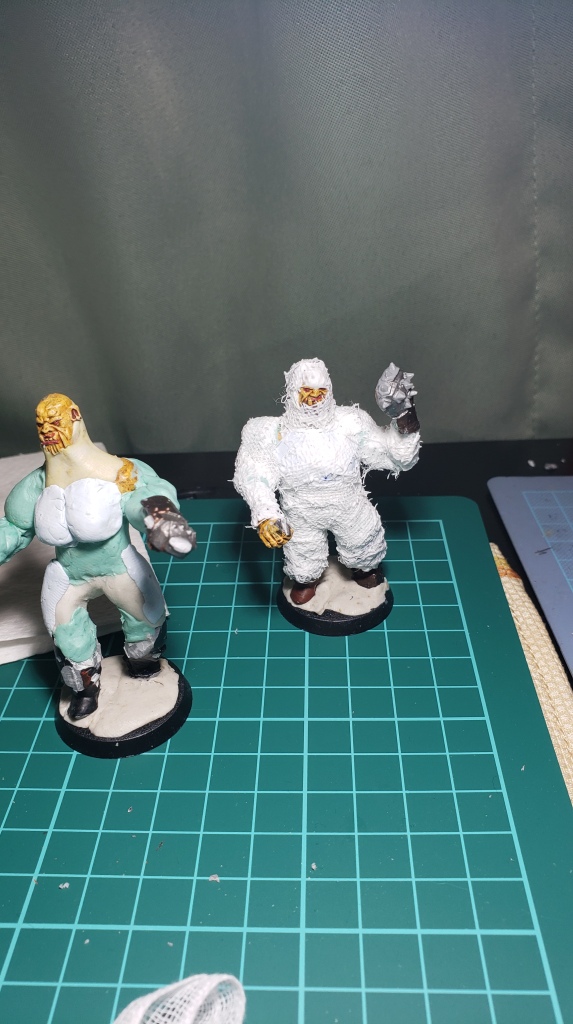
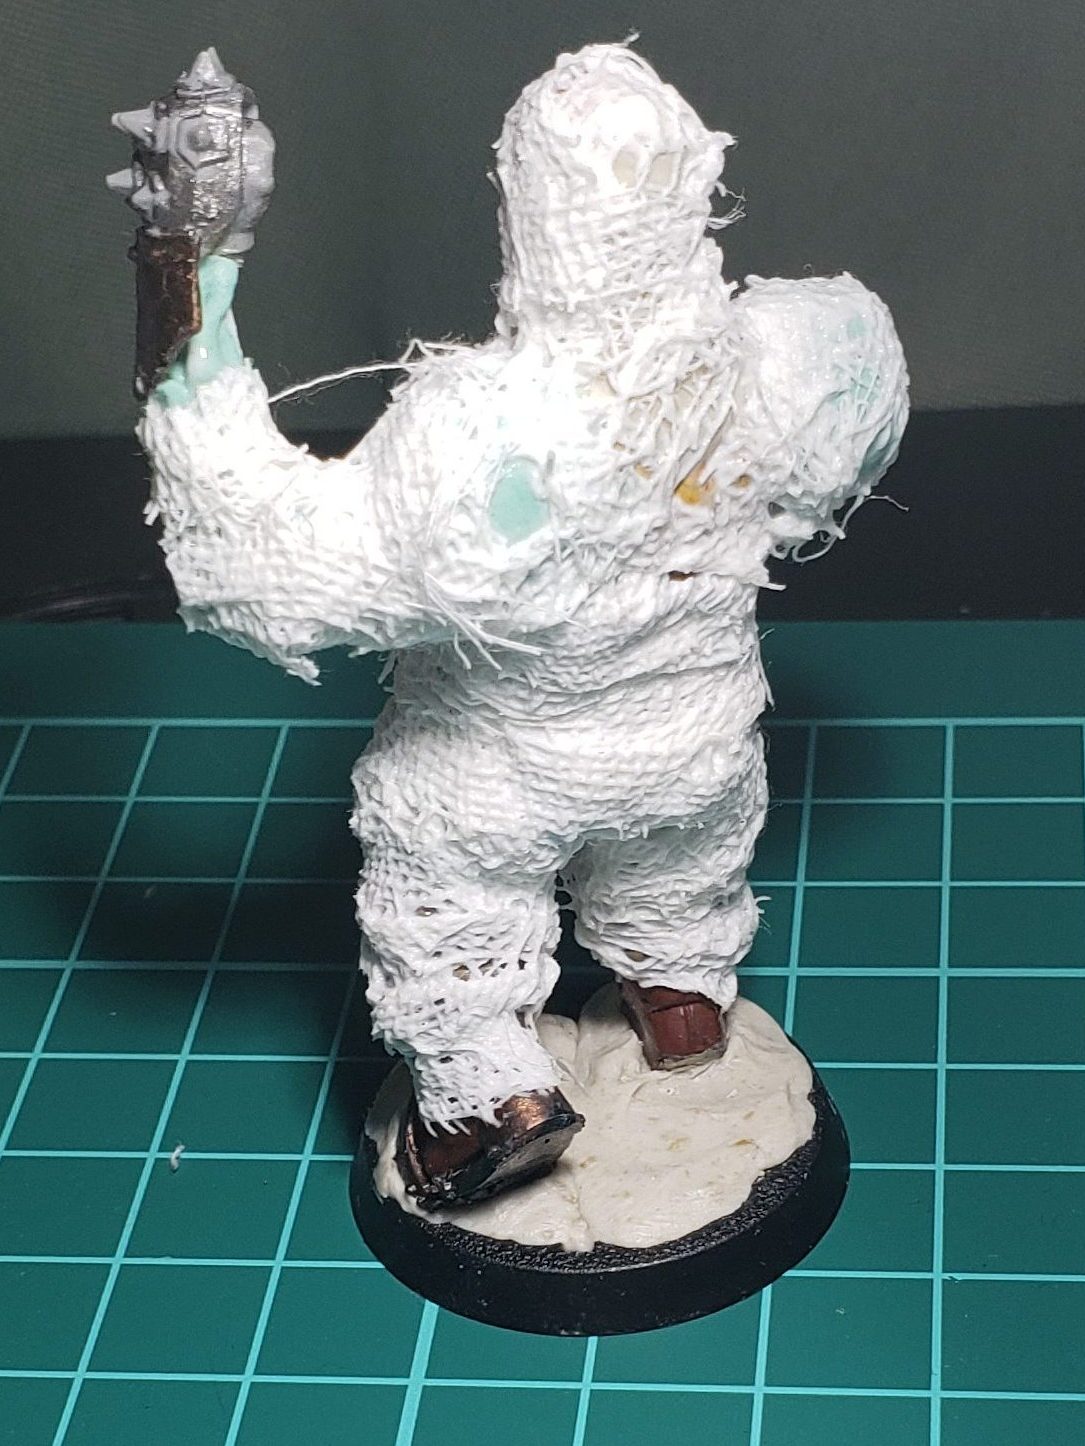
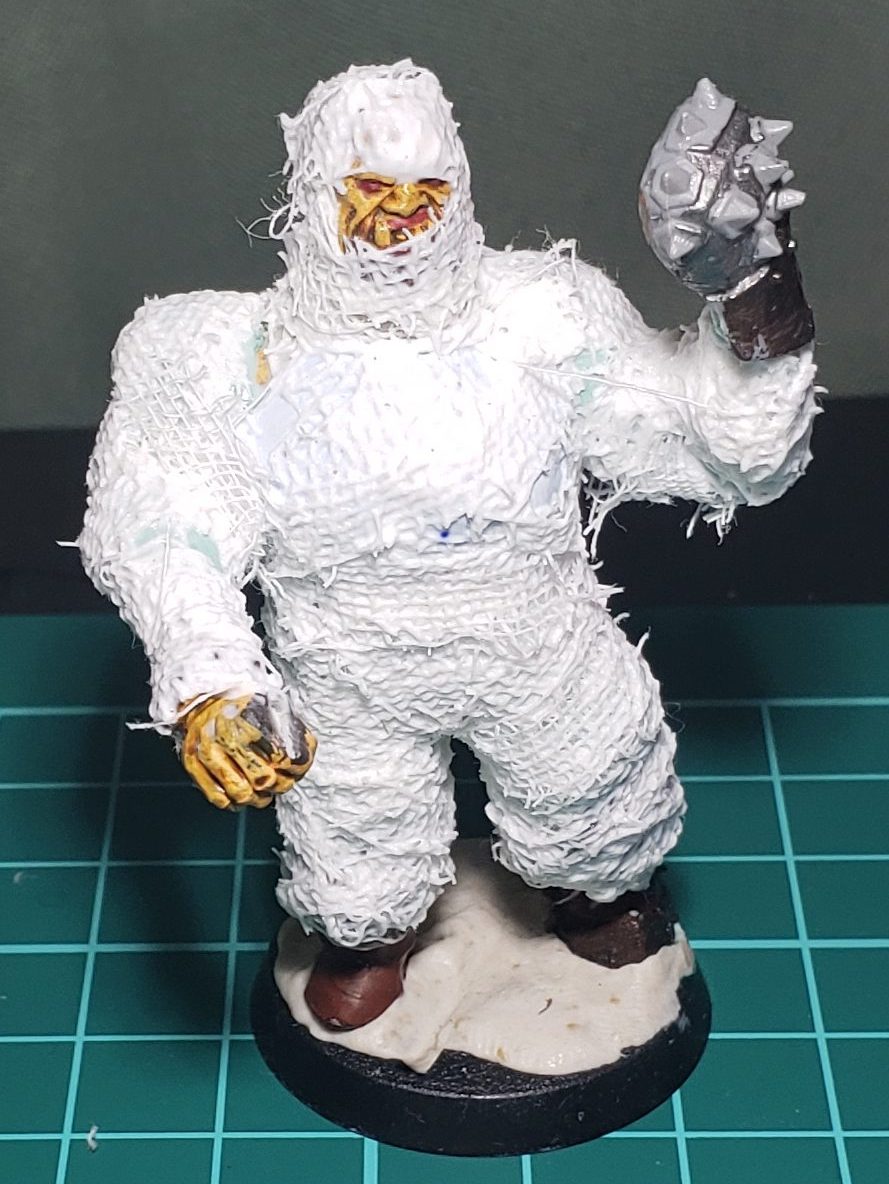
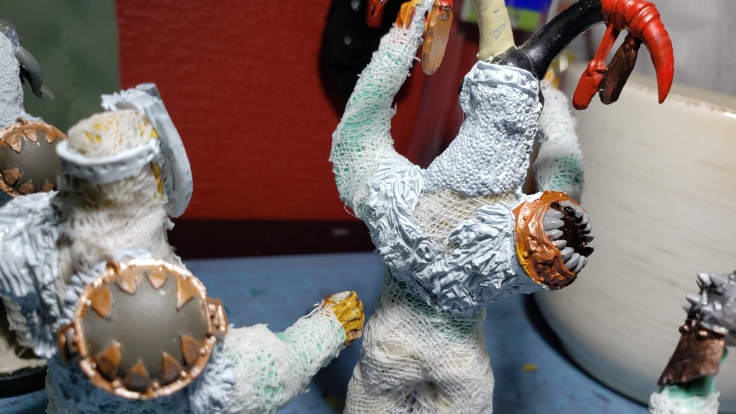
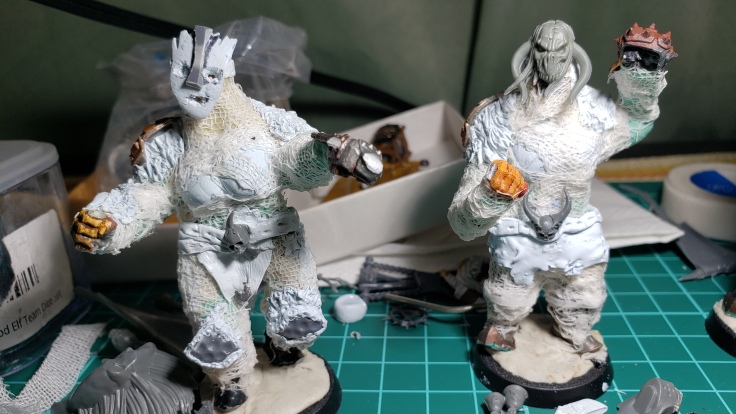
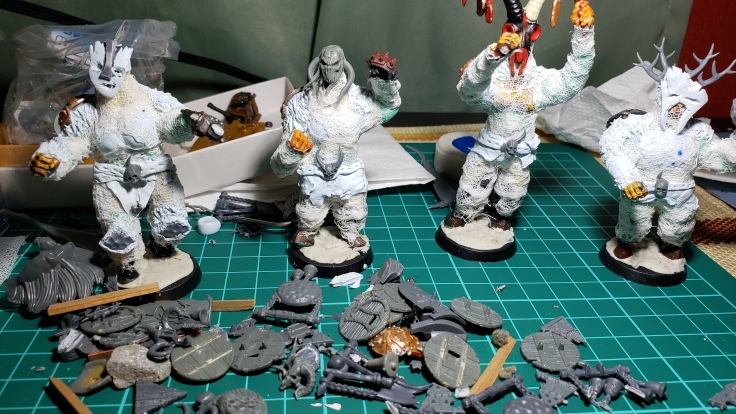
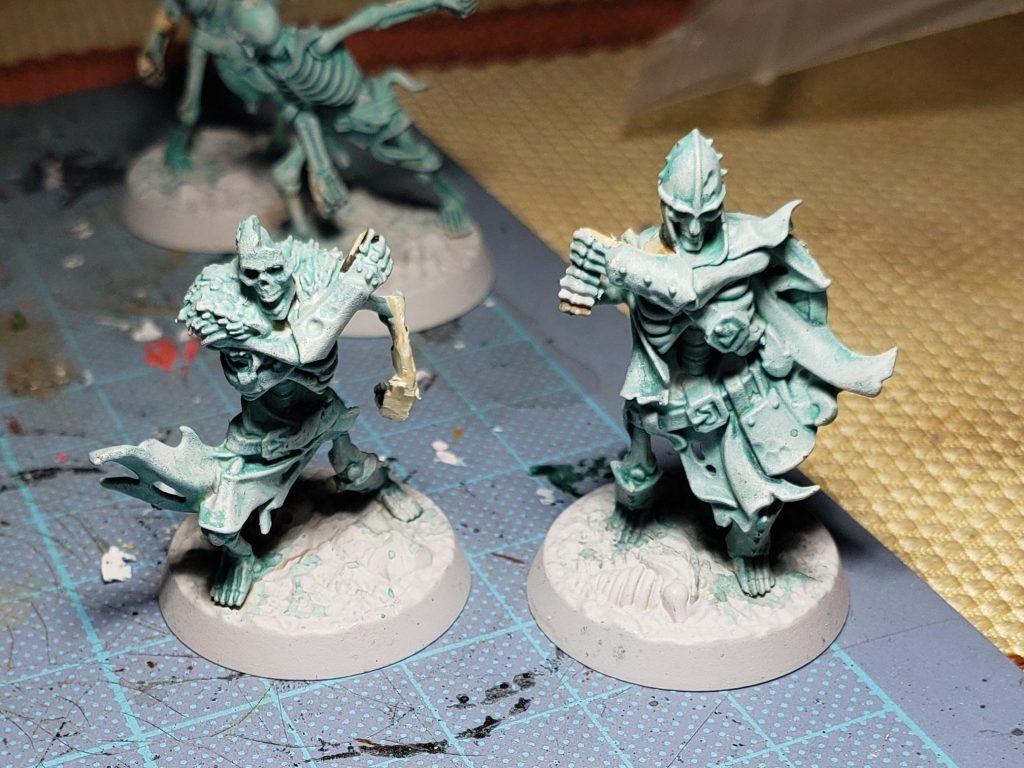
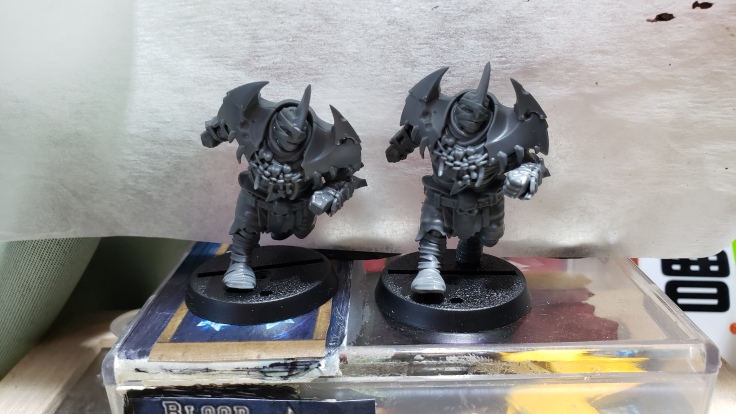
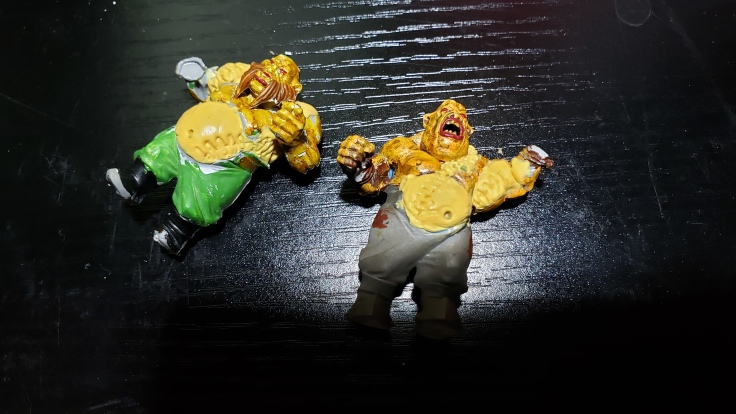
So the tomb guardians made some pretty good progress so far with just basic base coating and a little bit of TLC here and there.
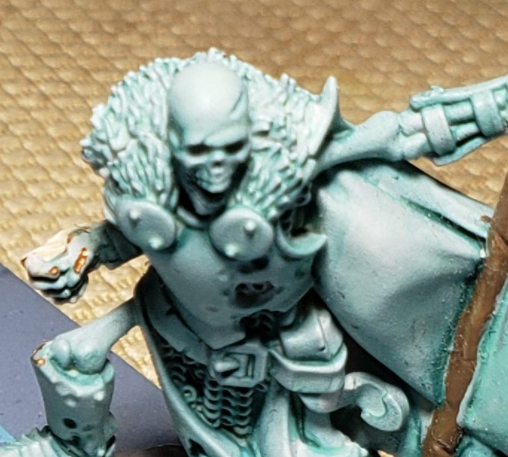
Four Tomb Guardians with some base paint on them.
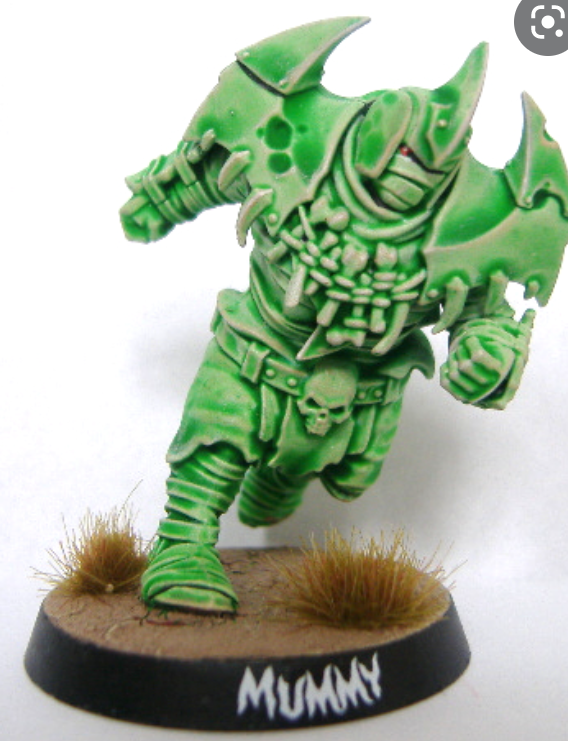
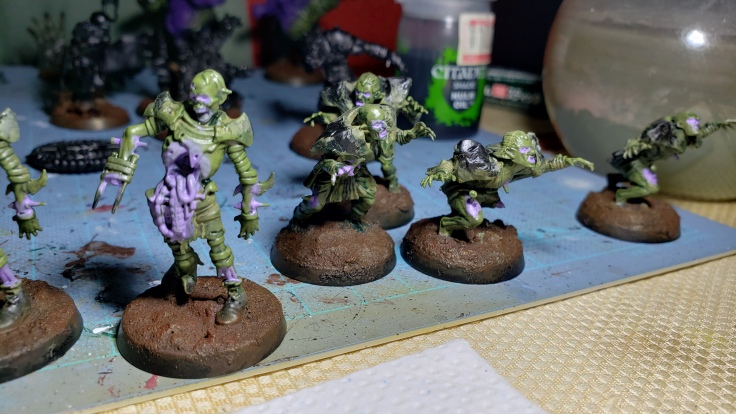
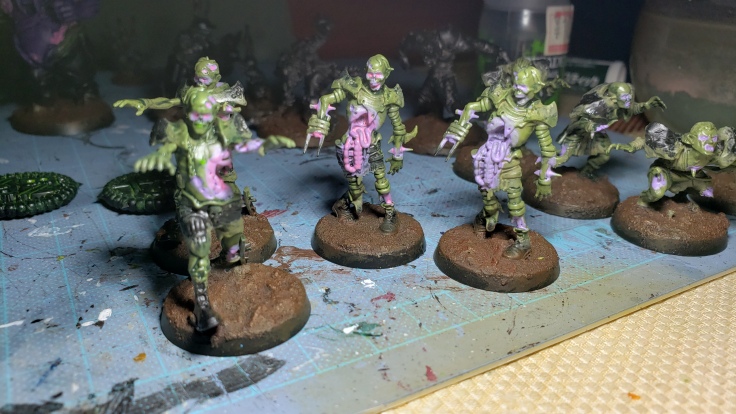
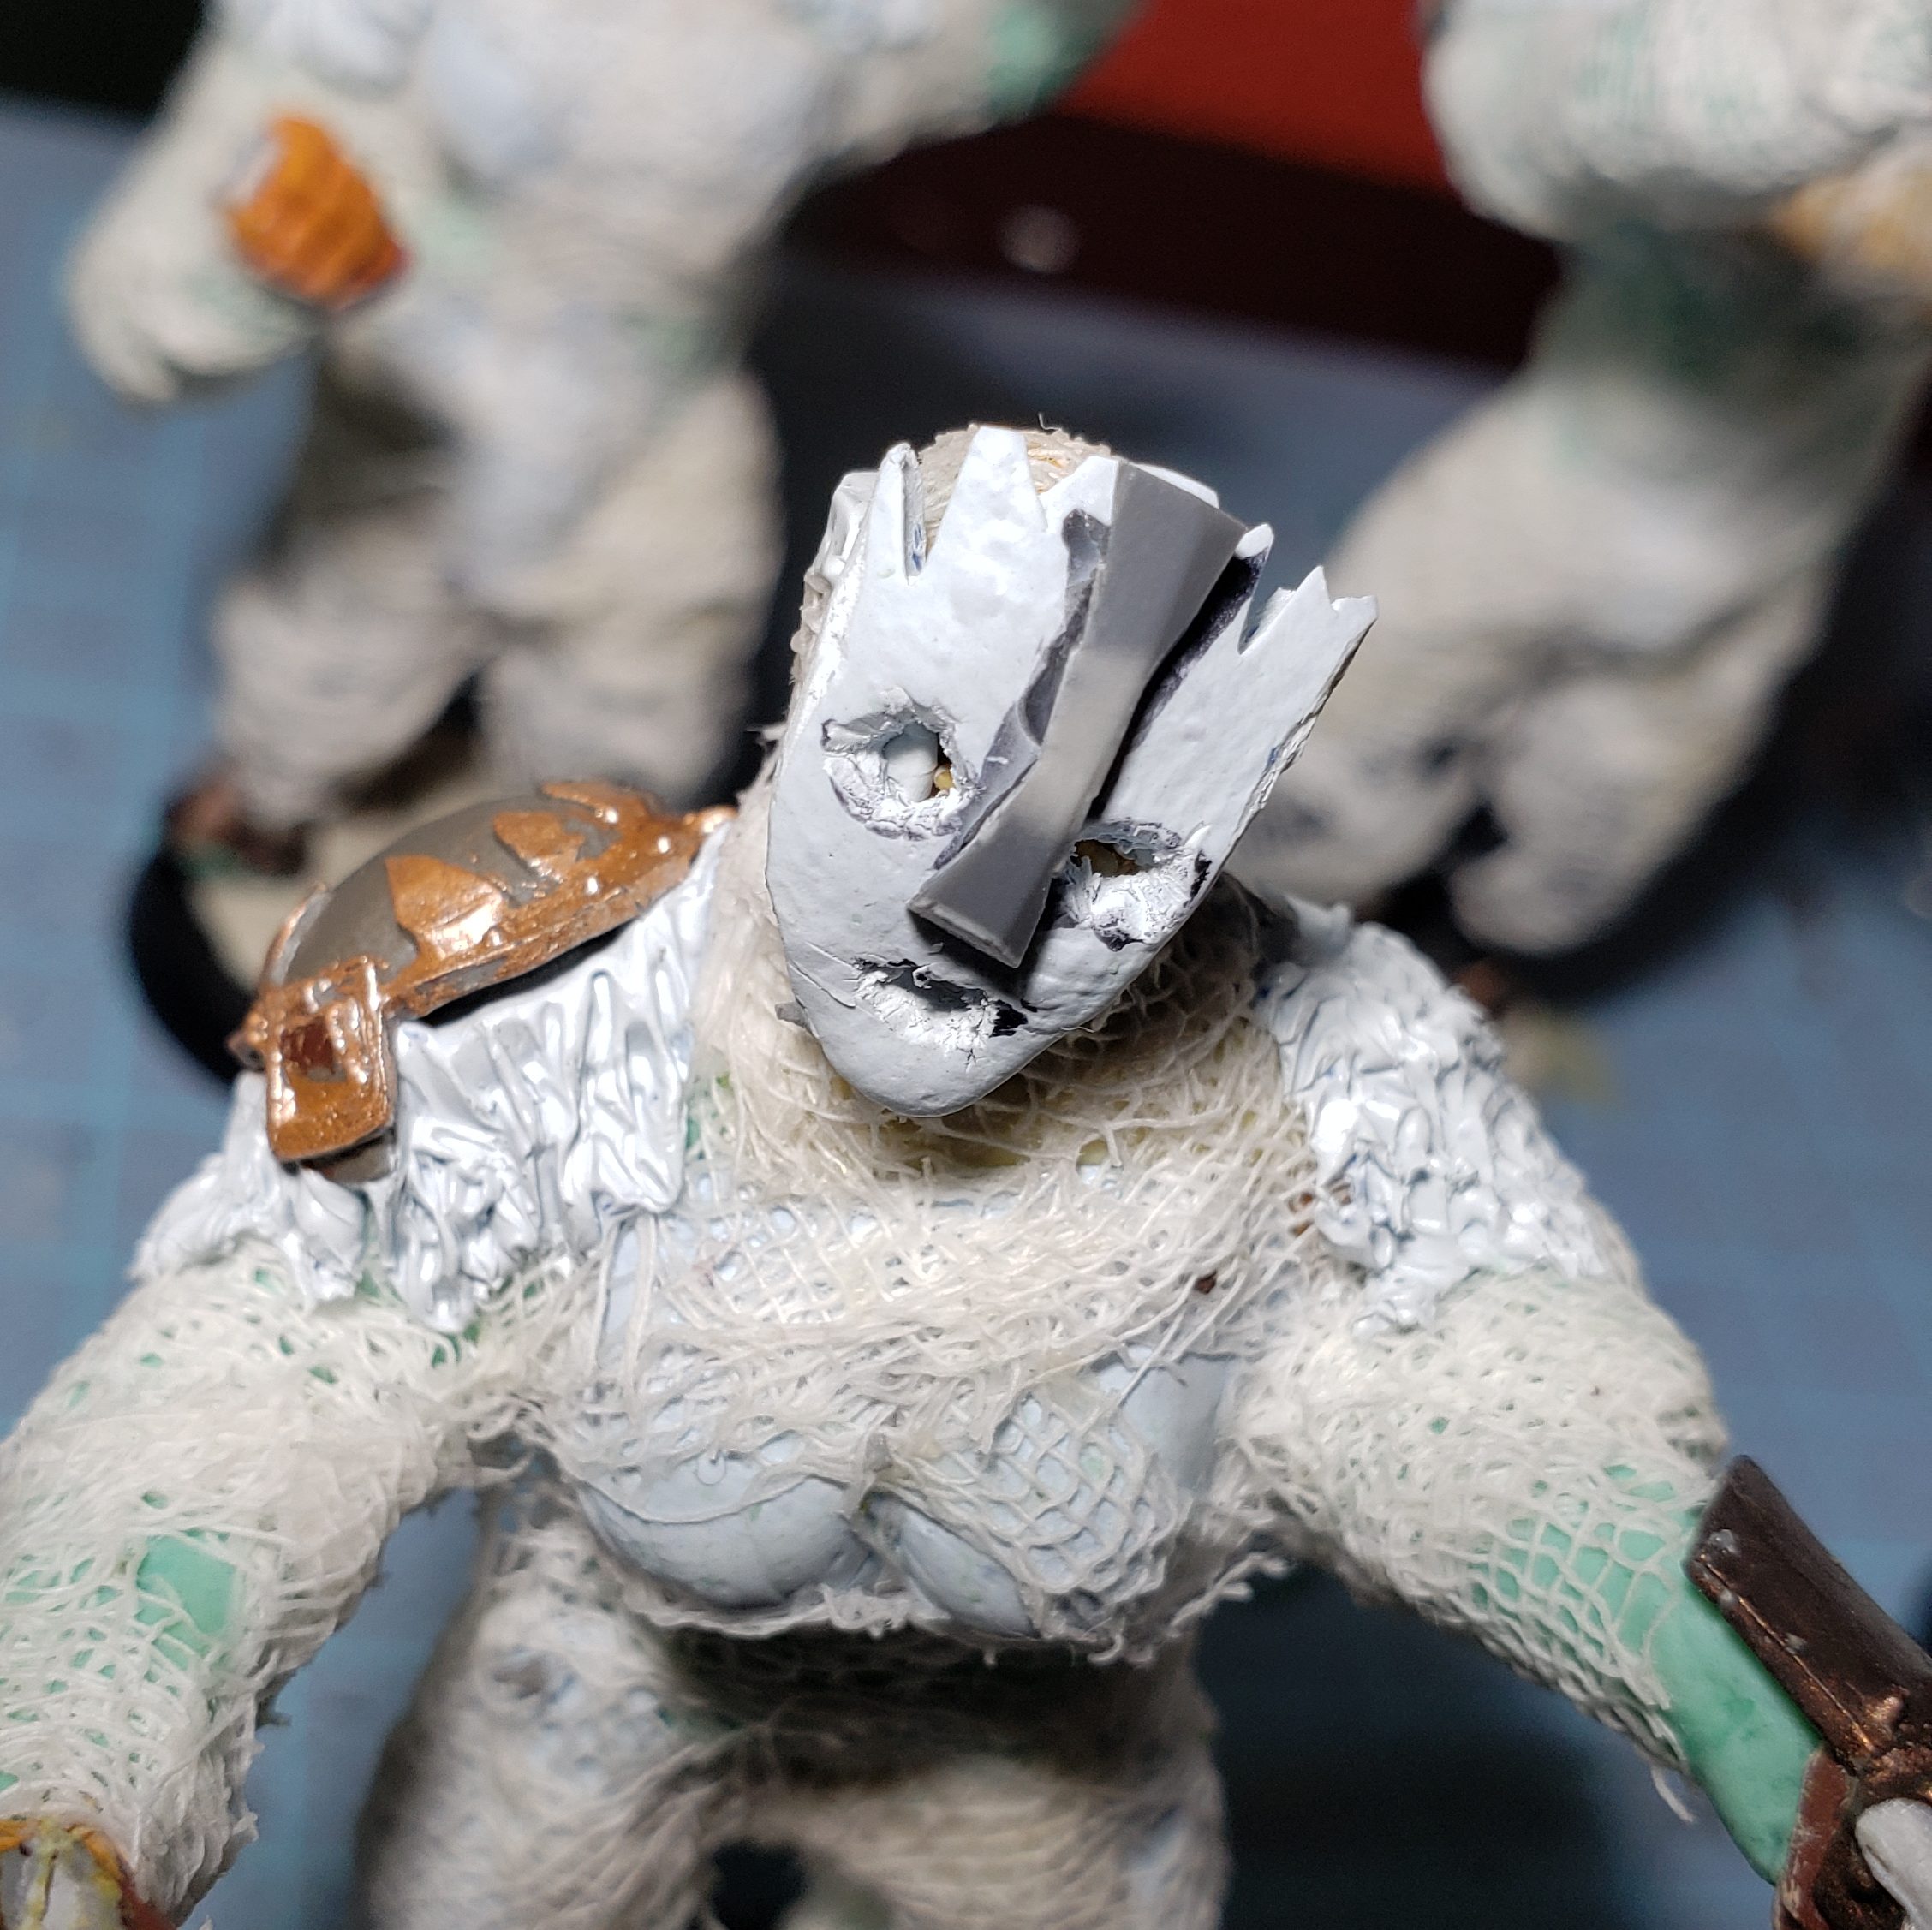
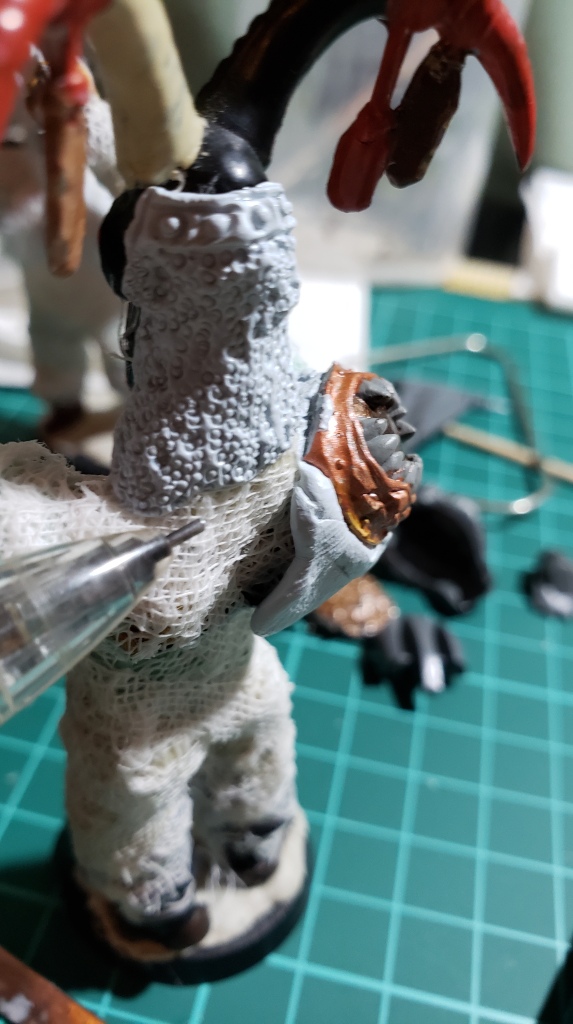
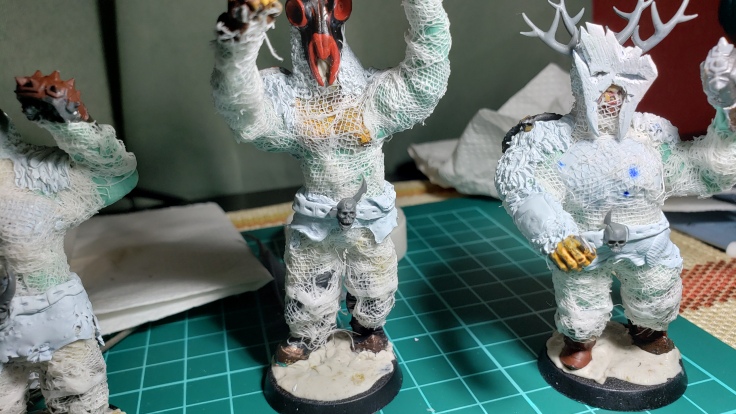
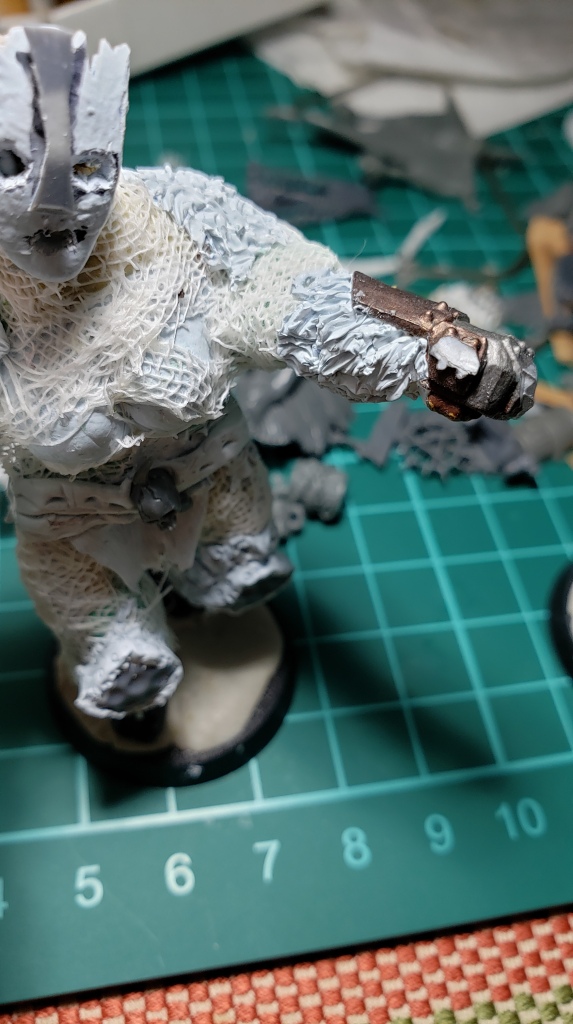
I painted a drab tan over the bone color for the main mummy wrappings and it honestly looks questionable at best. I did a dark grey on the fur parts which will eventually get washed, drybrushed lighter greys and then highlighted with white as well. Taking a cue from my flesh golems I did the exposed flesh areas in purple and soaked a bit of purple wash into the bandages surrounding the exposed flesh as well for effect. Some brown for wooden bits and a coating of grey on the masks, but I think I will do them in just bone color when I finally get around to that. Got ahead of myself doing purple on the eyes and mouth for some of them, but masks and such will ultimately be touched up quite a bit since they are a focal point on the model.
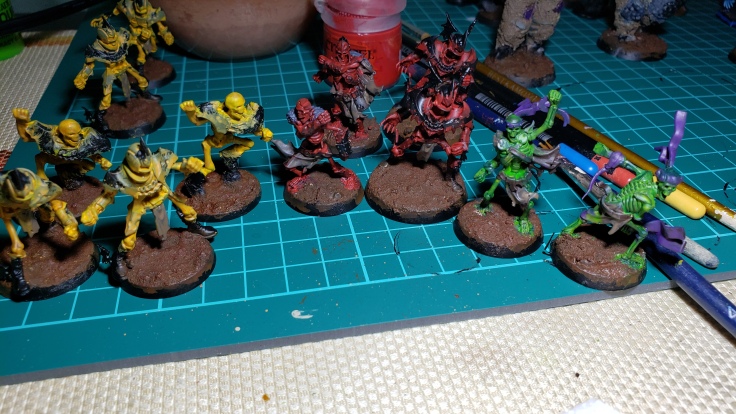
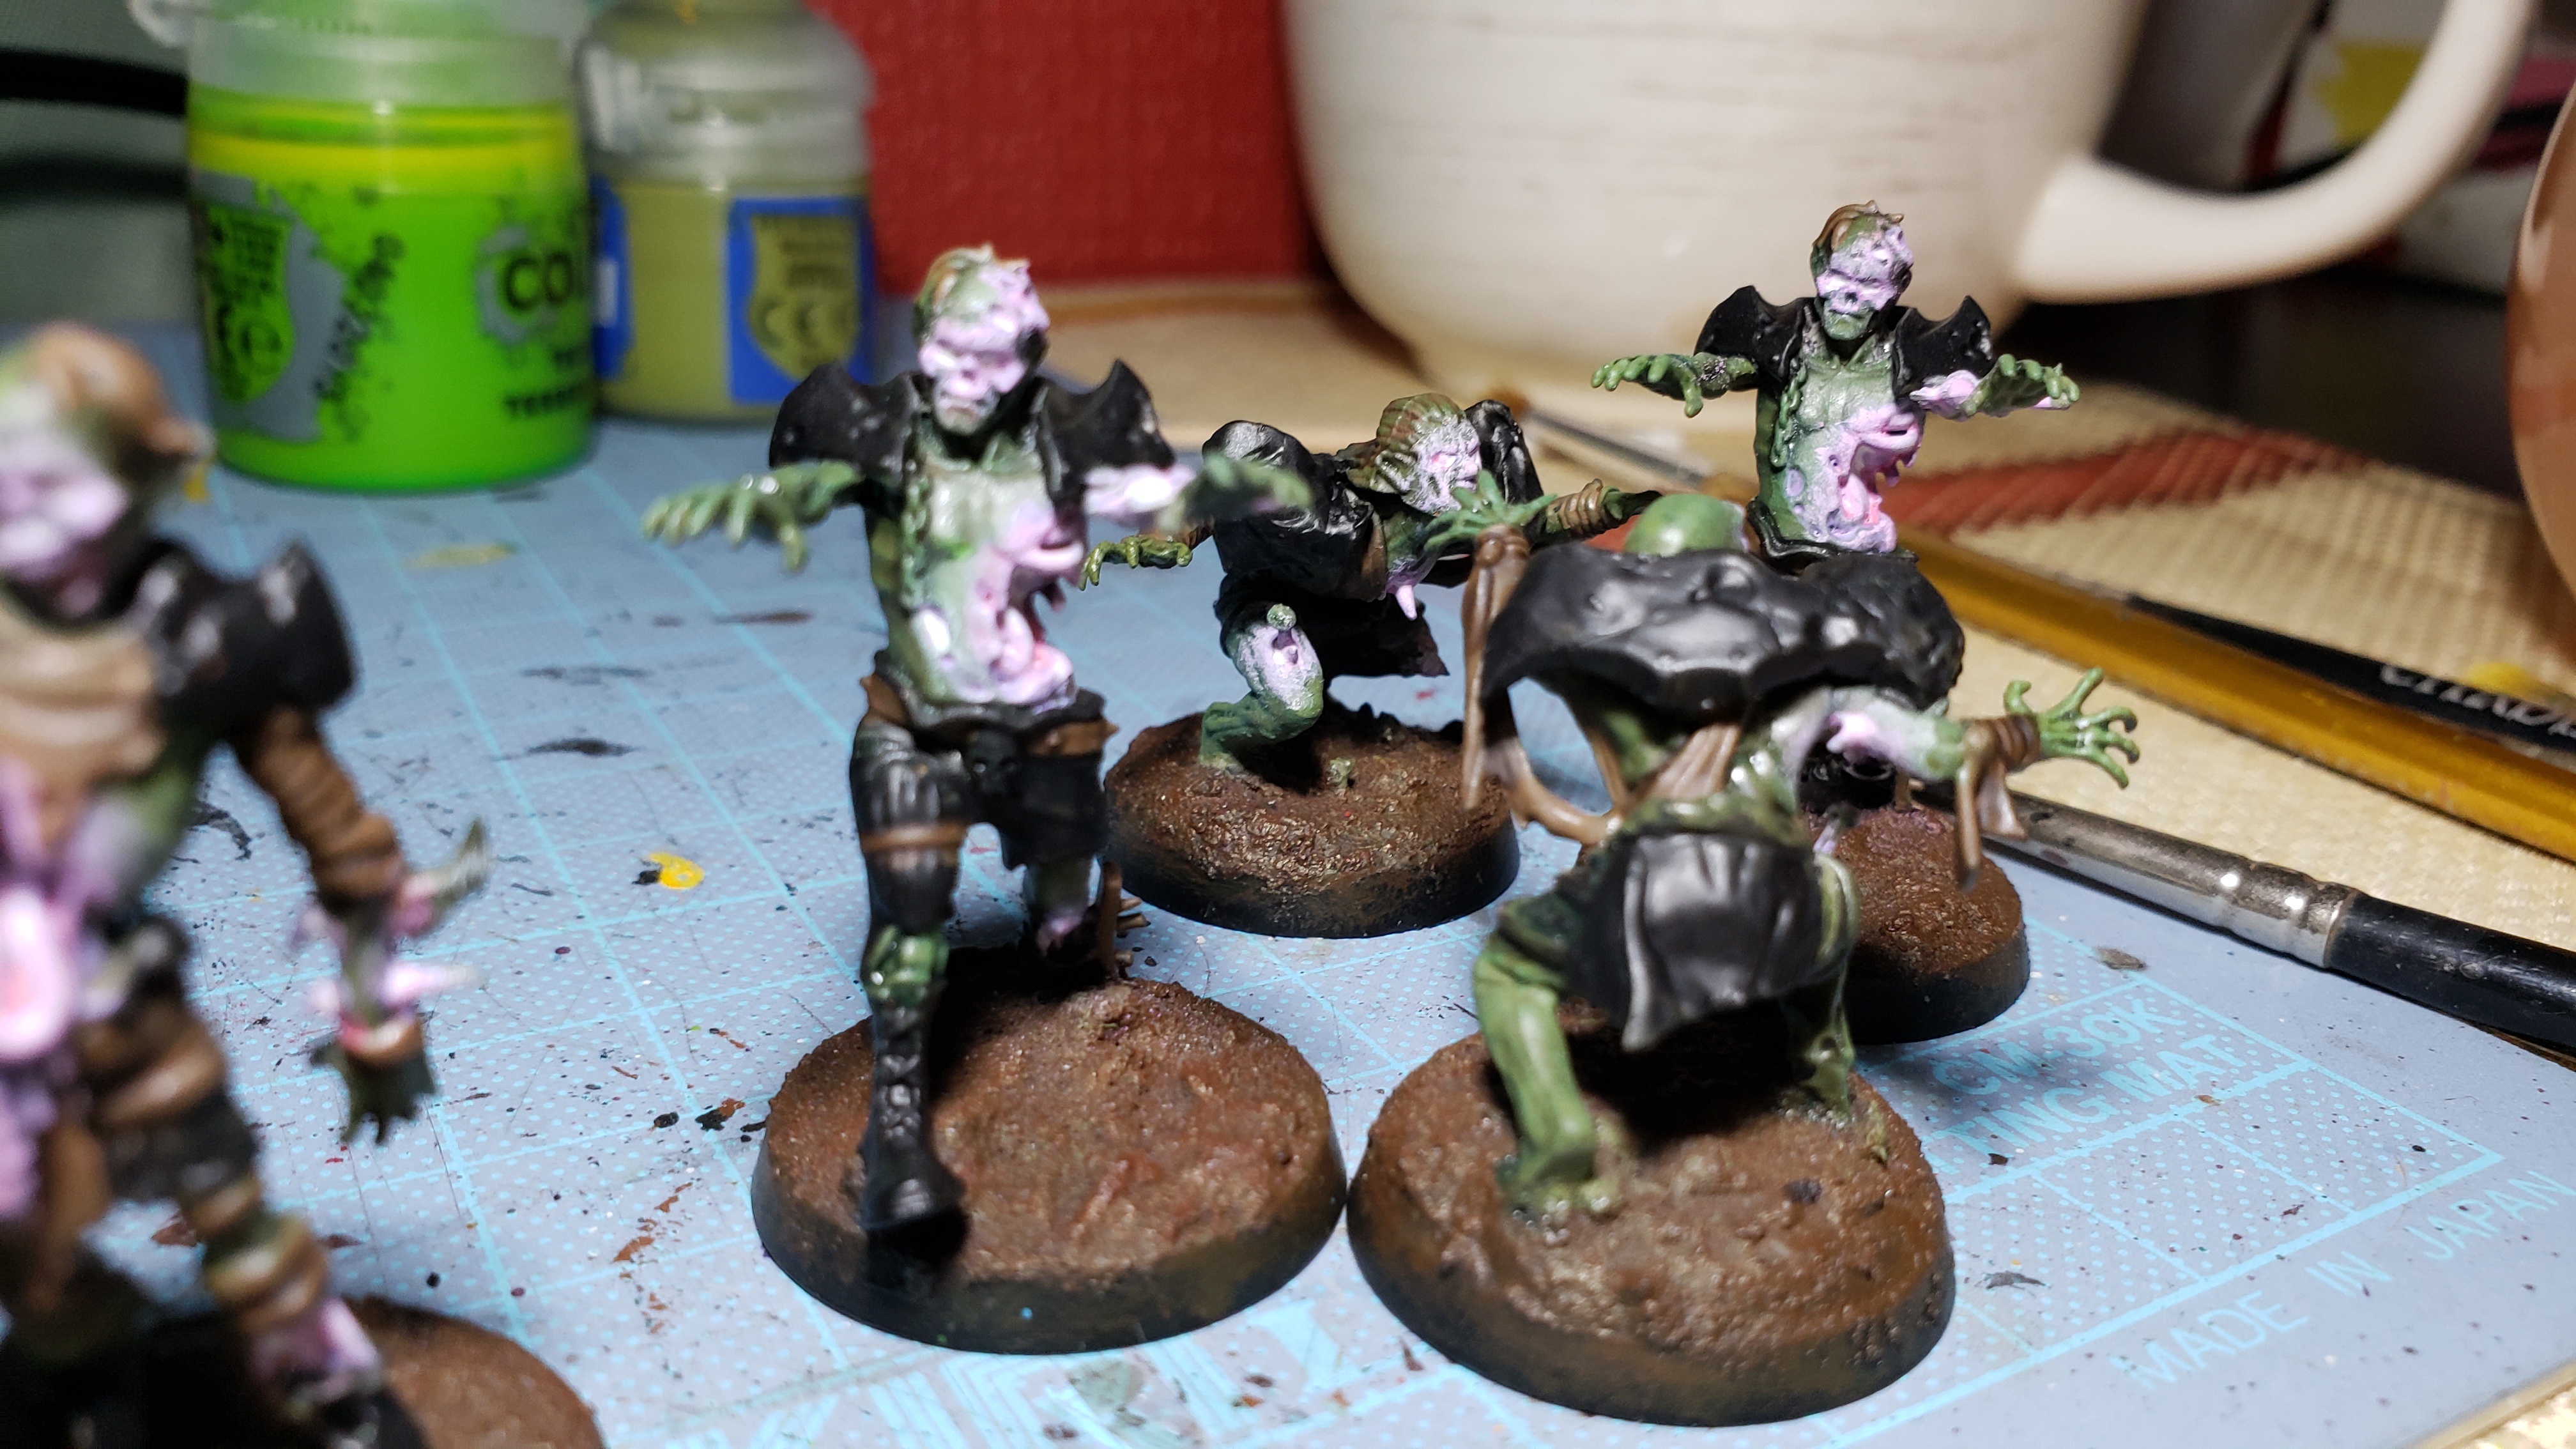
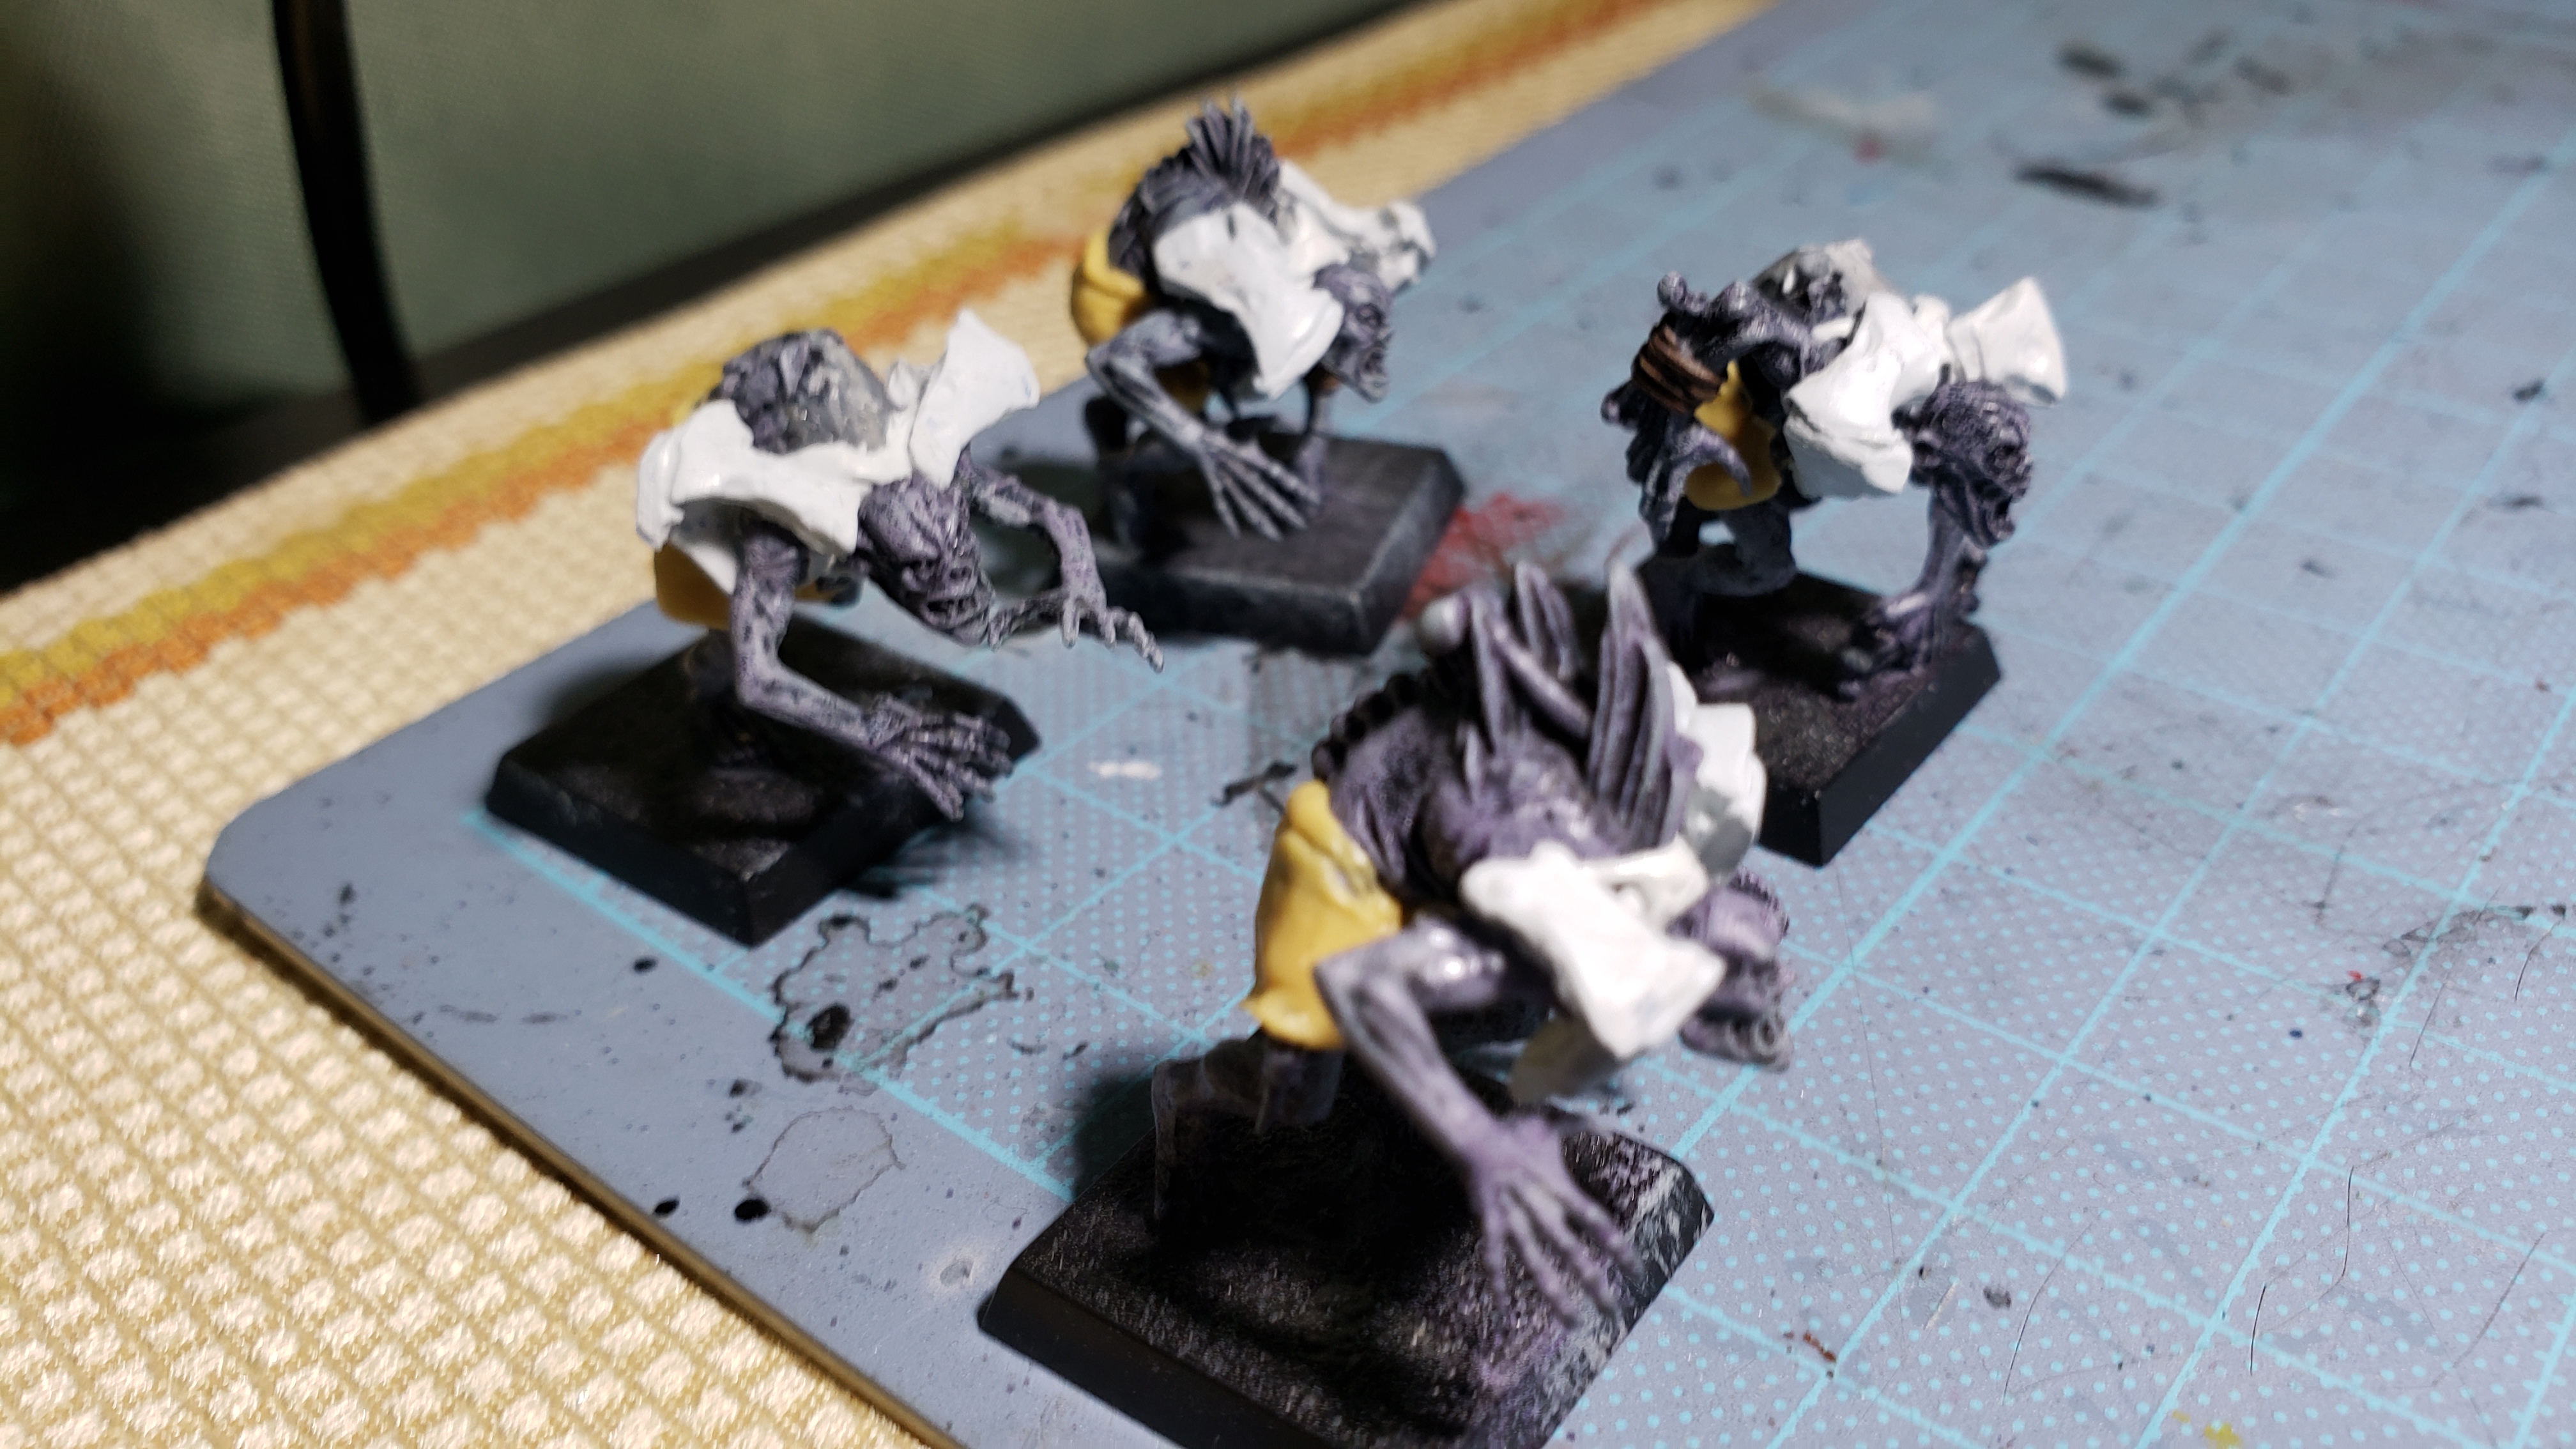
The Throw-Ra’s looking glowy and nice. Maybe dusty.
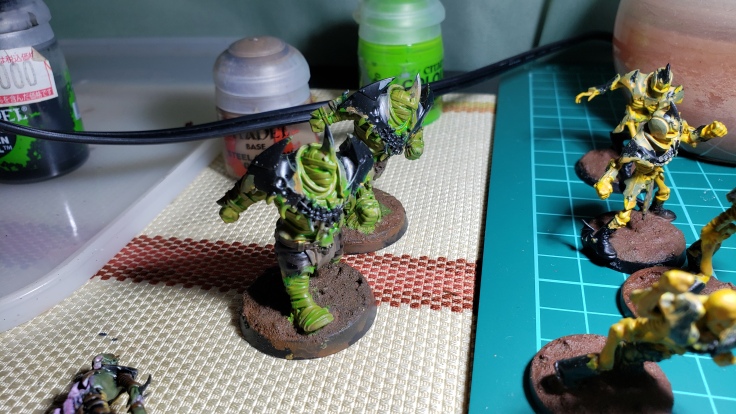
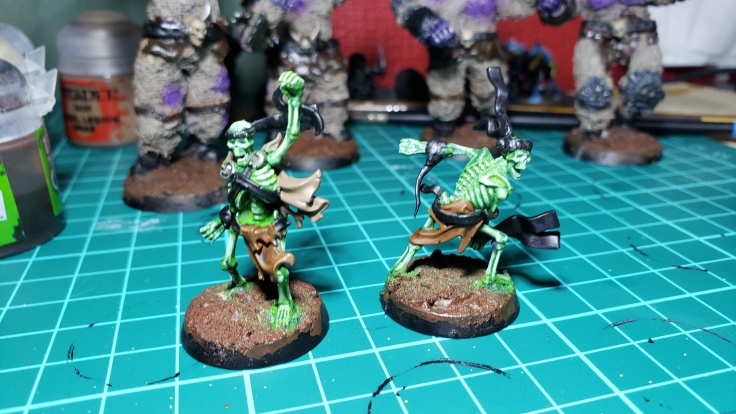
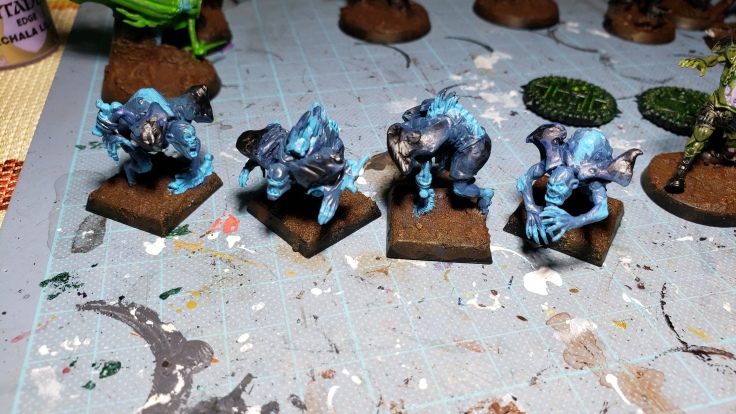
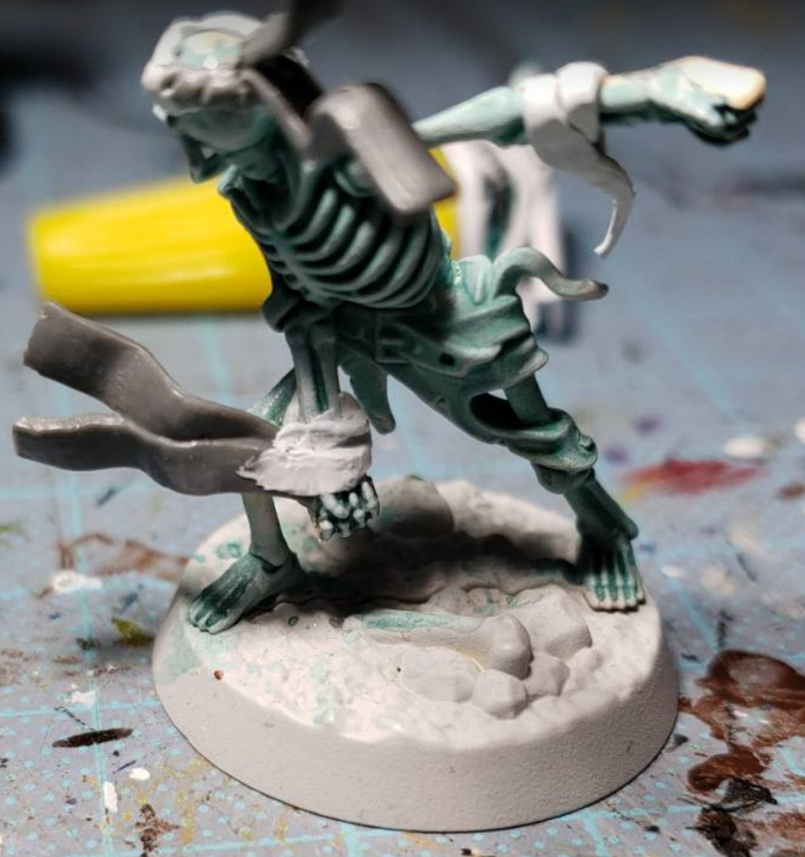
So tesseract, dark green wash, light green drybrush, and then focused highlights of a minty green/yellow mixture on each bone gave me this result. I think the bones look pretty good and I will do the eyes up a bit more and maybe do some pure white here and there, but I am happy with them and ready to jump into doing the other details. After doing up the details I will give a gentle gentle drybrush of green to sell the glow a bit more.
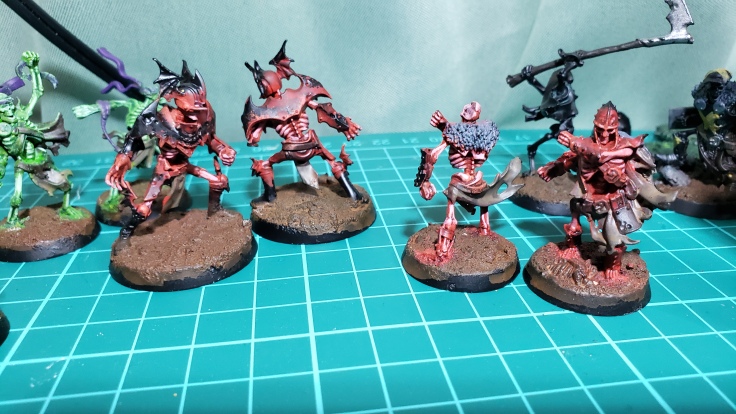
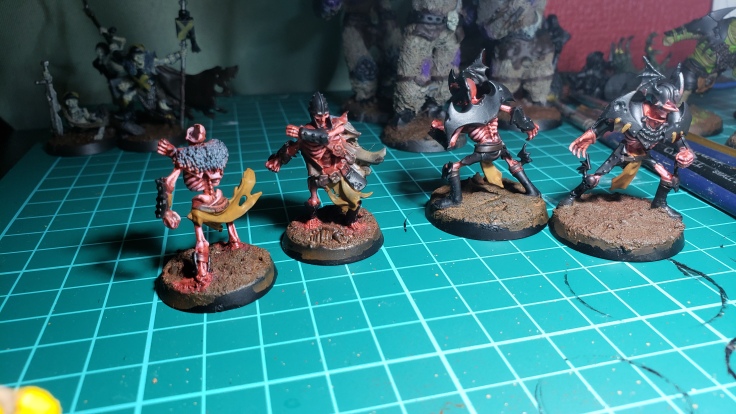
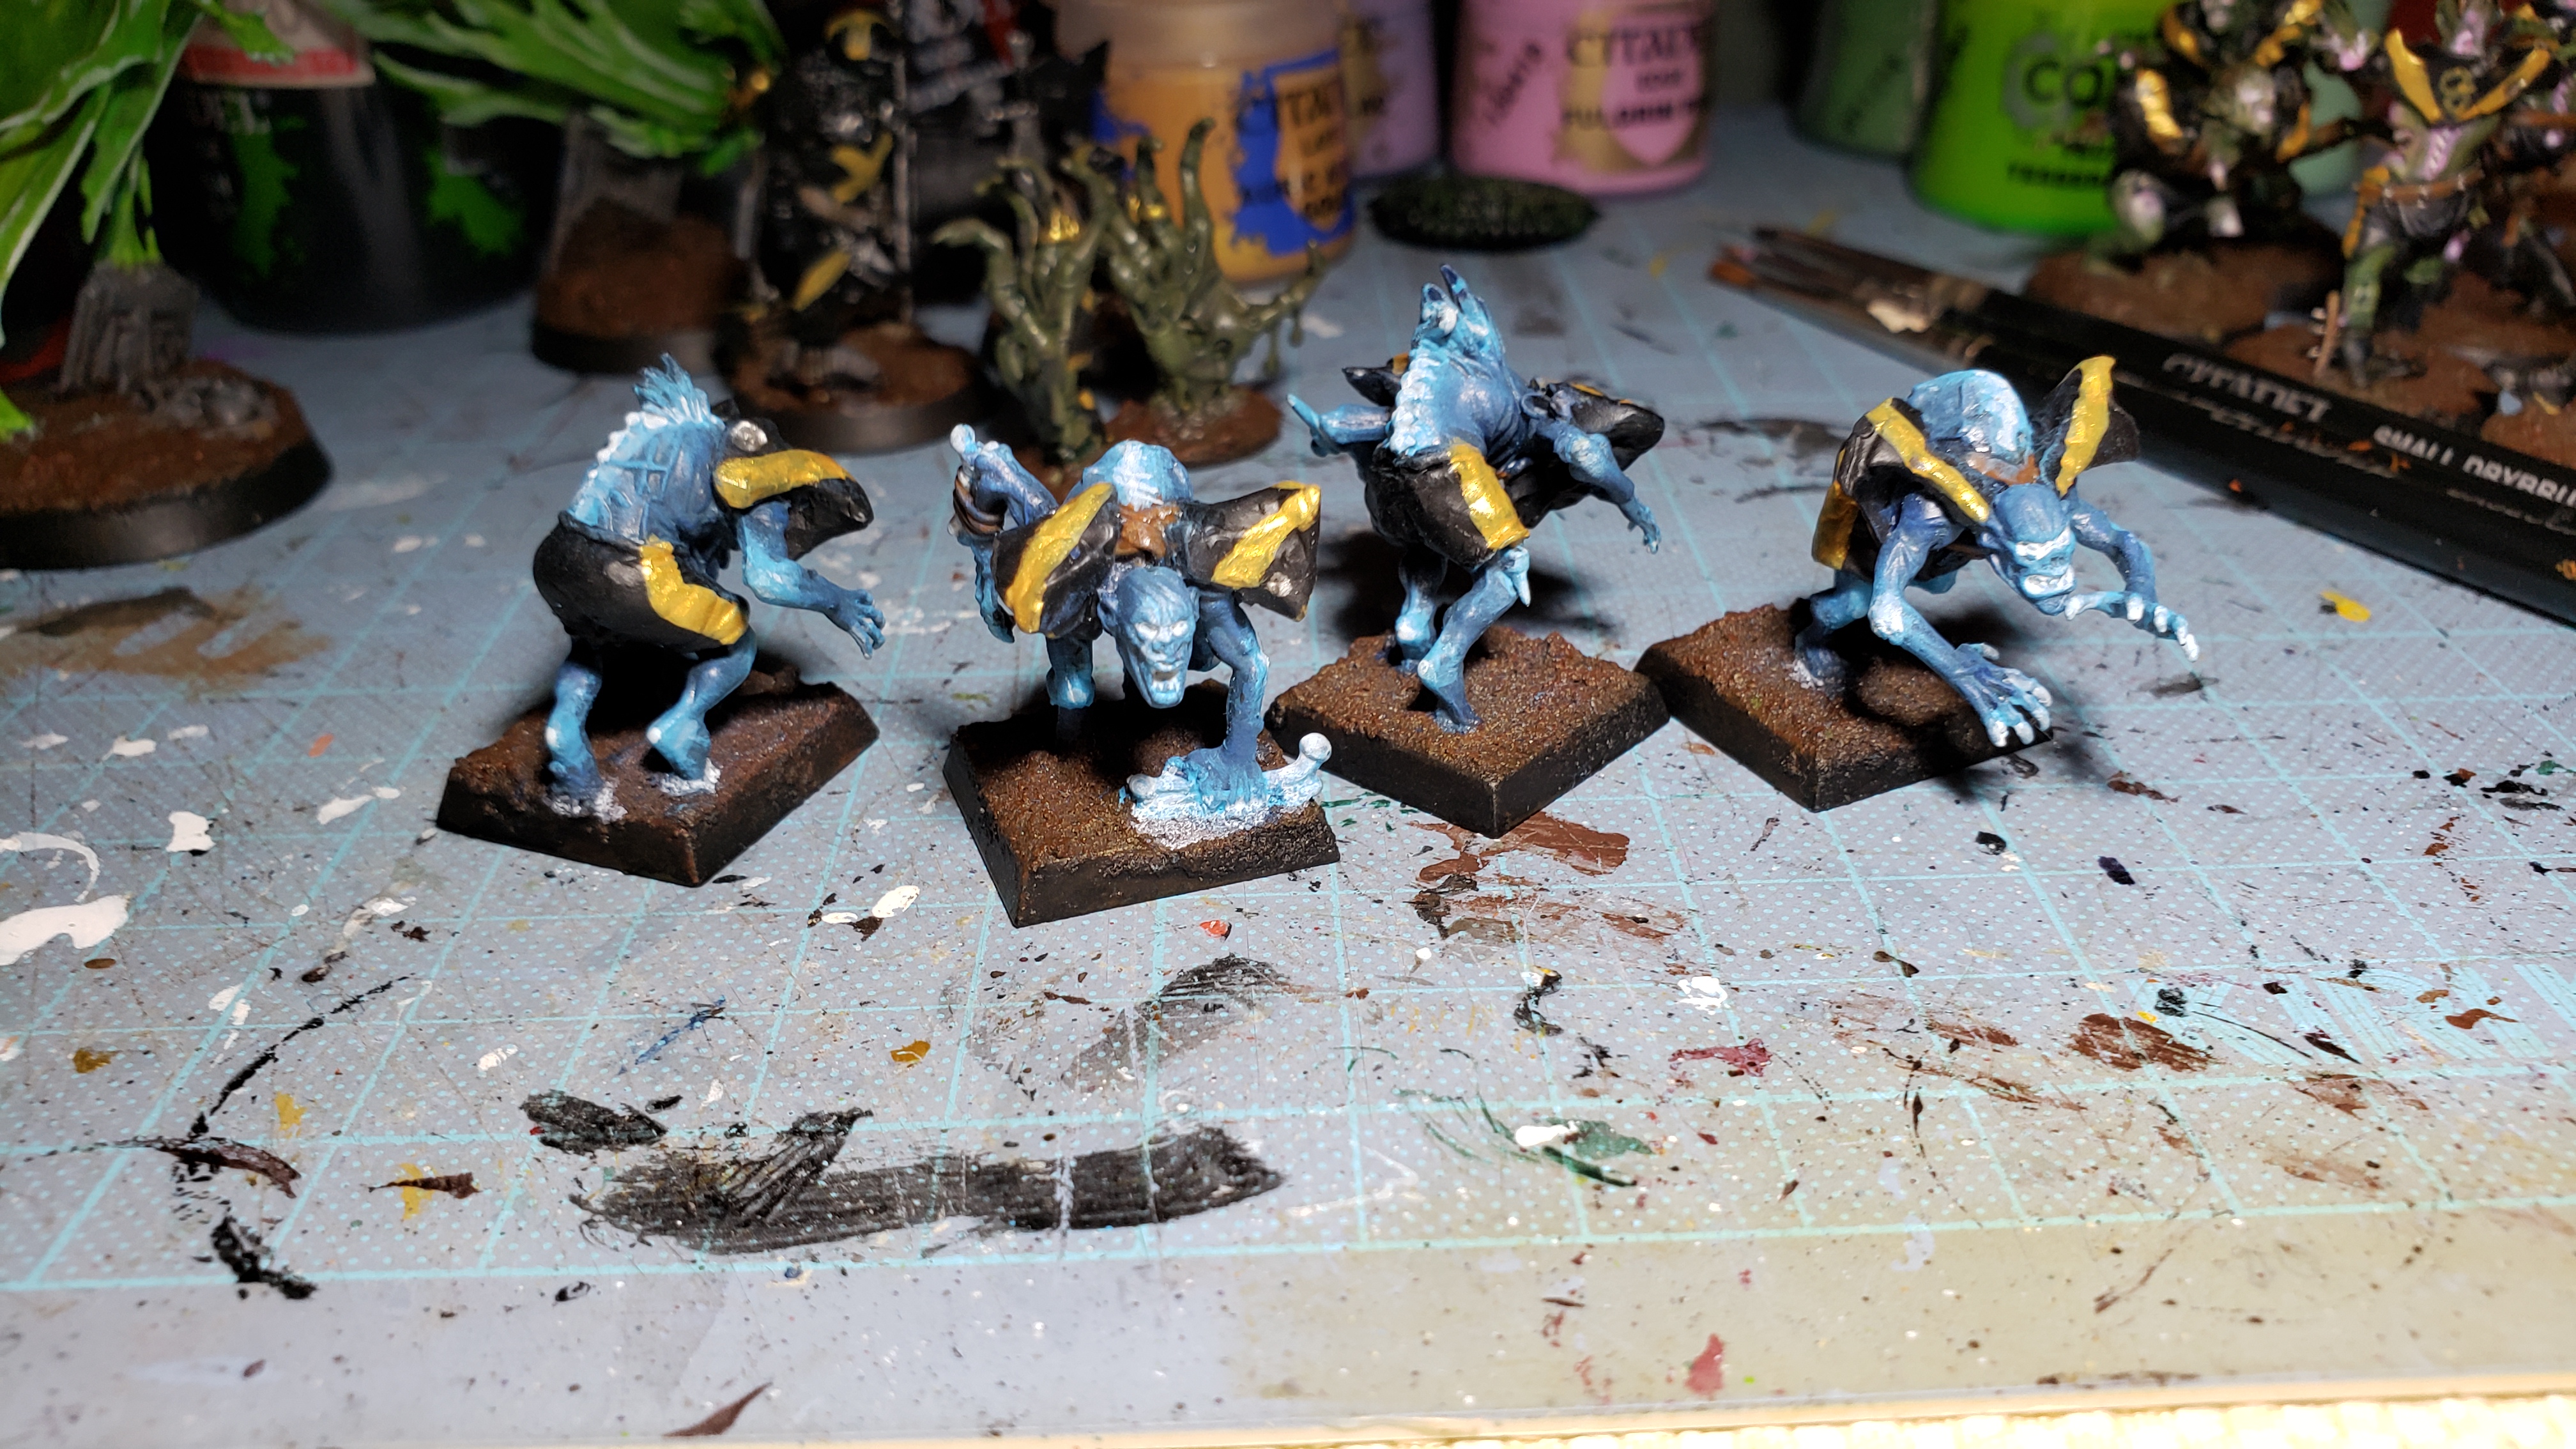
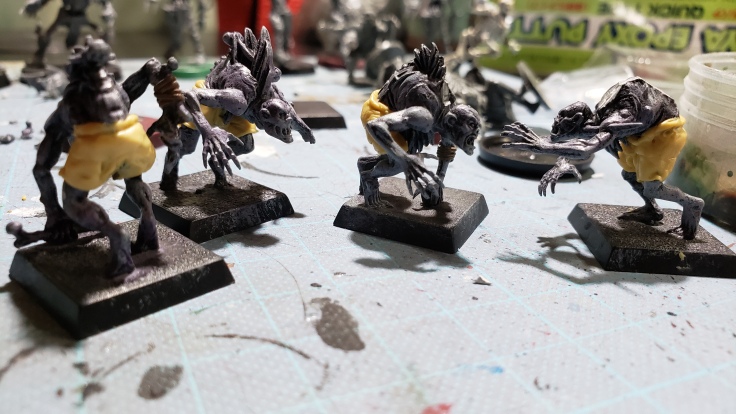
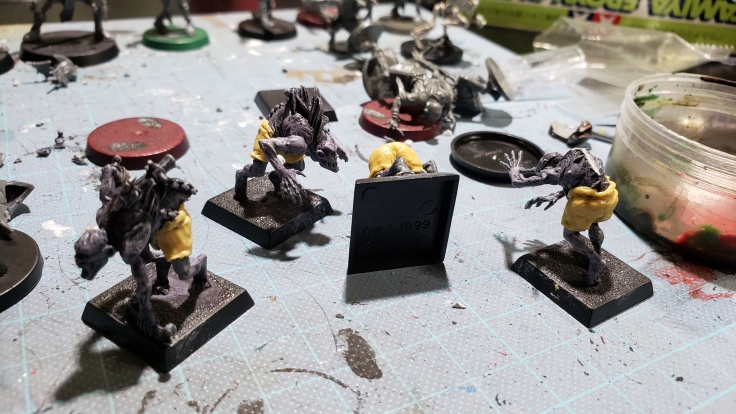
Blitz-Ra’s and Wights looking tasty.
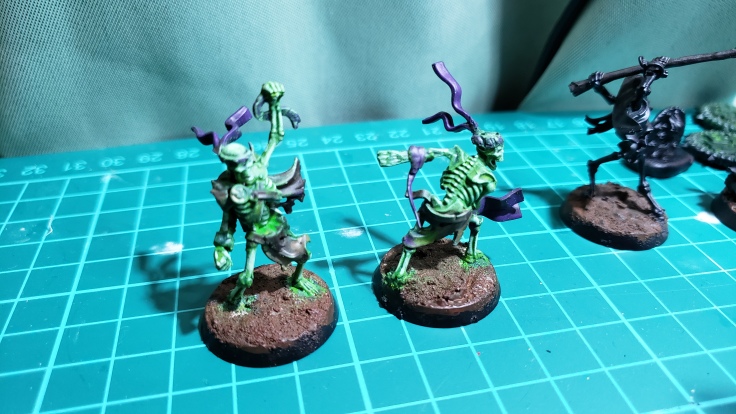
The red skeletons came out alright. With them and the green ones I fear that the white is coming off more dusty than glowy, but I am not overly worried about it. They look good enough and when the other bits around them are all painted in and they get a light drybrush of glowy emotion it will work I think. I still have to do all the yellow skeletons and their highlights, but it was passed midnight oil time when I got the bright idea to do the 6 positional skeletons, but it laid a roadmap for me to get it done and went very quickly.
Mummayzzzzzz!!!! Looking absolutely ectoplasmic and tasty.
After seeing how amazing the green looked before doing anything else, I decided to do one more drybrush of drab tan to make the cloth a bit more…drab…and… you know…tan. And the effect was absolutely stellar. Now it really looks like these bad boys are just wrapped up radioactive glowing monstrosities and the light cannae be held back! Touch up all the black armor, do up some accessories and such like the bone necklace, belt, etc. and they were be off to the final stages. I am scared to death to even put a serious highlight on them, but will probably do something to make those bandages pop a bit more. Probably go in with a watered down brown to give the cloth a bit more look of wear. Or like shadows and folds and such.
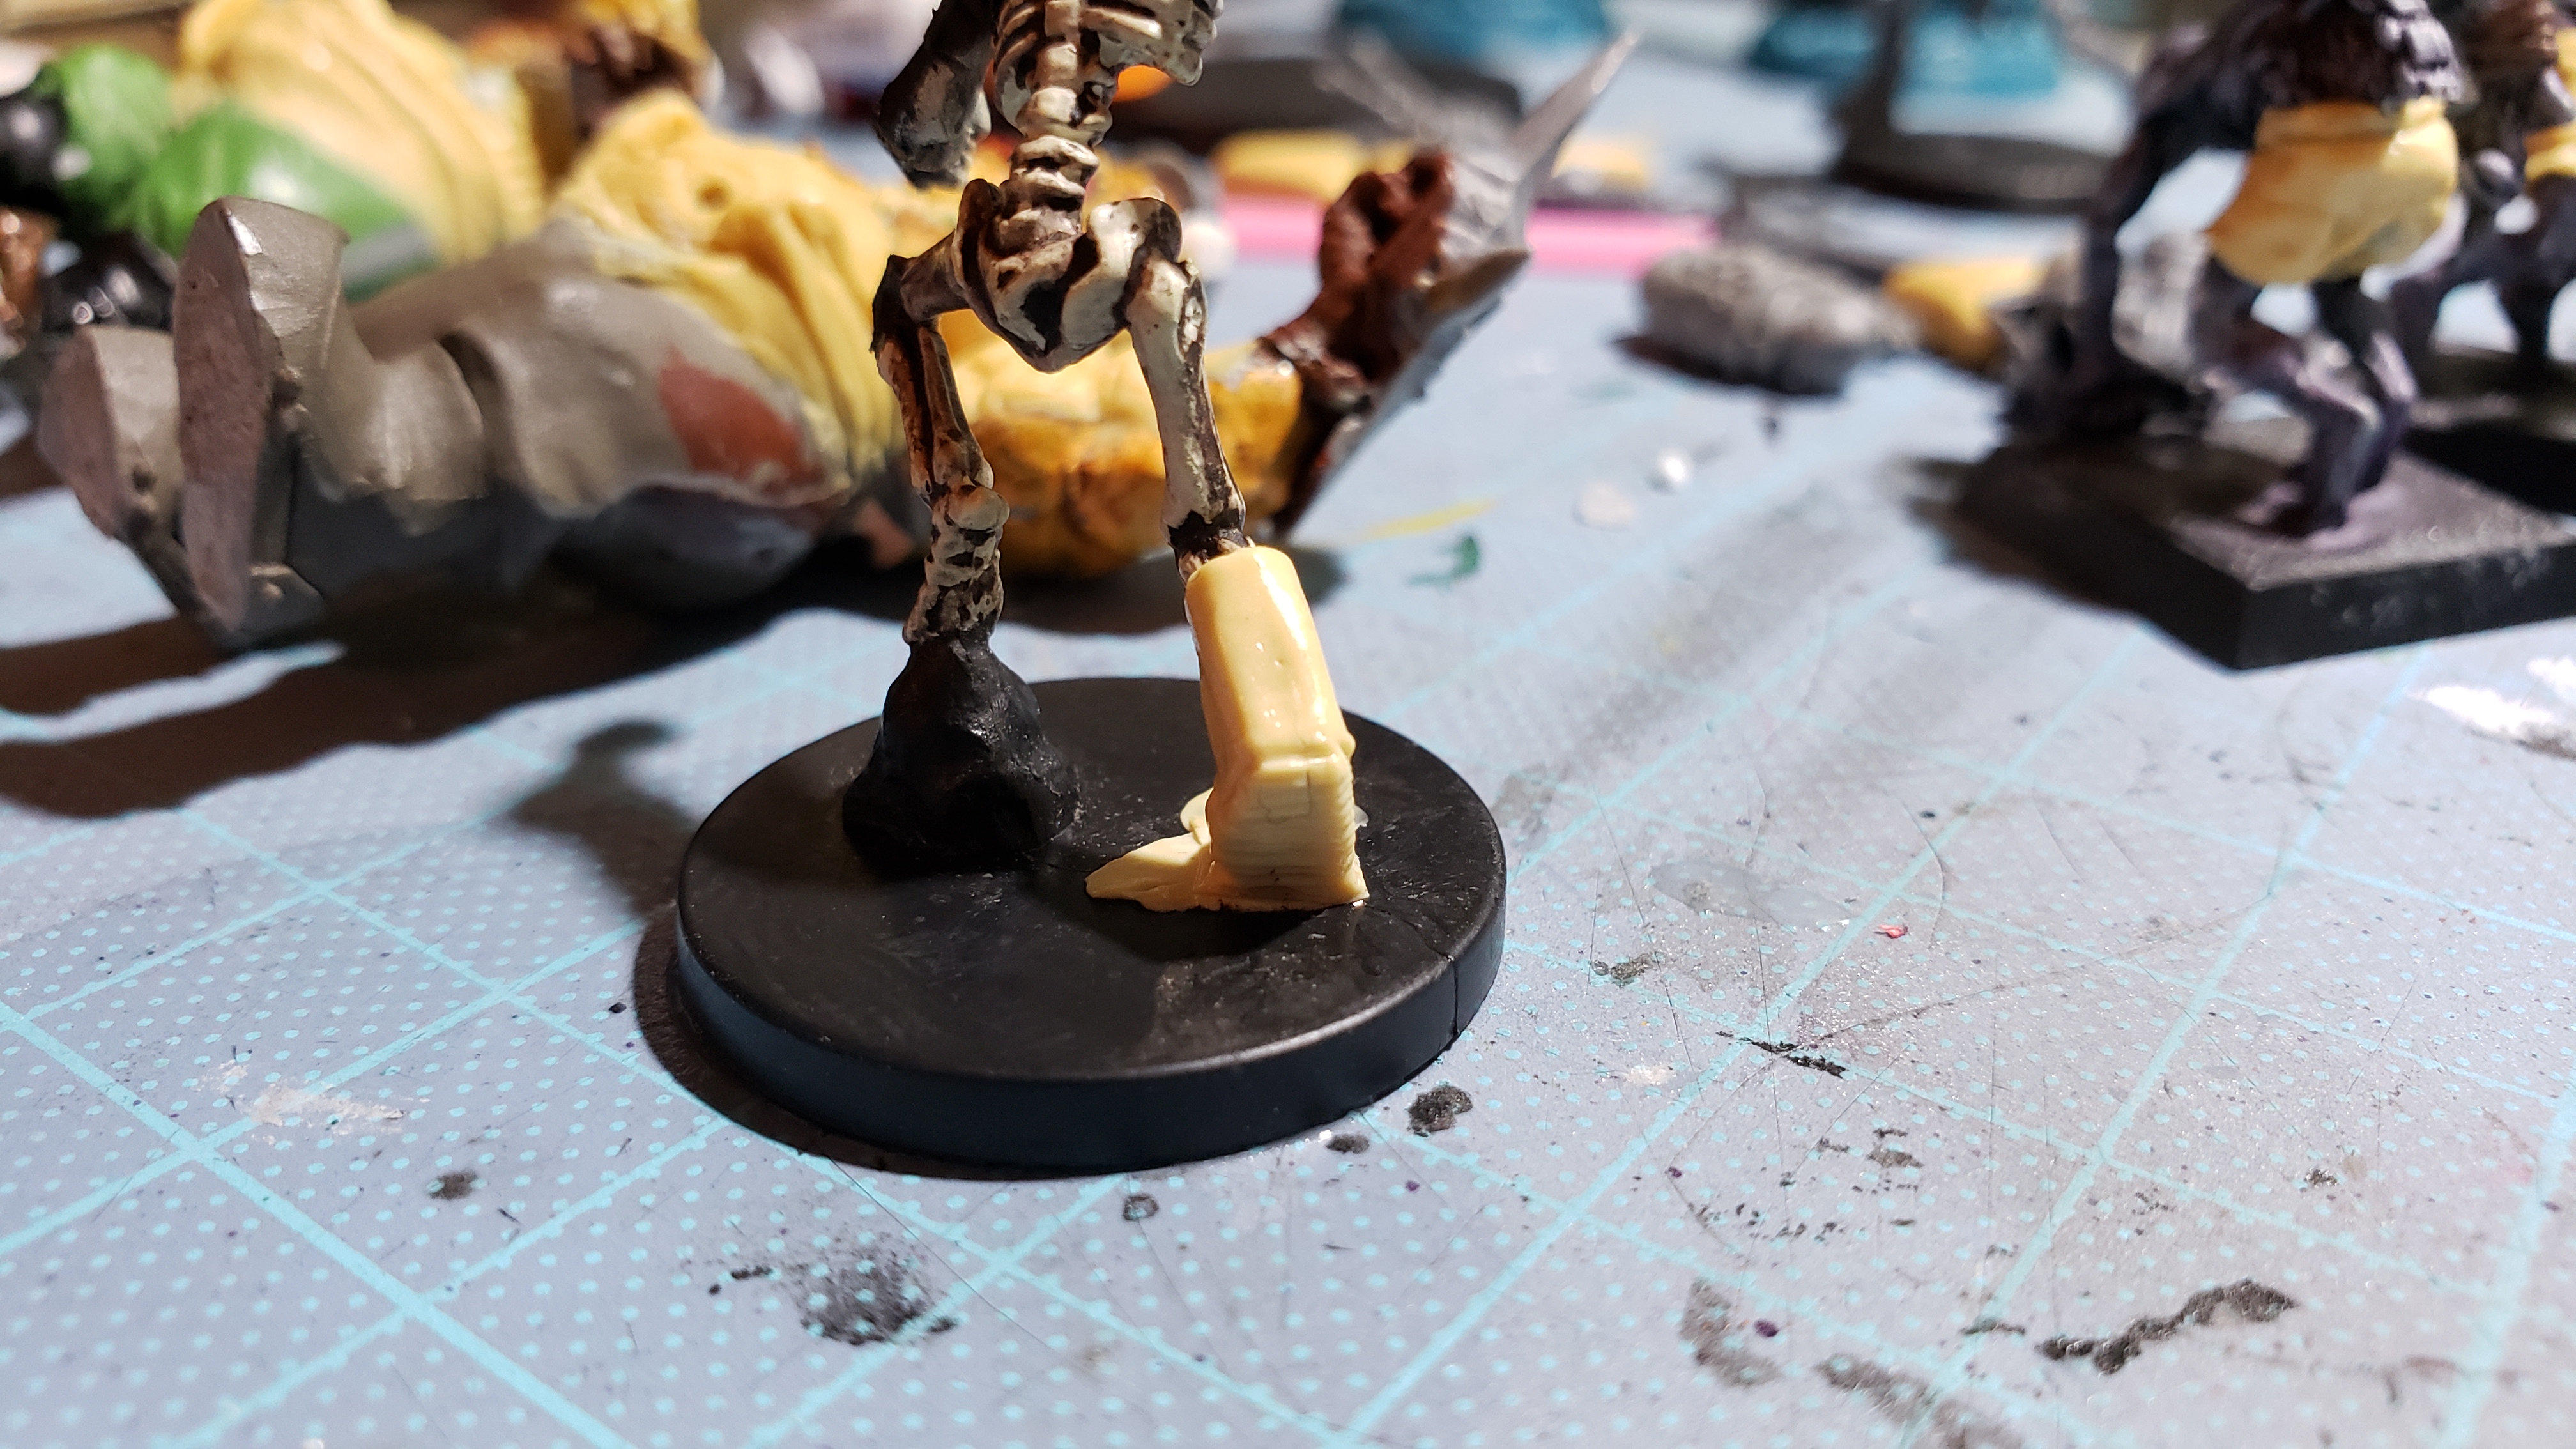
There are actually a few spots on the model, mostly on the knees and feet, where the cloth is actually exposing the skin and I think I just need to double down on the brightness and highlight those up when it gets to that phase. (3.15)
Update (Touched up the Black, etc 3.23)
So I got a little bit of work done since the last update and laid down the black and a few main colors. In particular, the skeletons really benefited from this and the glowing bones stand out very nicely with the black.
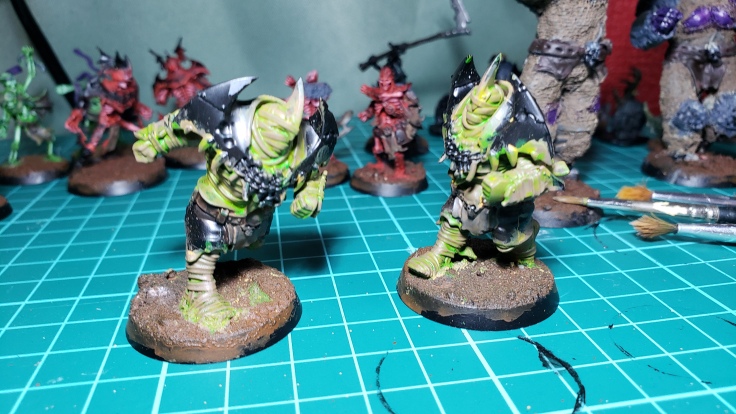
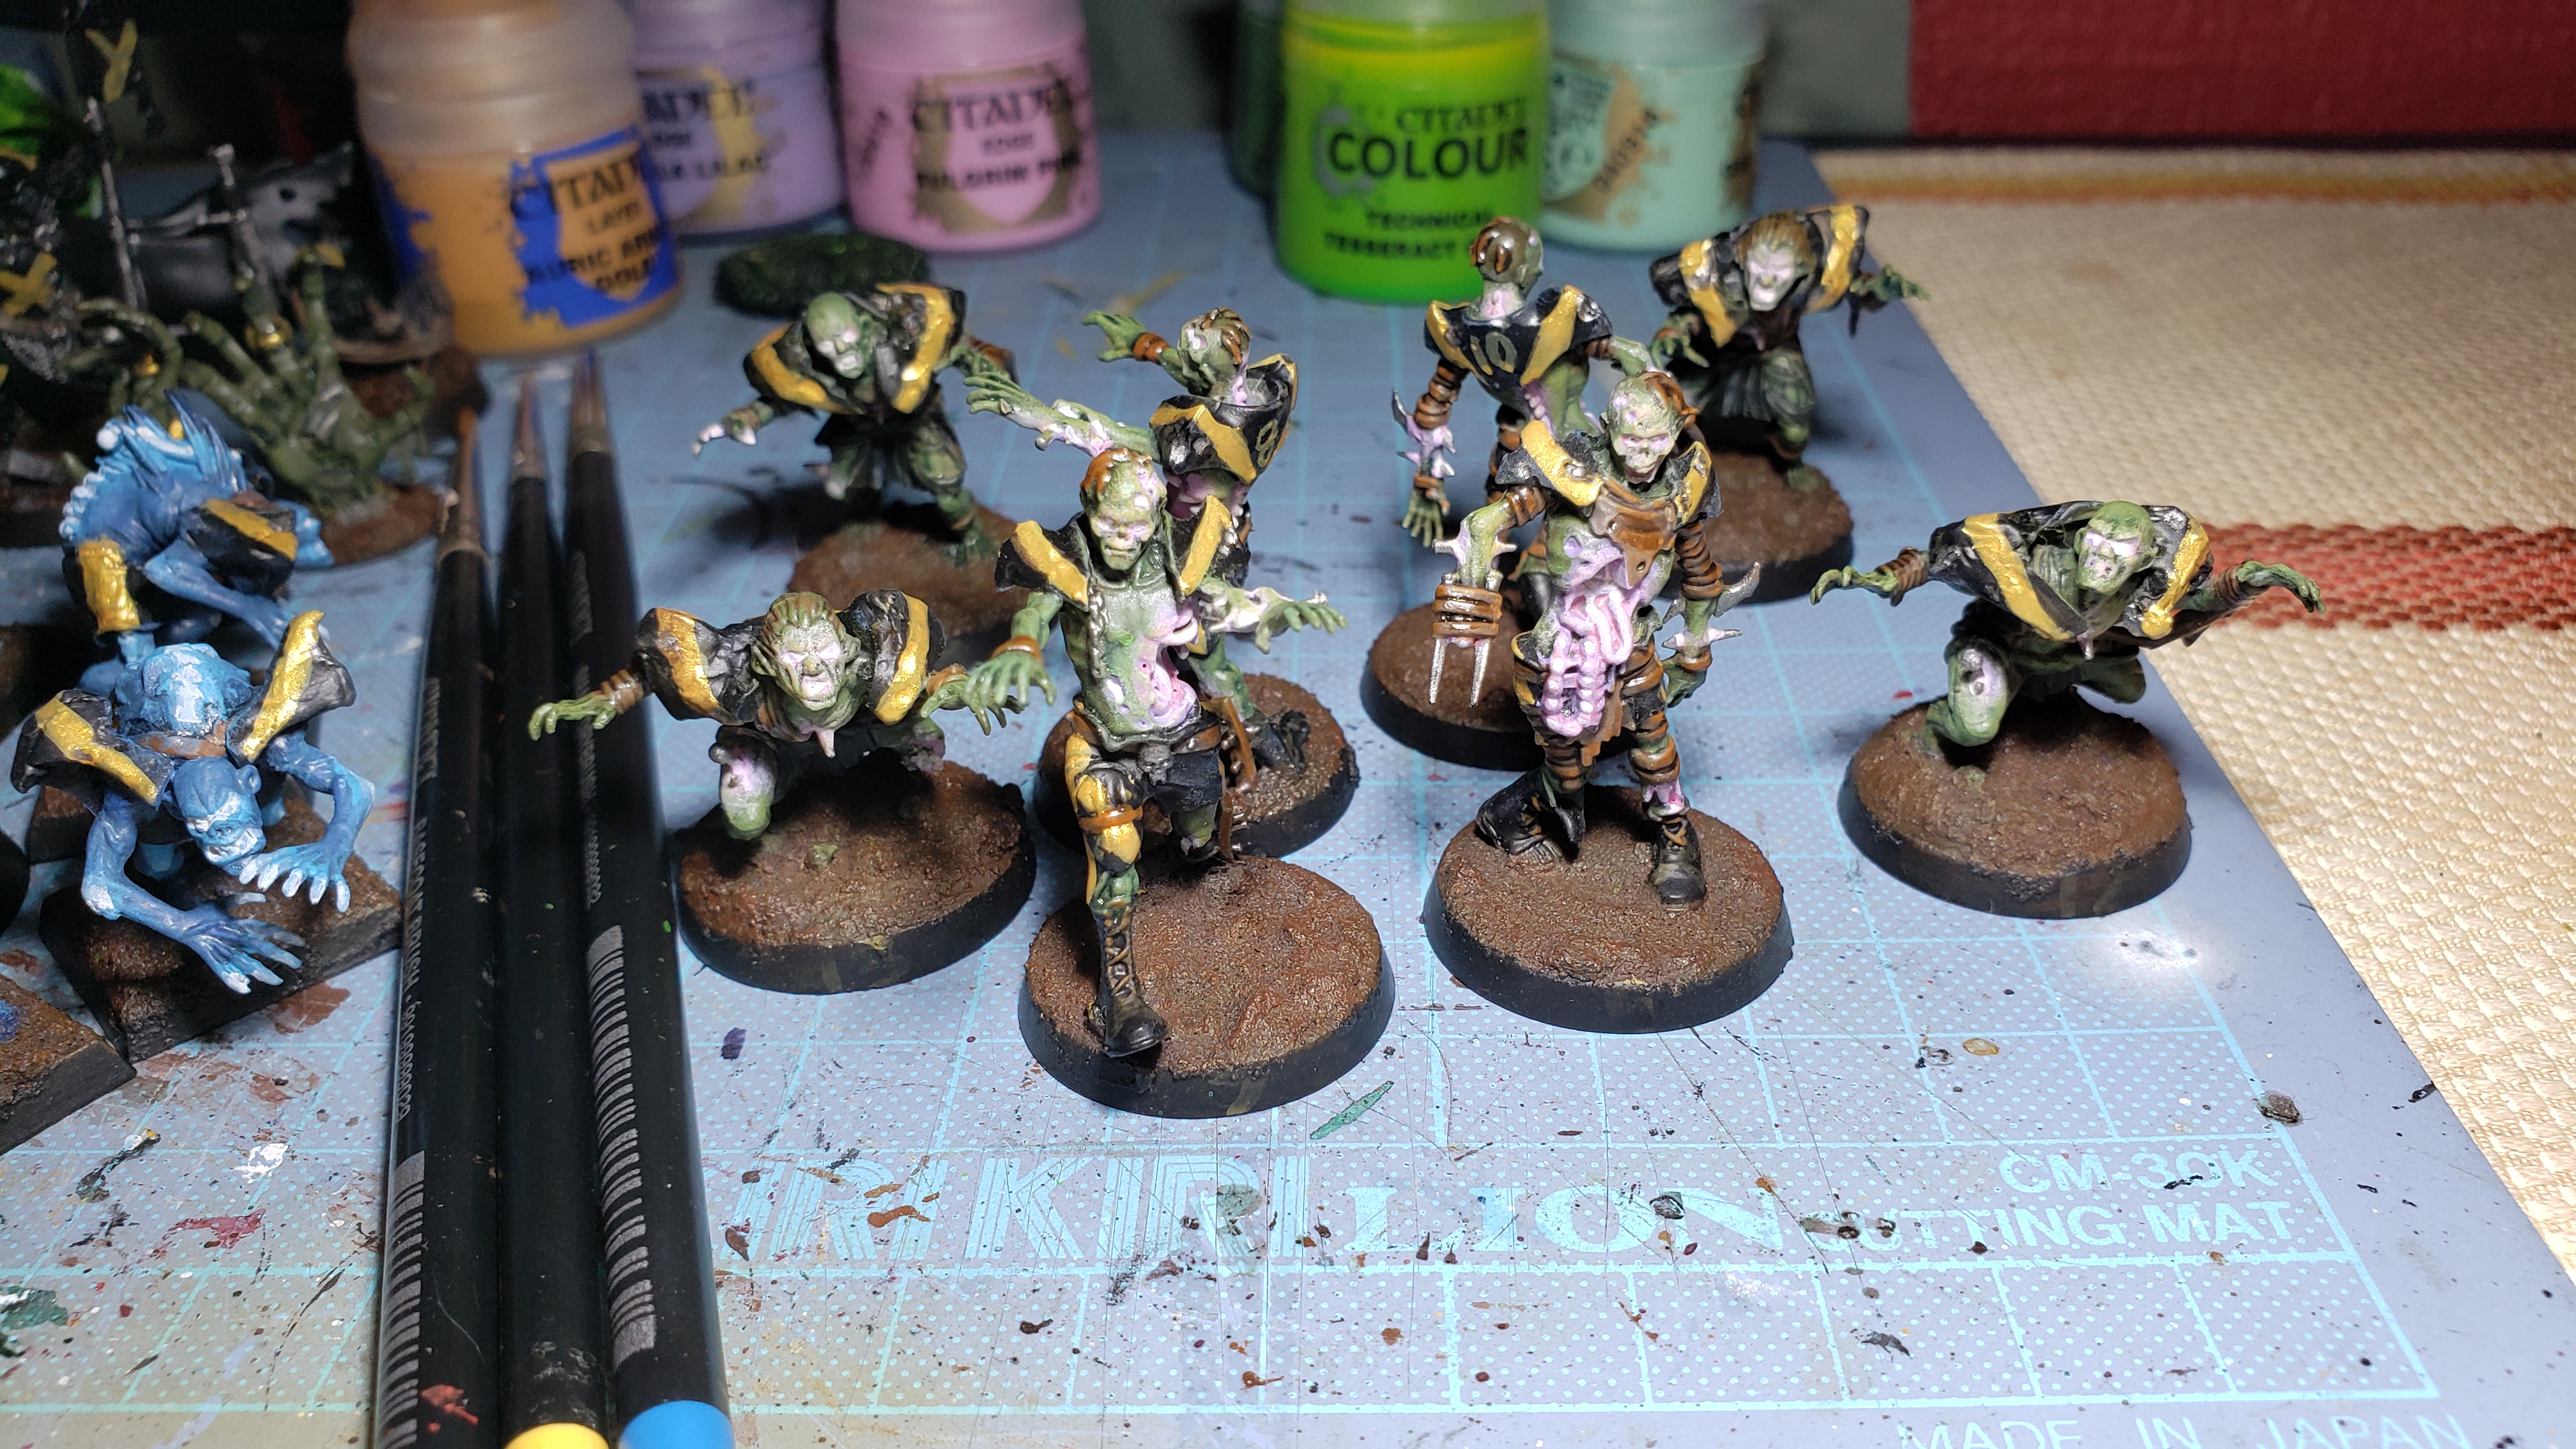
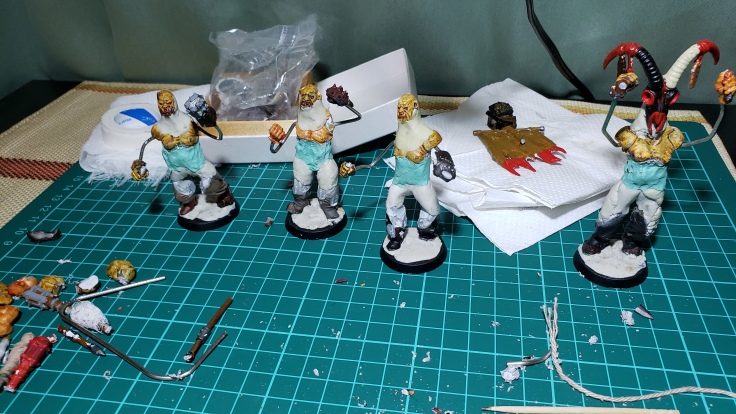
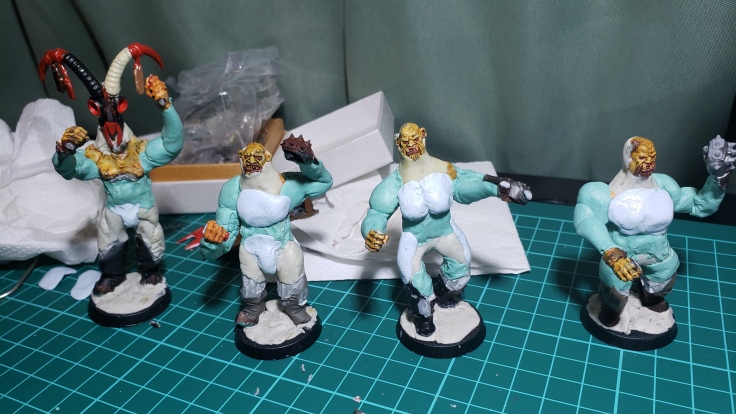
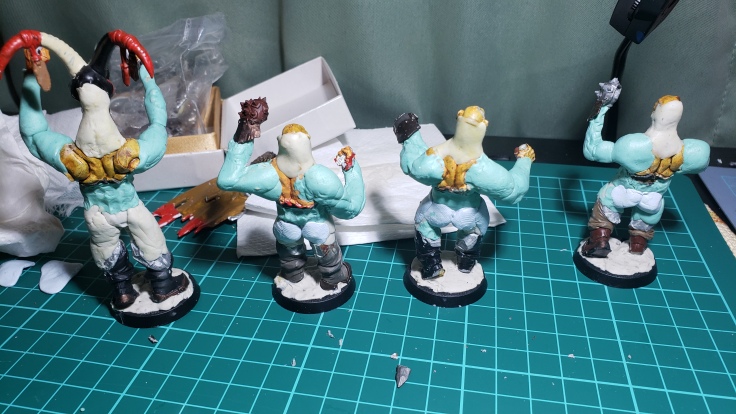
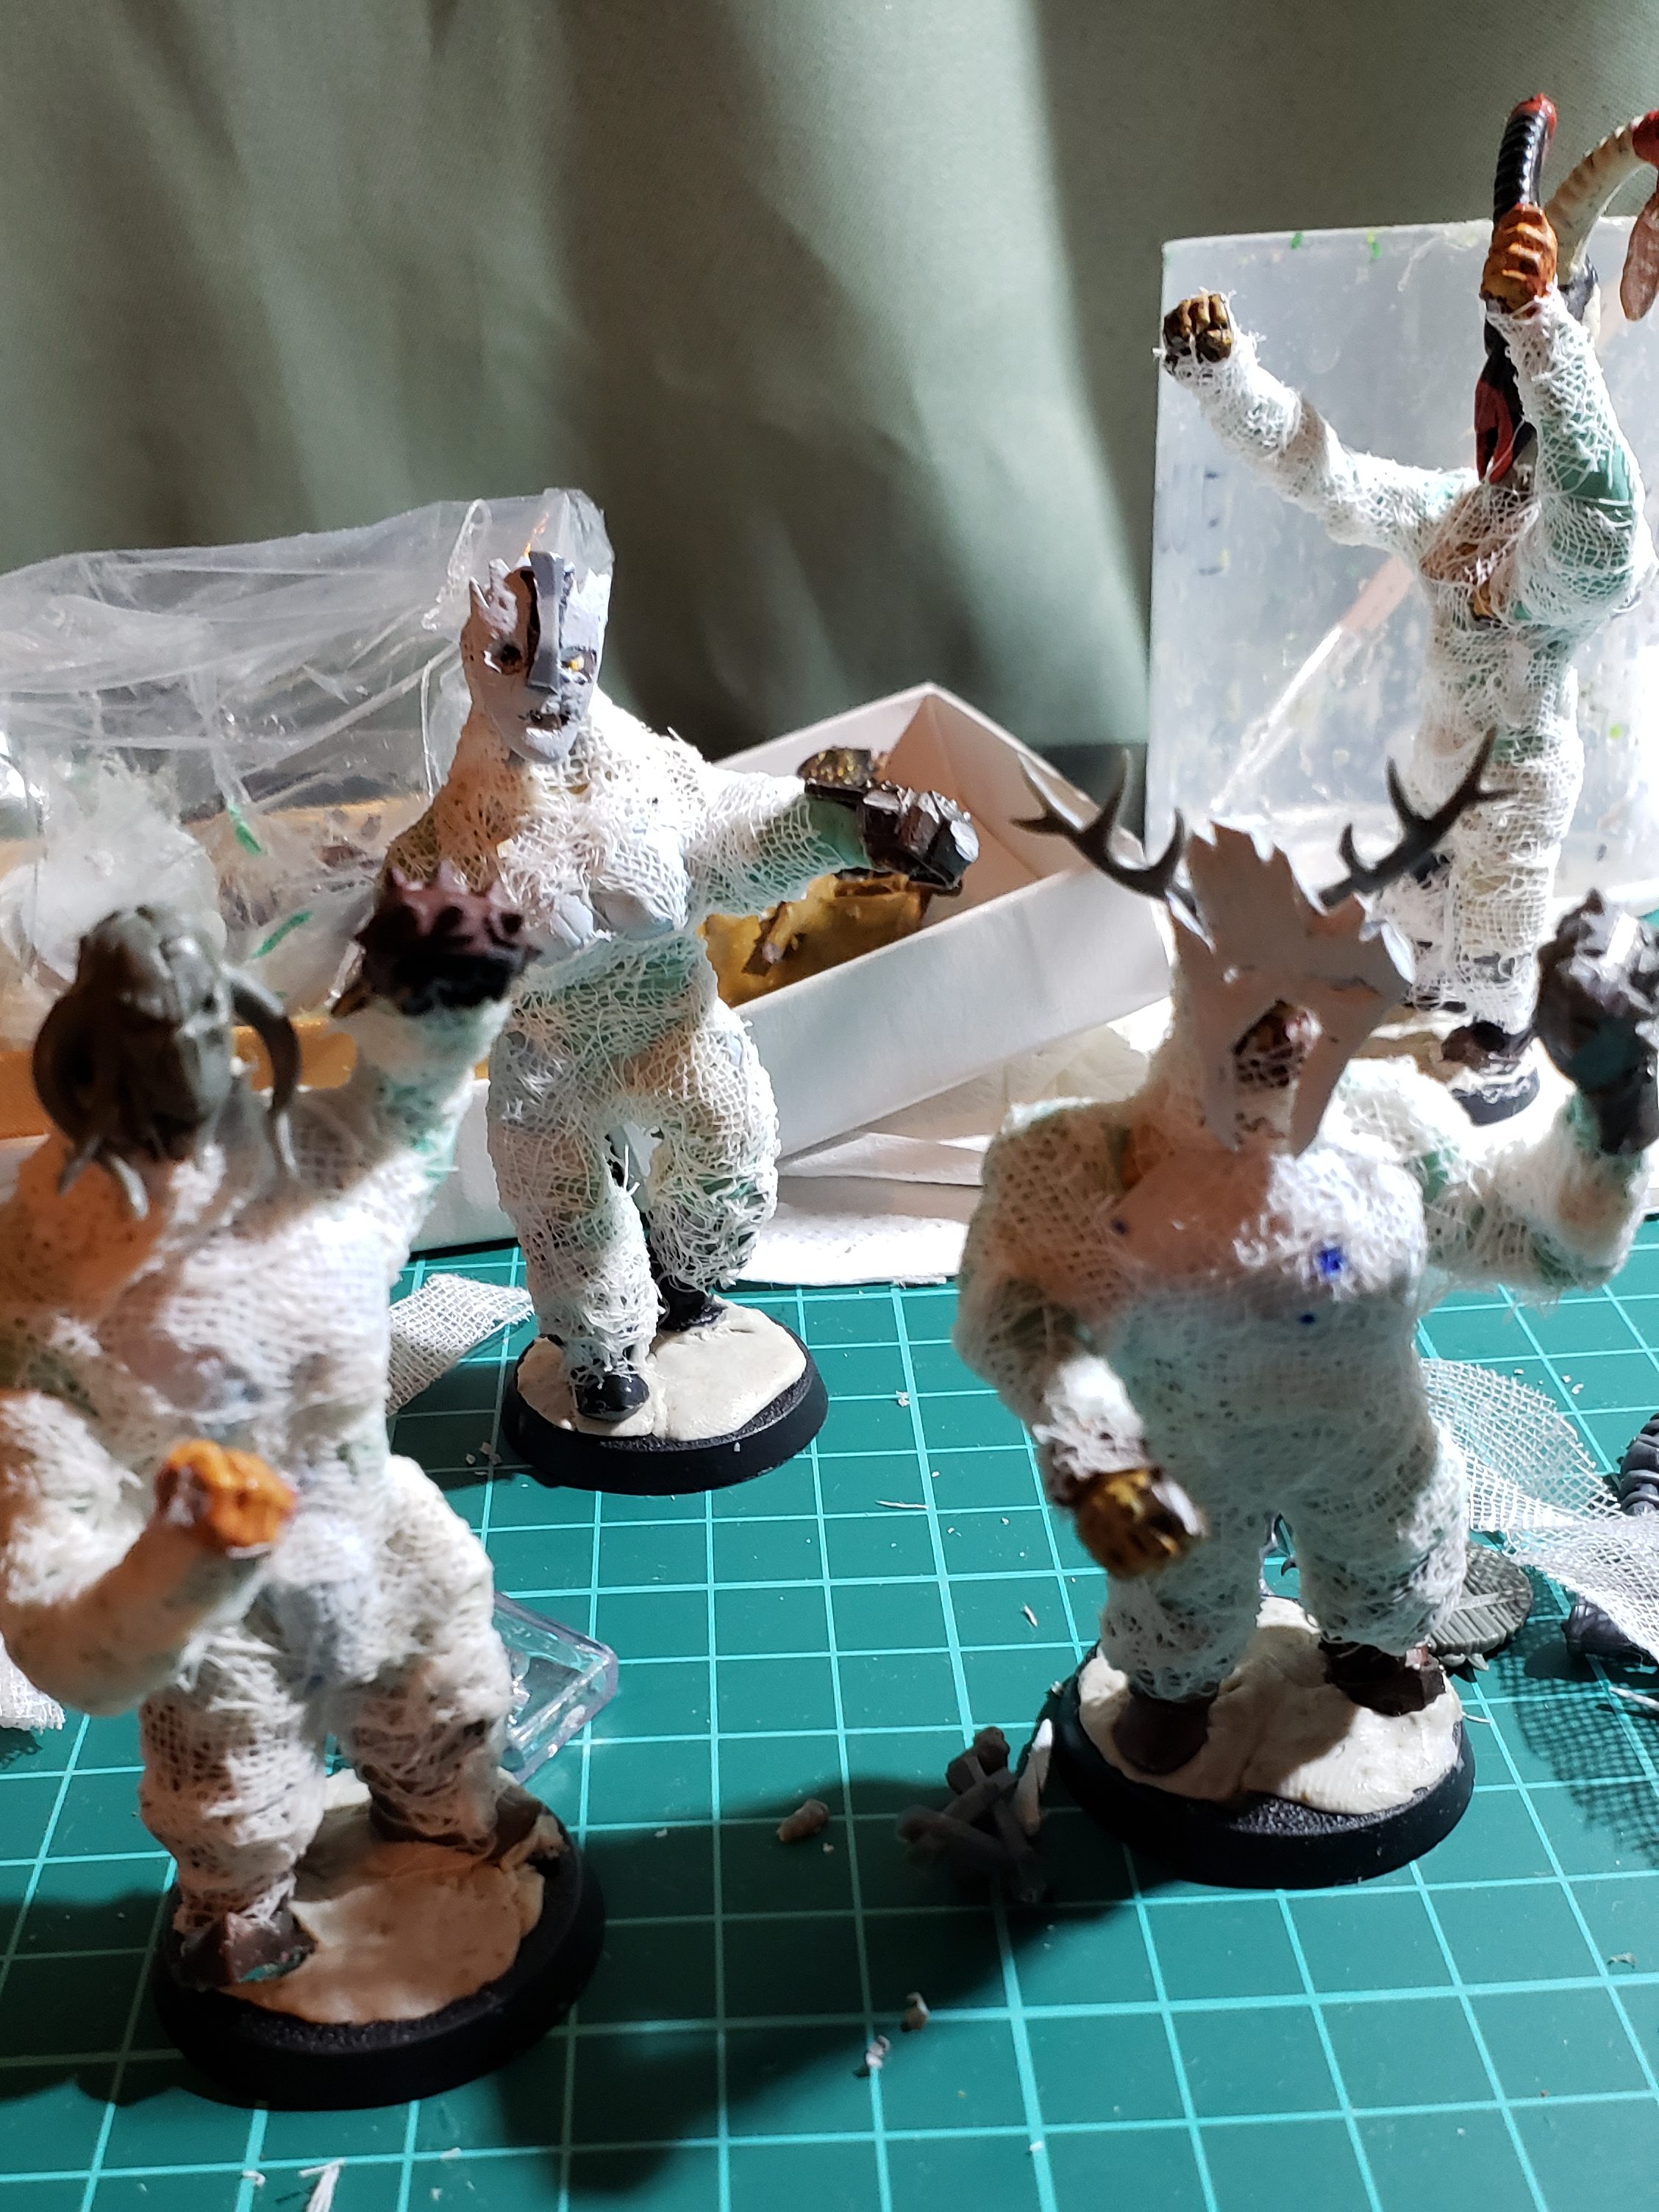
Wights & Blitz-Ras have a nice variety of various cloth and armor elements that make them pop.The more progress I make on these Throw-Ra’s the more I like them. The poses are so interesting and the little cloth accents give them a lot of personality I think. Seeing them in black as opposed to their previous purple makes them look more sinister and clean.The tomb guardians are proving to be a roadblock for me mentally and with the brush. Touching up the blacks, browns, and skull colors here and there are bringing out more of the flavor in then, but they are still missing something I feel.The Mummies are great and they are so big and have plenty of smooth spaces I am doing in black that means they will get some really thick and tasty gold stripes which will make them pop a ton.Standard issue line skeletons are looking pretty good as well. I didn’t end up giving them a special highlight, and after painting the black they have some of the nicest looking glow effects of the lot.
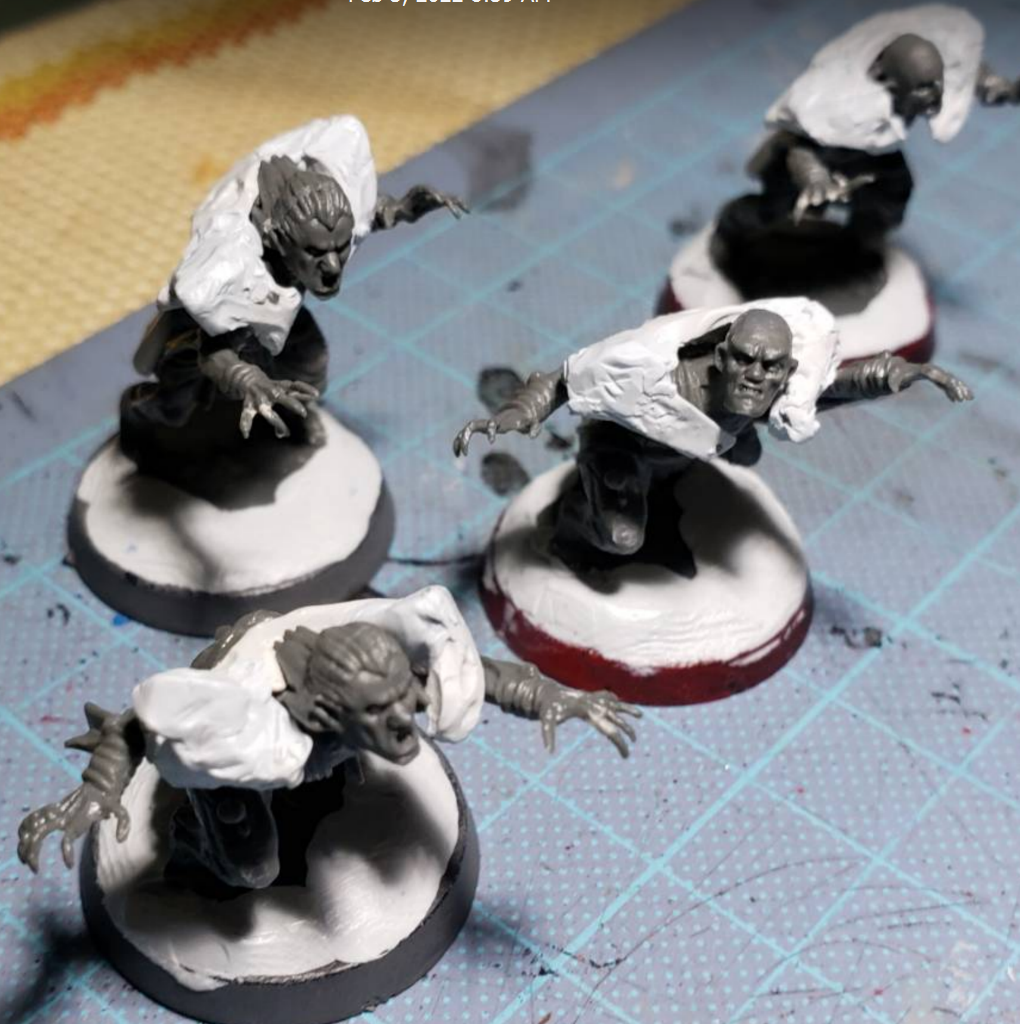
Almost there… (3.29 Update)
If the last update seemed a little short on commentary it’s because I didn’t write anything for it until I took these pictures today hah. I got a few more nice evenings of painting in and have pretty much got all my base colors down and have done highlighting on most of the models and their more detailed areas.
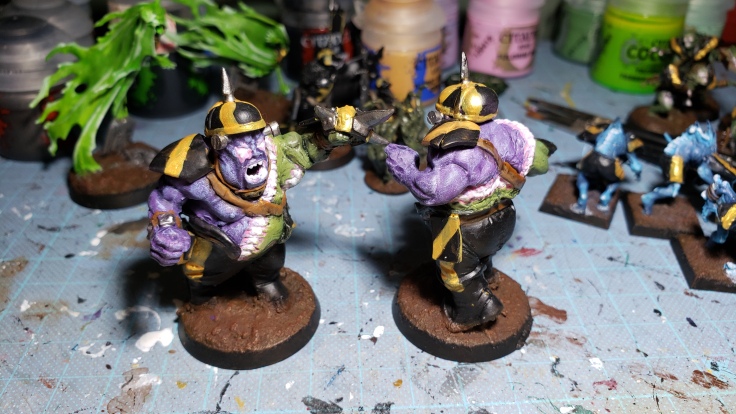
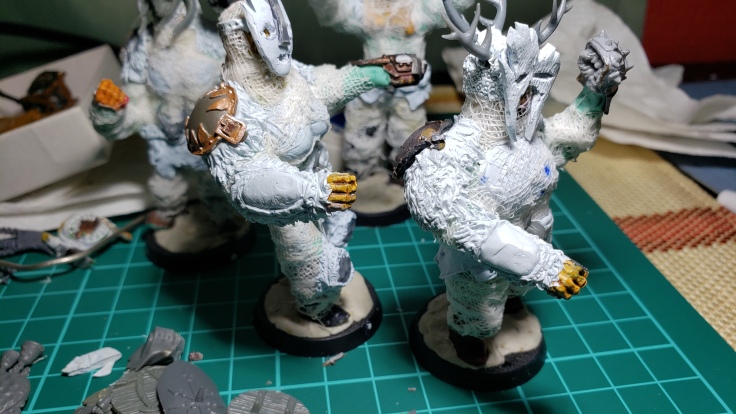
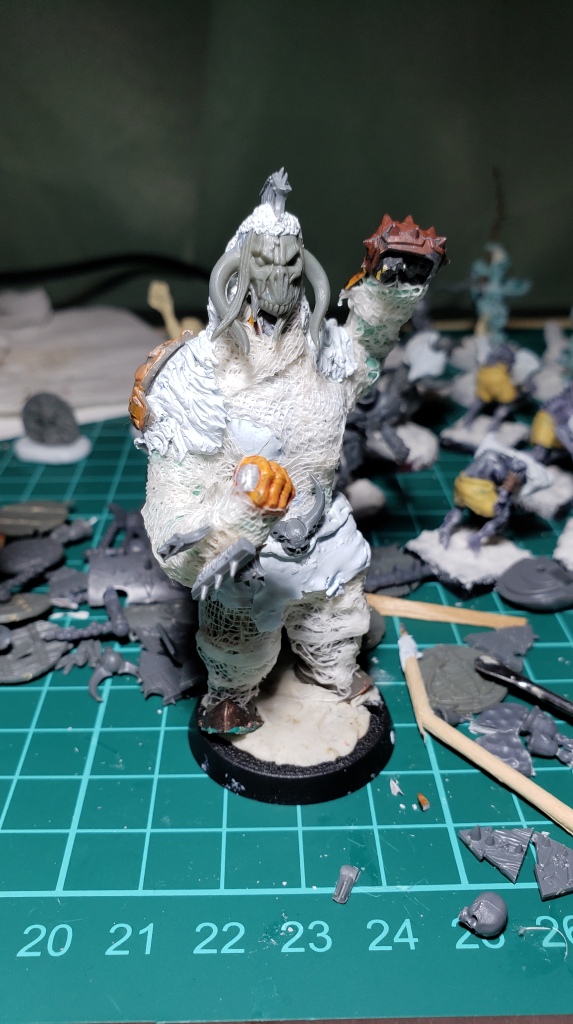
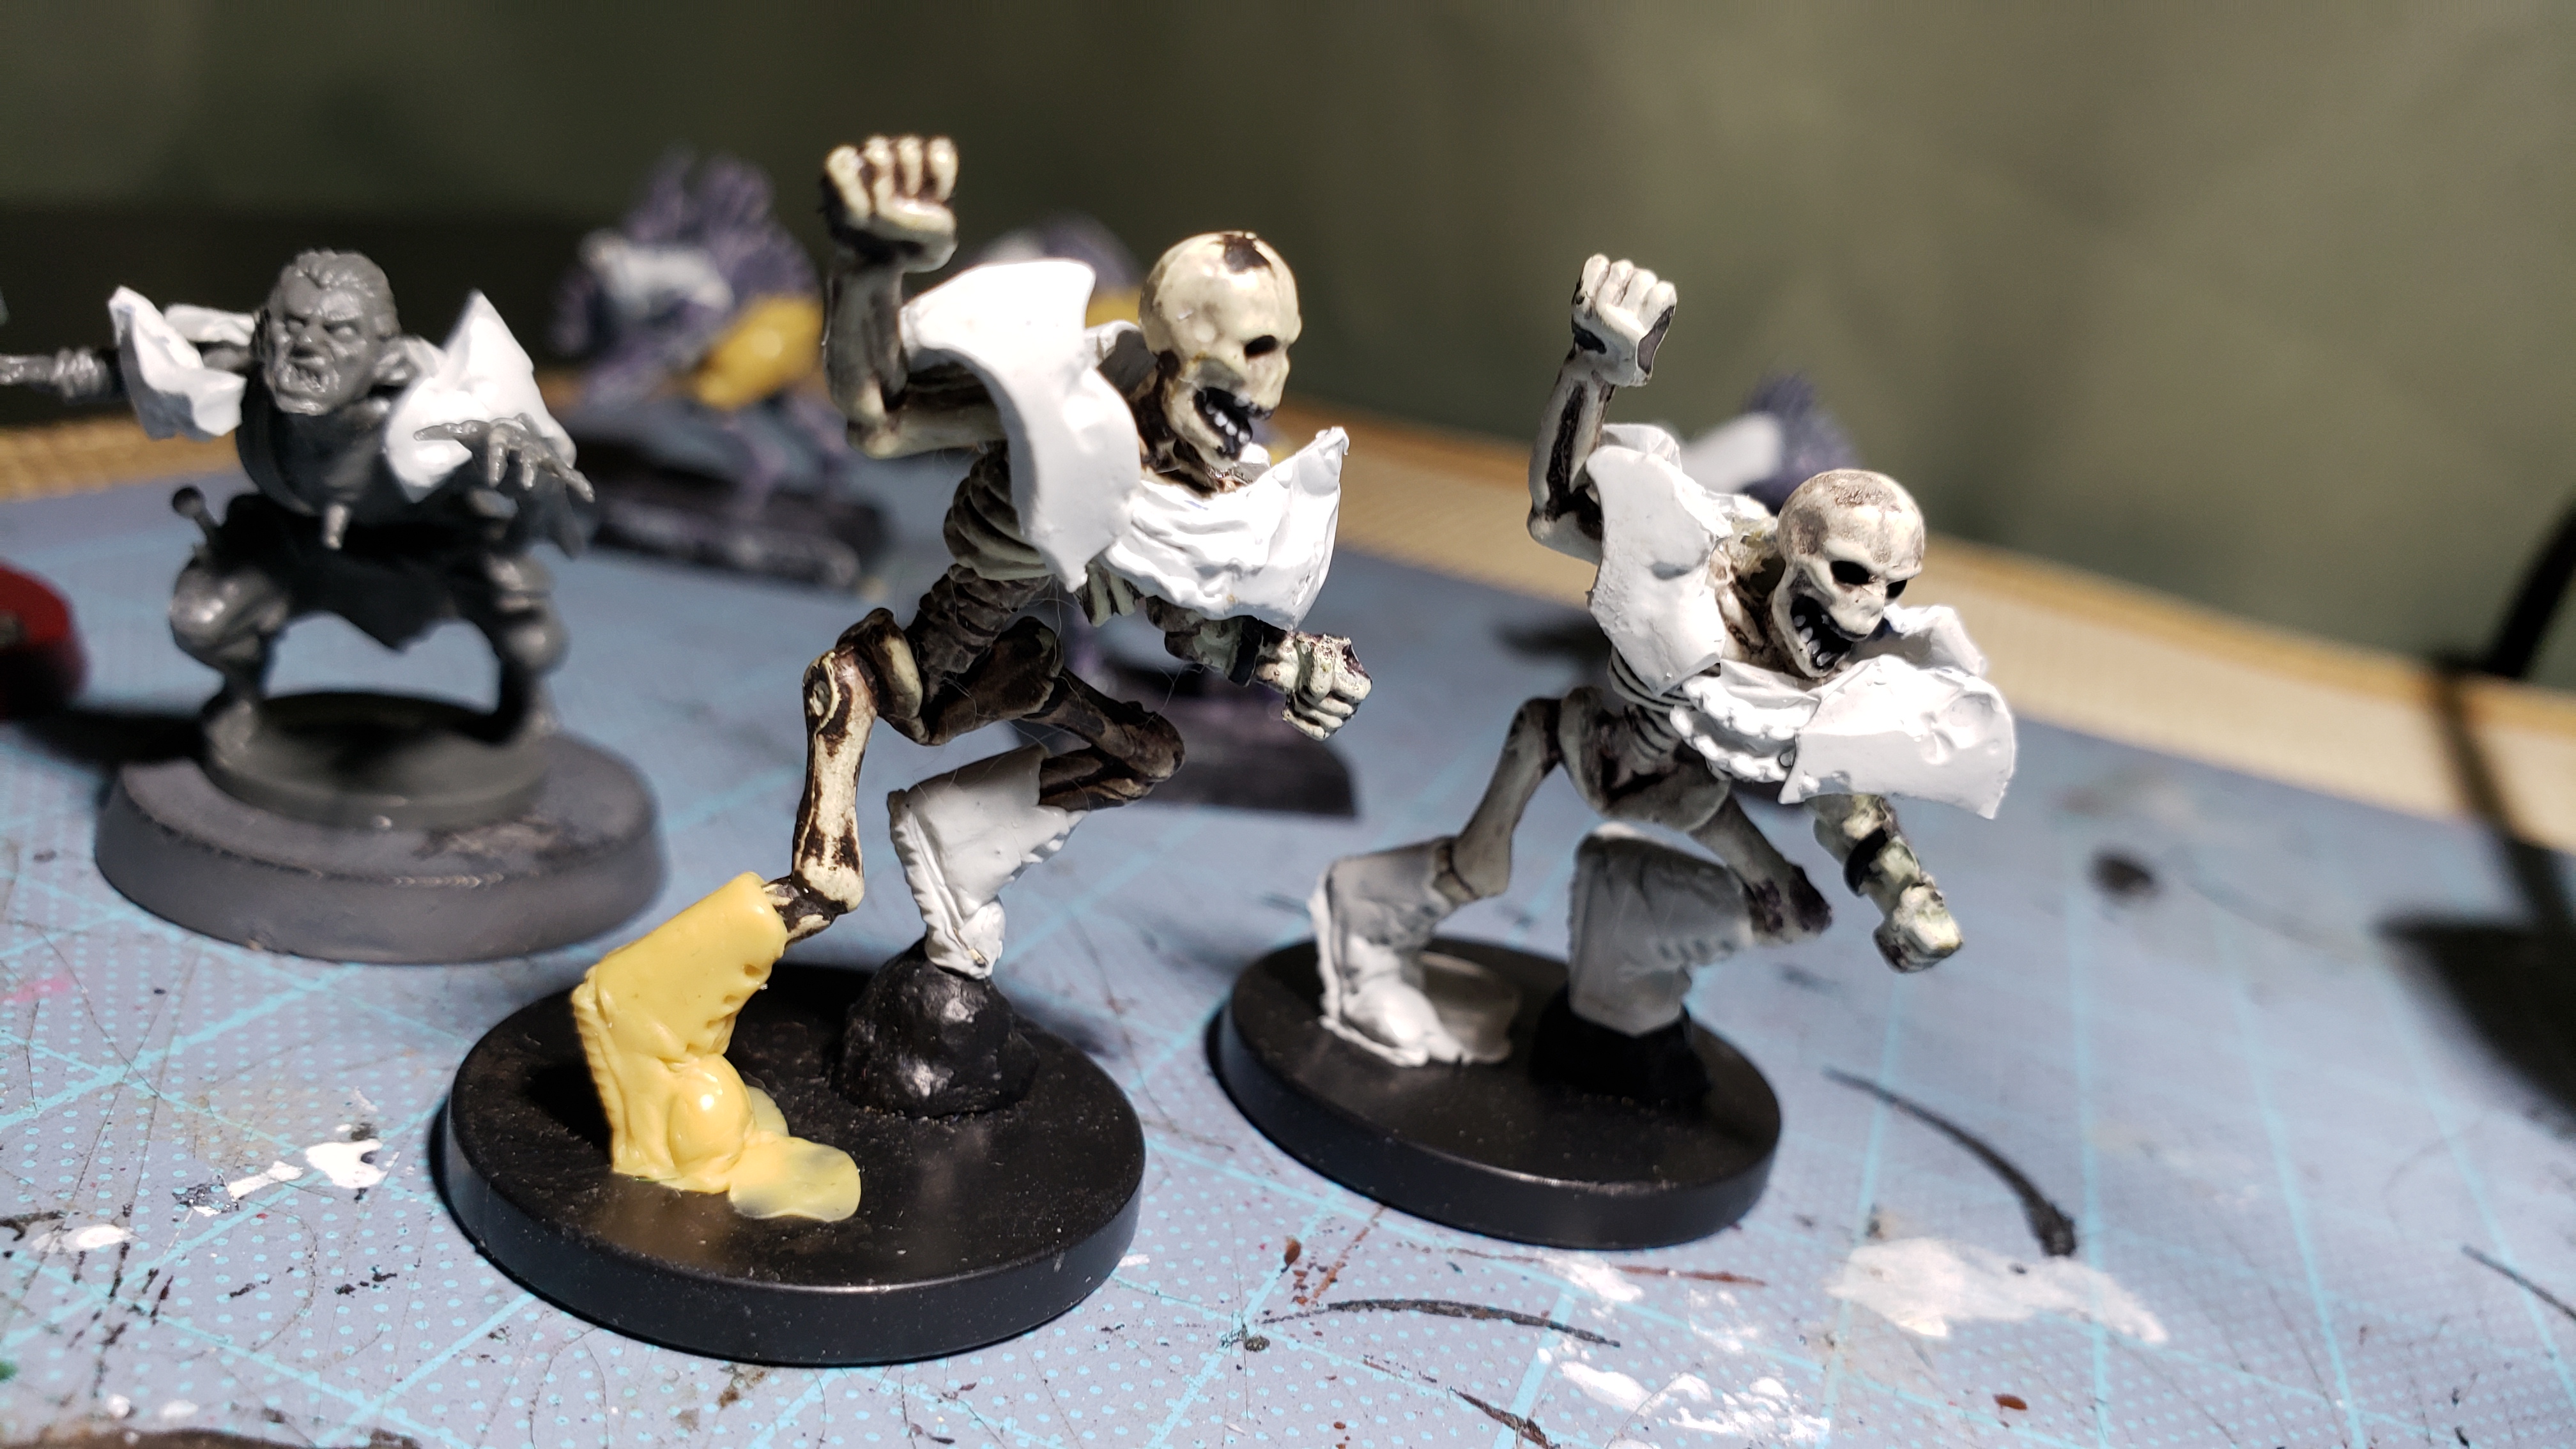
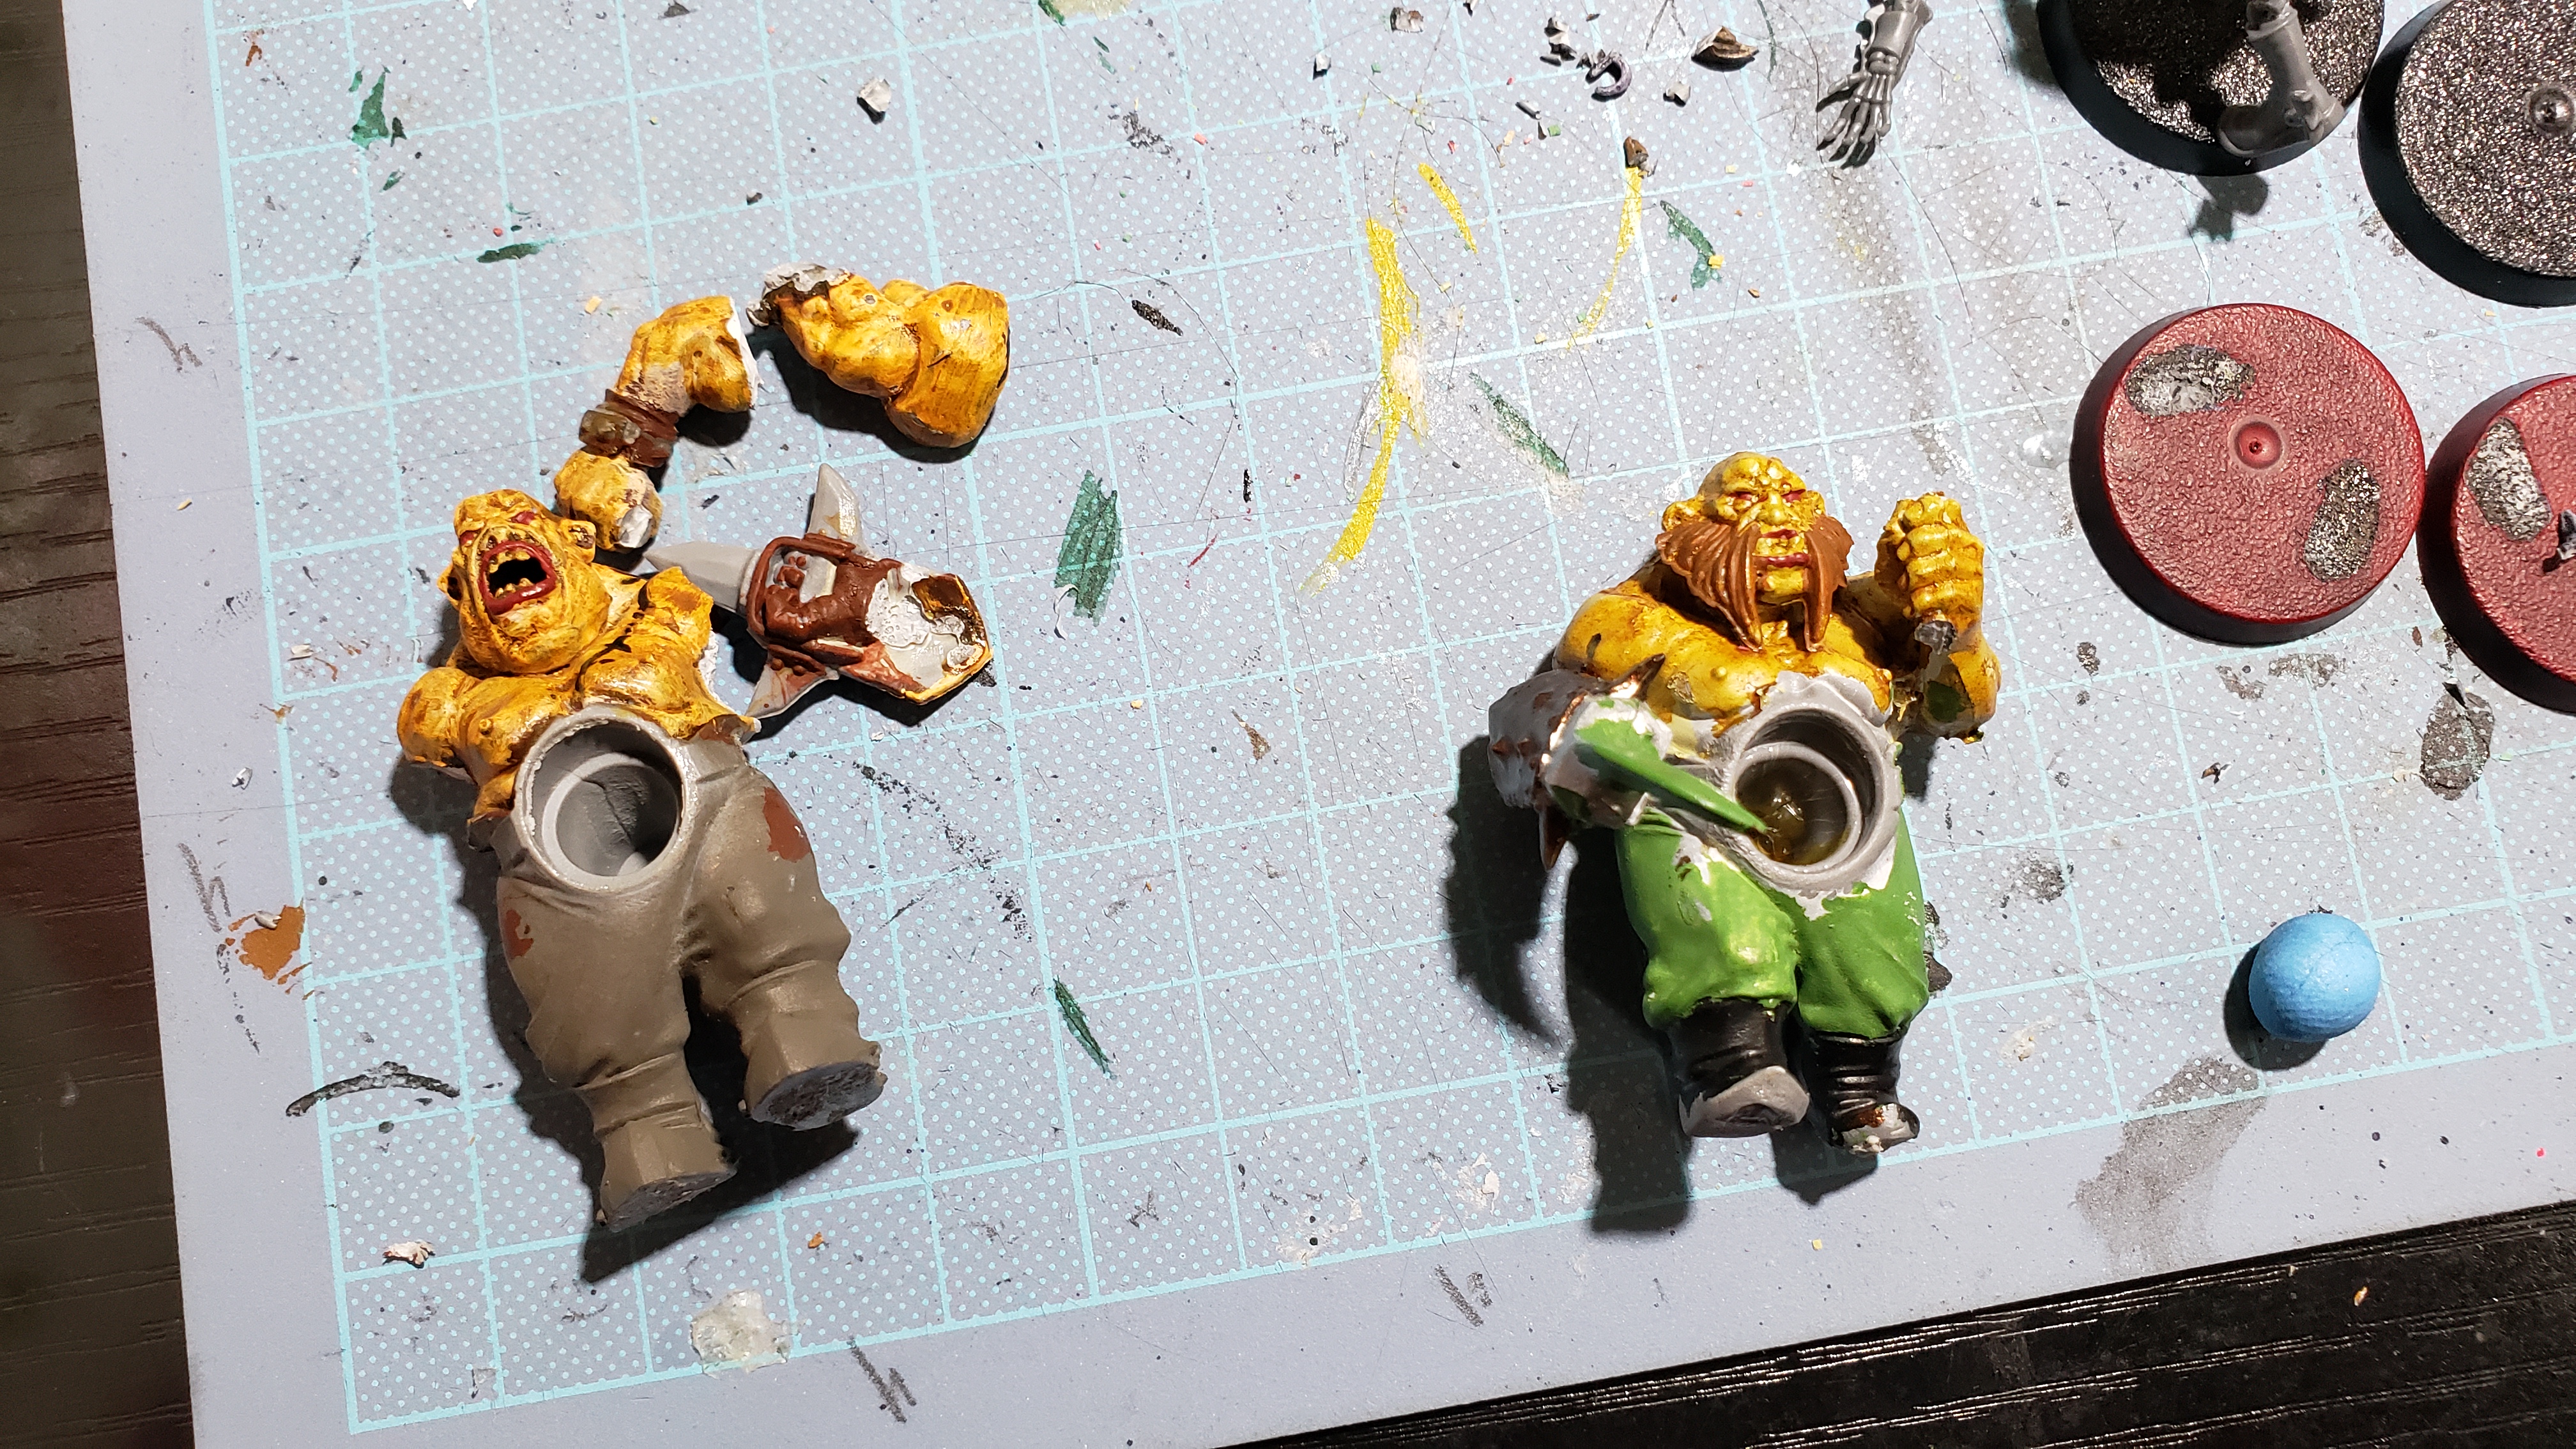
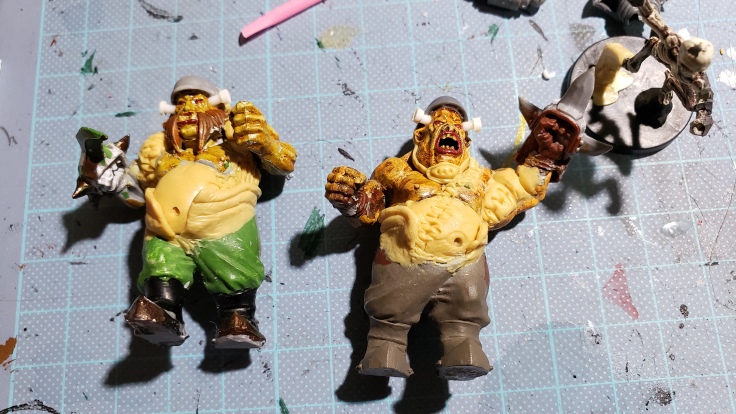
The line skeletons are pretty much good to go besides the gold highlights and stripes. I’ve done all of the metal bits and washed them down fairly well too including the cloths dangling from their loinal zones. Most of them have these neckerchief things and I didn’t paint them completely brown since it would disturb some of the yellow and black I painted, but I have a feeling I am going to go back in there and touch all that brown up since I need to do a pass of black over everything again towards the end to clean up the stripes, gold work, and base rims. Not sure what to do with the boot laces, but might just do them in a brown color too while I am at it. These guys don’t need too much special love and attention, but we will see how they turn out.Blitz-Ra’s and Wights are some of my favorites to paint. The Wights are going to have a lot of gilded gold on their batwing motifs and along their belts and such. The gloves on the right hand I finally got around to painting and did washes over all the bones and cloth and skulls. The fur cloaks are a work in progress on the blitz-ras, but that will be taken care of alongside the tomb guardians since they have a ton of that. Should just be some dry brushing and they will be in good shape.Delicious Throw-Ra’s posing pretty! I touched up some black leather belt elements I forgot about and did the silver as well on the buckles. The brown cloth was done up with a little TLC and it looking pretty good. I will touch them up with gold and they will be in good shape.The mummies are making great progress and the belts, cloth, and dangling bone necklace look great. I will need to touch up the bones with a brighter white and ultimately want to paint the exposed flesh a neon green fading to whiteish that goes well with the tesseract. I still need to add that slightly darker element to the bandages, but for some reason I don’t seem to want to do it. Looking at the picture here though, they need it.My Tomb Guardians.
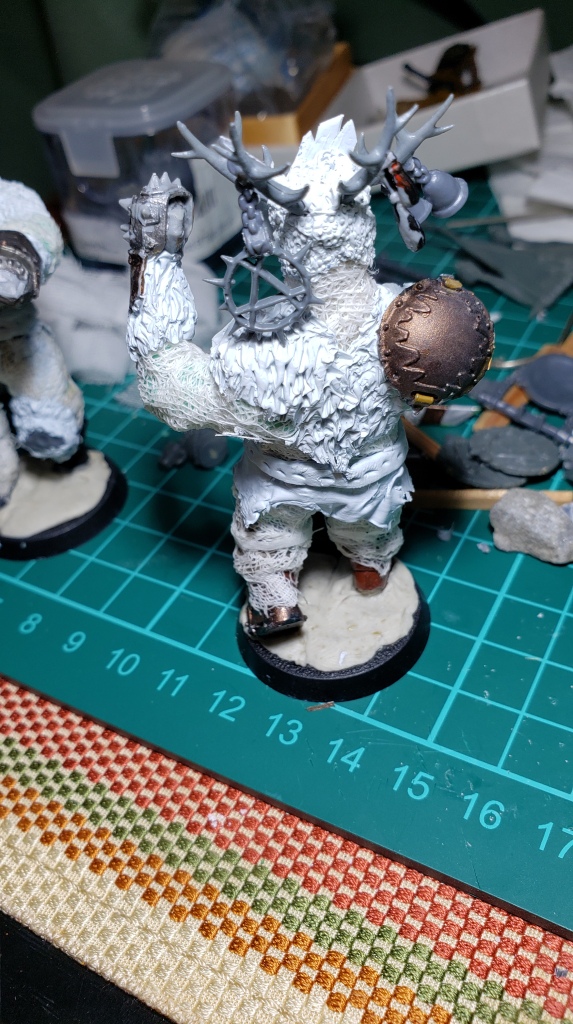
After putting some TLC into the fur and the leather and skull and wood parts, they are coming along, but I keep avoiding doing anything to the body wrappings on them. I am going to get to work on all the metallic parts and paint the gold stripes and see if something doesn’t come to mind. If not, I will just end up doing another dry brush of white on them I think. Maybe hope that the darker purple color will be enough to give them a more interesting and imposing look.
The next time I bother to take pictures of these guys the team should be pretty much done. For the sake of appealing to my brain, I will write a 7th article covering the final bits of the team, the bases, and painting up some of the staff models which I haven’t really been putting too much effort into since I am kind of saving them for the end. Like saving a hero to paint after doing a batch of infantry.
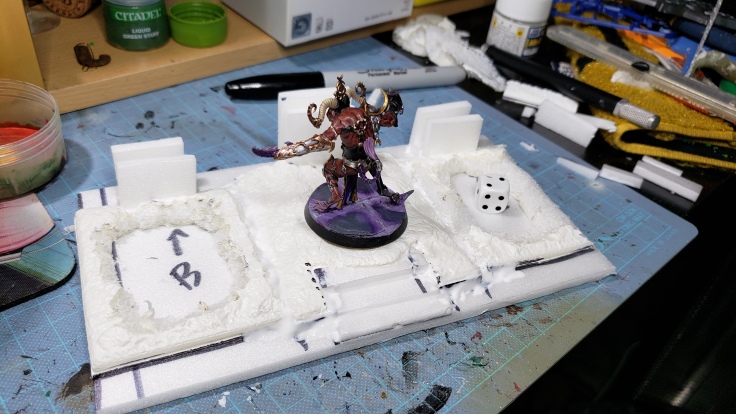
Final Stretch
Flock dried and nice.
First I glued down flock on the bases here and there.
Flocking em up!
I have a muddy base, and wanted patches of grass here and there with puddles as well. I glue on the flock, let it dry completely, and then soak the flock completely in glue water to seal it totally.
Flock soaked with glue water completely and allowed to dry for a day.Lines drawn
I drew lines along the grassy and muddy areas and they are pretty much done.
Work Complete
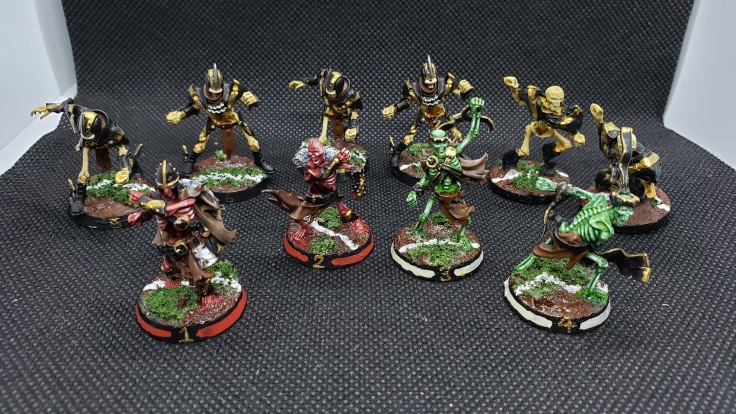
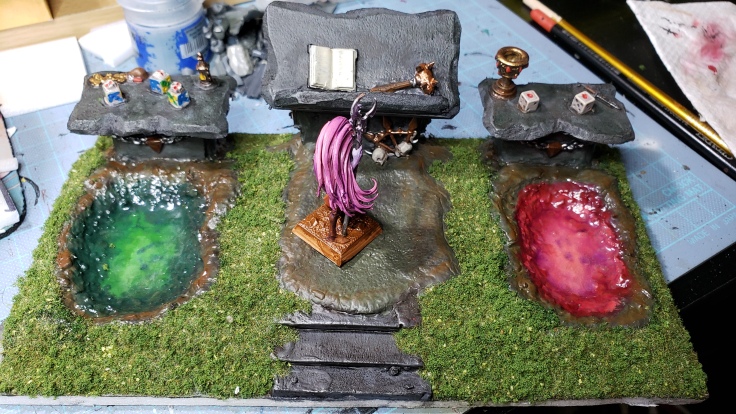
Take a look at the finished product. I snapped a few team pictures of the gangs together! First up, the Shambling Undead team (Name TBD)
Front shot of the positionals!
The Two wights, four ghouls, and two mummies that make up the shambling undead team in all their glory. I love the color variations and the lines on the bases to indicate their positionals. THe black and gold tie them together nicely enough and it still feels like a nice team. The glow even looks half decent.
From the back!
Shambling team ended up looking pretty good if I do say so myself. From the back they turned out pretty nice as well. Seeing them all lined up like a family feels good.
The line creatures. Skeletons and Zombies.
You’ve seen the zombies before from the Necromantic Horror team, but seeing them alongside their Skeleton brothers is nice too.
Moving on, the Khemri Tomb Kings team! Name TBD, but they are done!
The whole family! Only 14 models… Is it enough?
Only having 14 models does worry me to an extent, and I kind of want some more skeletons, but I can always use some zombies if the need arises. THe number work out so that can be the case too. I think the khemri positionals turned out the best. Those blitzers and throwers really have some good flavor. I am also glad I completed the tomb guardians, but I think they need something that I can’t quite put my finger on. Maybe some kind of cloth top or connecting piece between the pelt bits hanging on the shoulders. Something to add a bit more bling and to break up that huge swath of cloth. The purple glowy bits look decent, but I think there is a lot of room for improvement. Regardless, the job got done and they are playable. Not to mention one of the hugest most in depth kitbash/conversions I have done in my career as a modeler. A true accomplishment.
Closer look at the bone buddies
One last close up of the positionals and the skeletons. I seriously adore these blitzers and throwers. And the line skellies aren’t bad either. One of them has a spine issue (all the way on the left, #5.) and I know that his back is going to break big time sooner rather than later. Then I will need to pin it back in place. Thankfully skeleton #5 is literally the first one I will be using after positionals 1~4. Hah.
Wrapping up! (Mummy Joke.)
So this article took forever and a day to get up. I had a very very busy time between now and the beginning of writing this. Already Halfway through April currently. The latter half of this article got kind of tiresome and doing the project as well has been wearing on me. I think this is my limit for the time being on concentrating on such a big project. It’s been too long and the multi-team idea really takes a toll. There were nights where I’d look at the models, have my paints and stuff all out good to go and just watch youtube or stare at them wondering what I wanted to do. That means they are good to go for the most part I’d say.
I didn’t show it, but I put some water effects on the bases for mud and water logged grass, and also did the yellow/red bits on the underside of the bases to show prone/stunned more clearly. And I found a box to use for them and rigged it for magnetization and glued magnets on the bottom of all the bases as well. I will snap a shot later on.
I will do ONE more article and then that will be it. I like doing things in 7’s, and I still have some of the staff models and other odds and ends to get into while I still have the painting engines warmed up and ready. There is going to be a complete 180 for my two next projects. Making a pitch for a friend and then need to begin casting models for an event on the not too distant horizon. That will be good fun. Don’t know if I will show the casting bits since it might be in poor taste, but who knows. The pitch I already have a whole entire write up for my halfling pitch, but I think I will end up rewriting the whole article with the new pitch. If I do at all.
The Lethal Lemons. This is a concept that has multiple meanings and appeared across more than one of my online spheres of babbling space. First off, the ‘Lethal Lemon Division’ is one of the divisions in the blood bowl league that I am the commissioner for. I even made a logo for it. A few logos actually. I just like to have a simple illustration to represent things and can churn out a reasonable product in a short time because drawing is also a hobby of mine although I don’t showcase it much on this blog.
The literal ‘Lethal Lemon’ representative of the Lethal Lemon Division, AKA the LLD
The TOLL Logo A lemon. Can you spot the strawberry reference?
Prefectural Brand Item after which I name the league. The ‘Kanto/Tochigi Lemon’ Milk drink. It’s pretty good.
The (Sour) Spark
So in my infinite desire to spread the plague that is blood bowl across the planet, preferably near where I am, I made another website trying to share about what blood bowl was in general and be a hub for folks to try and find fellow blood bowl players in the nearby area.
During the process of writing the ‘What is blood bowl’ section of the site I was describing vaguely how to make a roster and decided that I needed an example roster and didn’t feel like stealing one off the internet. Decided to make a human team since it was one of the two team examples I put up and I loathe all greenskins so orcs were out. Just hate them and think they are unfair and dumb. (Yeah I play elves so I would think that wouldn’t I?) Anyway, all teams are valid but I have preferences is all and I do have some human models I was planning on making into a team in the near future…. more on that later.
Here is the roster I came up with:
The Lethal Lemons Human Blood Bowl team. 1 Million GP Budget.
Nothing fancy, 3 rerolls, 4 blitzers, two catchers, a thrower and a single player on the bench. Can’t ask for more than that for a million GP. Frankly I think it’s a steal since if these were elves I’d be down a reroll, have no bench and one of those catchers would be a lineman. Ayyy. Anyway.
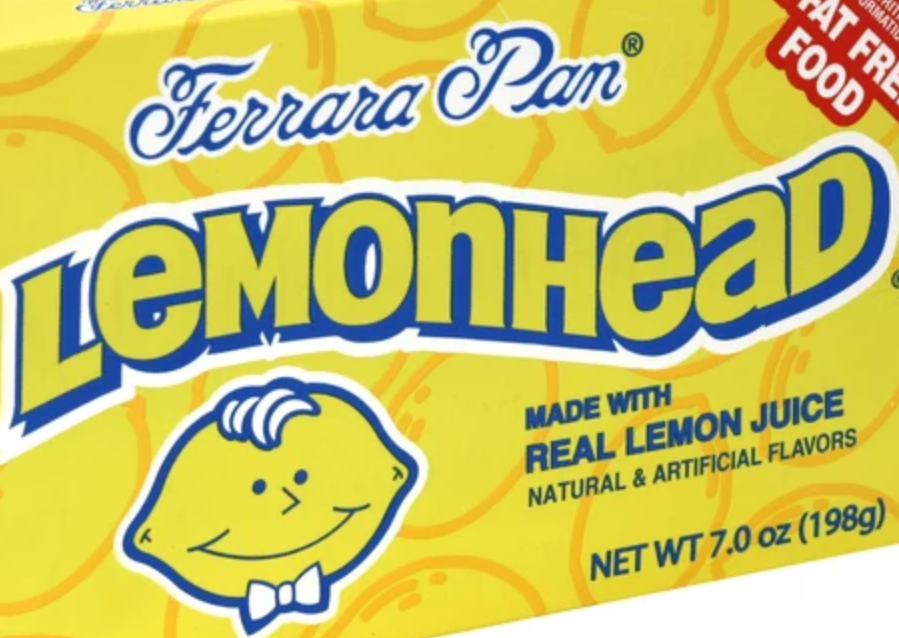
Needed a simple name and recently split the league into divisions so just decided to call them the Lethal Lemons. Went with simple Pun names, giving a little more oomph to my positionals although I kind of like them all. Then I drew the little logo dude. Gives me slight fallout-style vault boy meets a box of lemonheads vibes and I like it.
Lemonheads. I adore these and all their cousin candies as well.
Vault Boy. So gosh derned affable.
Besides the fact that I might have to obtain a small surplus of lemonheads off the internet after doing that websearch and my mouth watering uncontrollably, I think you can see the what I am saying. Instead of a yellow blue vibe though, I am going for a yellow green to be more similar to the Tochigi Lemon and also because I prefer that color combo personally.
Juicy Details & Further Inspirado
So there is already a human team in our league and they are orange. I love the look of the bright colored teams in blood bowl and I can’t help but paint all my dark and grim, not counting my dark elves which are orange and white of course, but that is another matter. I want a super bright team and I want them to look like modern football players. I love the idea that all these ruthless and war-torn nations filled with soldiers and monsters and various races of differing history and temperament all gather to play this glorious sport. I have teams that play up the ‘Literal Foot- long Wolverine-claws are just armor decorations’ angle with lots of semi-weapons, but I want a clean team. I want a team that (looks like it) is just there to play the sport and whose blocks aren’t just stabs in the gut covered in overtly deadly spikes ready to impale folks who bend down to pick up the ball nearby.
I have seen one or two human teams online by coaches who did simple mods like that and snipped blades and spikes to make them look more ‘normal’ and less fantastic. While I am in favor of spikes and pseudo weapon armor in spades, for some reason I just want this team to be different. Also, I saw this halfling team, The ‘Margarita Manglers’ by a hobbyist called ‘Campbell’ and kind of fell in love with the bright colors and simple designs. Take a look at their tumblr to see more cool stuff.
Gordon Ramsay in the Flamingo Hawaiian is luscious.
This guy’s tongue sticking out and that nice palm tree pattern is too good to deny.
The beautiful freehand and easygoing nature and theme of the team is just relaxing and refreshing to me. It is ok to put the grimdark down once and awhile, this is why we aren’t playing 40K. It’s blood bowl and we can have some fun with it without being scoffed at, and rather be complimented for doing such a theme.
This team will ultimately end up being kind of a posterboy for the league I will guess. When I start to do streaming more properly. I want to have a simple, relatable, easy team that people can follow along home with. Big dreams as always, but who knows it could (and shall!) happen. Gotta keep busy somehow. But that is for another day.
My previous project was a gigantic undertaking with tons of conversions, kitbashing, and sculpting pretty much making three undead teams from scratch. Needless to say it was an effort which kind of drained me! (Currently in the painting process of that project right now and the going is slow! But I am enjoying it very much! 2.24) So the next team project I want to undertake I want to be kind of vanilla, and what better than a human team. So while the build and prep for the team will be fairly simple, of course I want to add in some challenges and goals mostly for the painting aspect of the team.
Challenges and Goals for the Project
A human team, especially one with a more ‘simple look’ to them after clipping spikes off here and there and making the helmets more smooth is pretty much the ultimate blank canvas as far as blood bowl is concerned. So while my undead were an undertaking in conversions and modding, this will be an undertaking in painting. I don’t know how well my undead look painted because as I write this they are just barely basecoated. Regardless, here are the main goals I have for the project:
Paint them well so they can handle some close up camera shots. This means a few things. I want the colors to be smooth and creamy. I am going to have to take my time with them. (Which I usually don’t do since being impatient and striving to just get shit done because ‘progress’ is literally one of my main working tenets)
Did some research and there are a few green/yellow teams.
This yellow is a bit too ‘sour’, but I don’t mind it that much. Doesn’t form a perfect match to the Tochigi lemon, but might be a nice representation of the brighter highlights.
I do really like the squared off numbers though and that black outline. Might be stolen, might not be.
This team has almost the exact color scheme I am looking for. Helmet stripe TBD.
Similar Color Schemes (Click images for source)
There have been many many many human blood bowl teams painting and showed off online thanks to them being the pack in for the BB 2016 starter pack and being a popular team overall for many coaches new and old.
I really like this green with the dark to light fade. More packers colors, but it is inevitable to not bump into examples. They will help a lot though. The yellow on the bottom there is pretty good and doing the thigh pads the same as the cloth is doable. Only on the thrower’s and catchers though which will set them apart a bit too.
This green is closer to the colors of the kanto lemon package, but it’s too much green. Maybe do the leg armor in yellow, pants in white.Here is a full on yellow team with dark blue on the bottom. Even the armor plates being all
More heavy packers reference which I want to avoid. This also brings up a good question as I look over the models. Specifically the knee pads. Do I add a brown leather element or paint that bit green/yellow and maybe add a metallic element?Another nice yellow and green team. Interesting variation with the alternating greens and yellows on the armor and knee pads.
Further thoughts on color. What needs painting and what colors they should be.
Chest Armor will be green and the shirt underneath it will be…yellow maybe? I don’t like how the full green looked on the thrower in the above picture. Leg armor will most likely be yellow. Pants will most likely be yellow as well. Maybe if I do the shirt under the armor yellow, I can do the pants under the leg armor a more whitish color. I have a super bright white-yellow color which might do the trick. I will probably do them up completely in white and then do a little yellow at a time and some green on the chest and see if I want to change things up as I go. Shoes and Socks will probably be green I guess. Maybe white with a green and yellow stripe on them perhaps. Chance for some texture there. Gloves and wristbands I will have to do on a case by case basis. Probably green or yellow for gloves and white with yellow and/or gold stripes for the wrist bands. Helmets will probably be Yellow as well potentially with a green stripe. I will have a think about it. Still early early doors yet.
An overview of pretty much all the models on the team.
2. Add interesting texture that tells a story. This means I want primarily the jerseys (Green shirts under the armor) to have a super detailed and small kind of mesh look to them and look like proper mesh fabric as opposed to just green cotton t-shirt cloth. I have a stippling brush which might be up to the task. Go back and forth over the cloth with the base color and the ‘hole’ color until I find the right balance. Should be alright. I also want to have some dirt stains on the knees, sweat and blood on the hanging towels. I’d like the towels to look kind of fluffy and have some light grey texture to appear less like wet paper and more like actual cloth. Also adding vertical lines on the socks to give them more depth and add those nice colored horizontal stripes like old school 70’s/80’s tube socks in team colors.
3. The simple and subtle modifications. Despite this mostly being a painting-focused project, I think I will be doing a few key subtle spike/blade snips to make them less blood and more bowl. Also, the blitzer/lineman helmet regalia debacle has always been a nightmare for me to try and reconcile so I will be cutting the helmet head thing off of all the lineman so only positionals have them.
Blitzers typically have the larger head crest as well as larger armor plates I always thought. Dude in the back (Blitzer, I think.) has the larger head crest compared to the guy in the foreground.
But the guy in the foreground (Lineman, I think.) has a larger pauldron compared to the blitzer…
Wut.
Exactly. I will snip all the short head crests off and make them normal helmets so ONLY blitzers have the head crests.
GW may be suggesting red shoes and gloves mean ‘blitzer’, but I find the actual model to be the best way to differentiate positionals. It is a matter of courtesy to an extent to your fellow coach. An oversight.
4. Freehand Funtime & Decoration. That halfling team with the hawaiian shirts is one of the things that sparked the fire within me to do this and that combined with the mini lemonhead logo dude I drew up on the draft list set my heart ablaze. I will certainly be developing a logo and freehanding it all over the place. The human chest armor has plentiful broad smooth armor plates and big smooth pauldrons asking for some sort of logos, player numbers, maybe even brand logos or something.
If I don’t freehand it, I am considering maybe drawing something and printing then out at size on white paper then just gluing them on. I have done it countless times for other signage mostly for terrain, but if it was small enough it would look fine with a wash and have a really nice touch. Basically homemade transfers at that point.
Having mascot logos, a snazzy ‘LL’ logo here and there, numbers and color in appropriate amounts will really sell these guys as footballers more than off-duty warhammer fantasy warriors. Also this team will be getting the crisp and clean base treatment with absolutely impeccable lines. I experimented with trash on the pitch-bases before with some cheerleader models, but it was quick and dirty. The effect was still amazing and I think it will be fun to make some small bits of junk to add on the bases and break up the fact that this team is going to be super well painted and look good, by playing on a pitch that has refuse on it. It all goes back to telling that story and hopefully people will look at each mini and the base and the details and be able to picture this player moving and interacting on the pitch.
5. Immersion. AKA, background story. I also want to take some time and write up a fun story for the team as well. Maybe give them a little bit of history or give the players and coaches some background as well. Humans are kind of fragile so I don’t know how much to invest in them since they are mostly just dudes with gag names.
6. Ogre, Fling, & Coach. Almost forgot! The human roster can accept a fling and an ogre and I love a one turner. I play flings pretty often so love them. I have an ogre from the BB2020 Starter box still I think so that is legit. I will be getting another fling or two in a month or so, no rush, but that will be that as well. Kind of a bonus goal to #3 will be getting the ogre and fling less spikey and more football-y and match the team overall. I also want to make a coach so will need to rig something up out of the bits box to make that happen. Should be painless, but the coaches tend to be the basis for my team stories which is at least the case for the triple undead team. So that is that basically.
Said all I had to say you know what I’m saying?
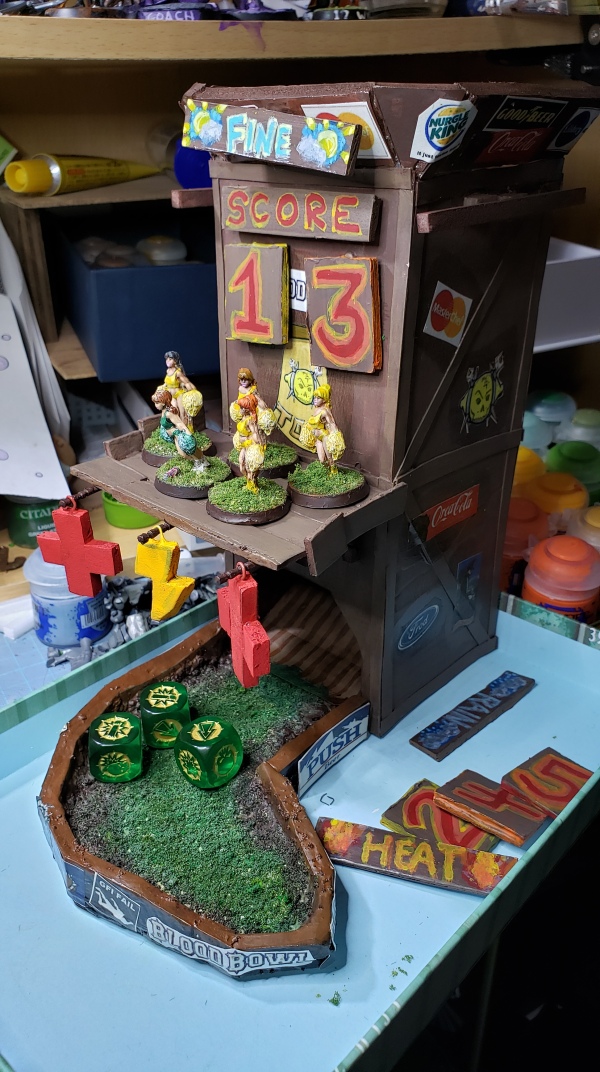
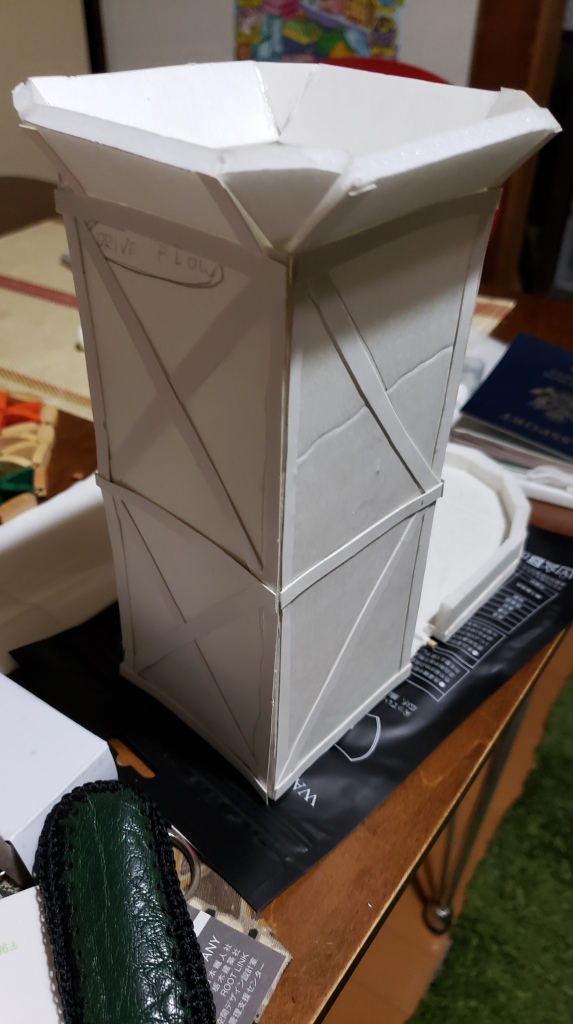
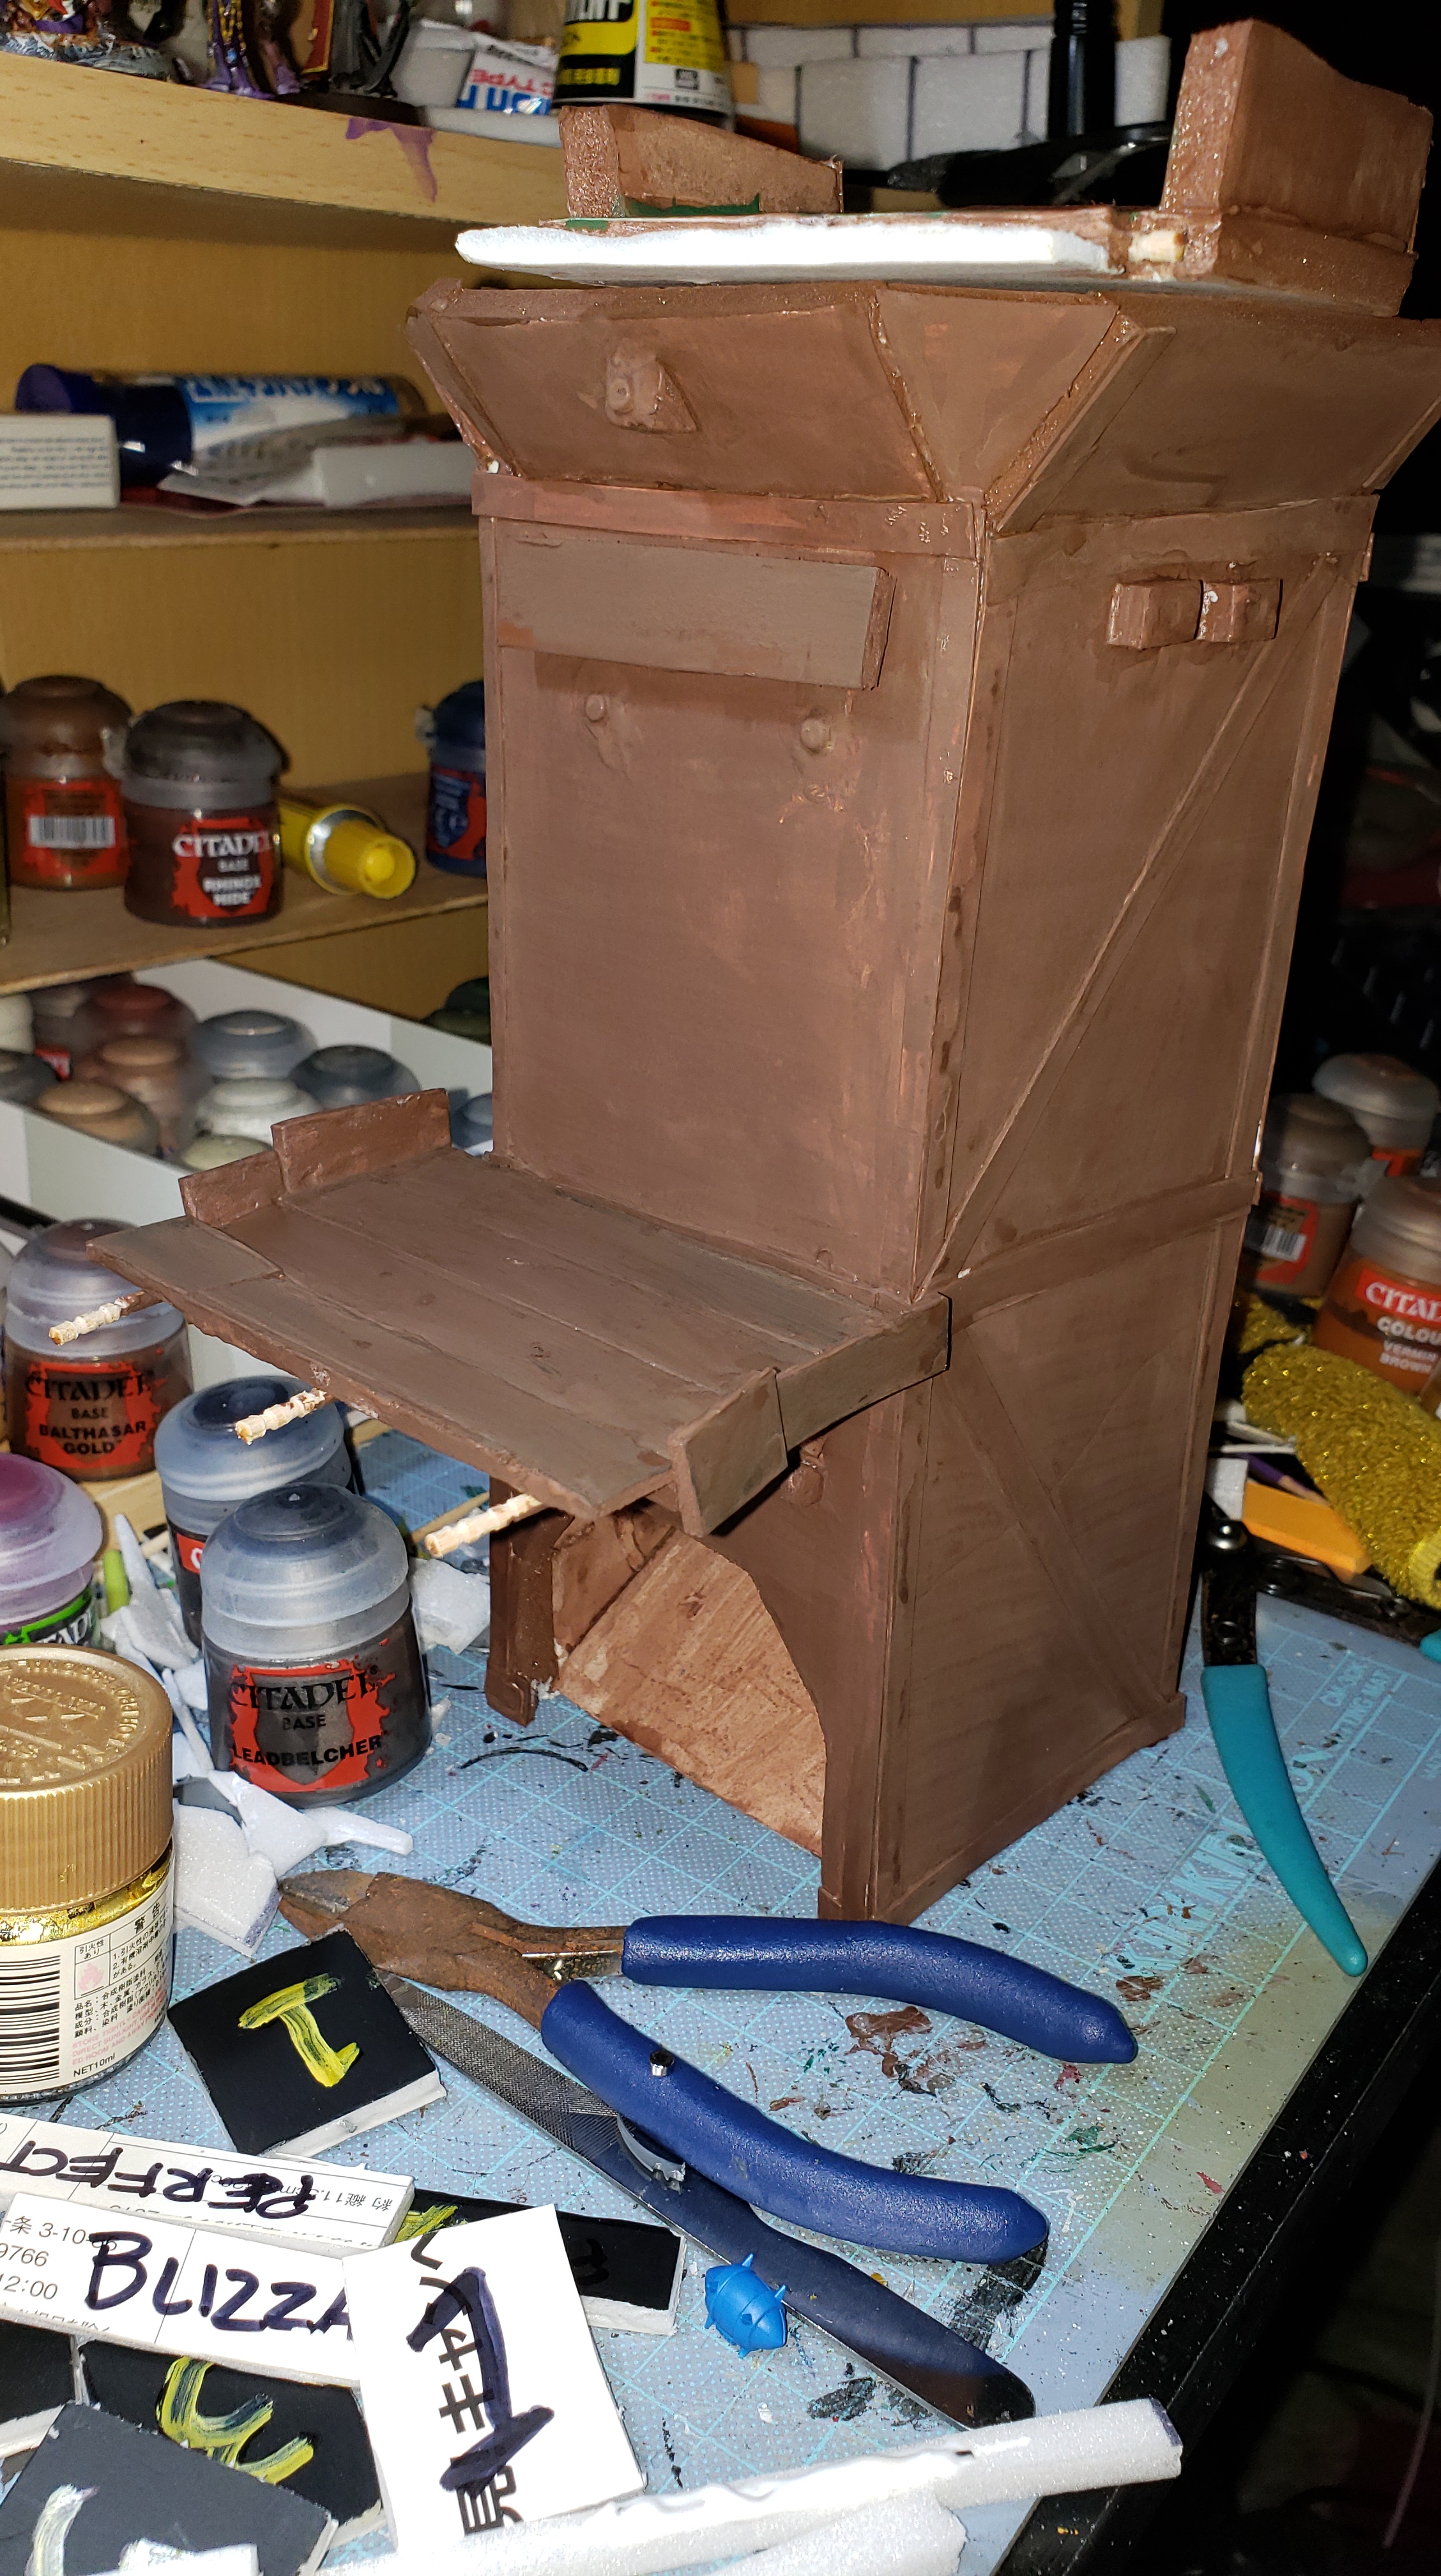
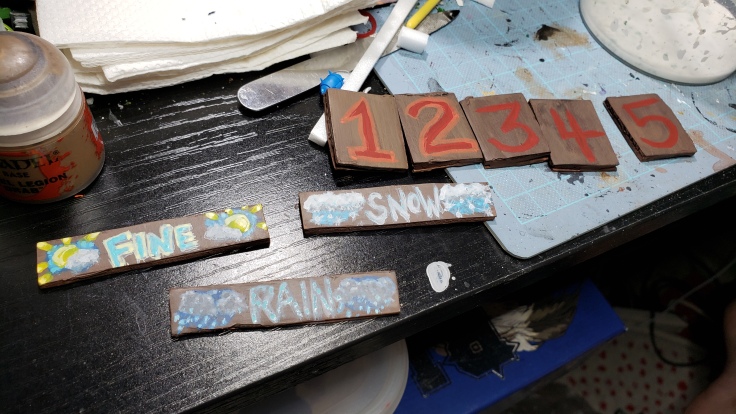
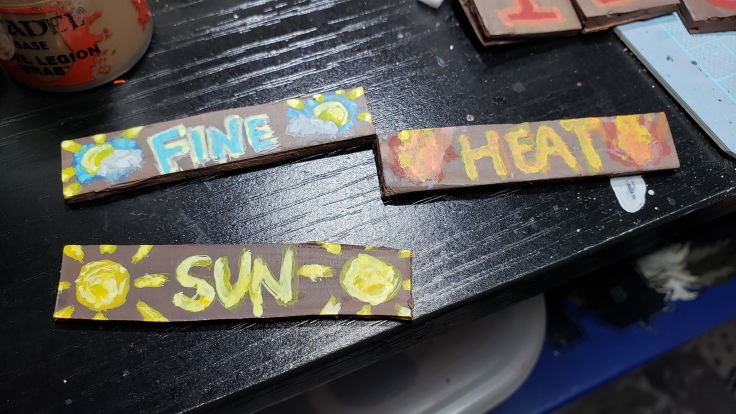
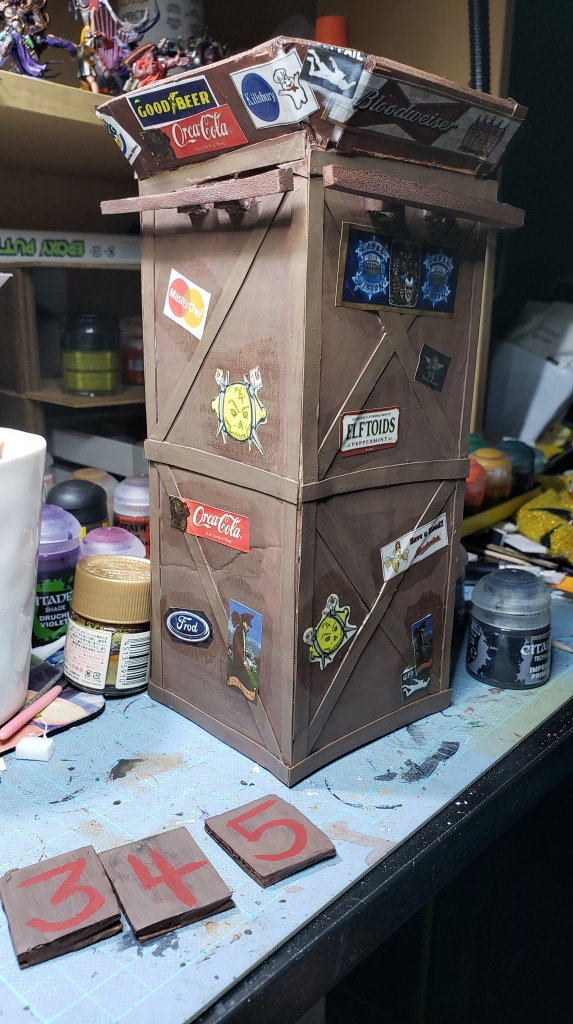
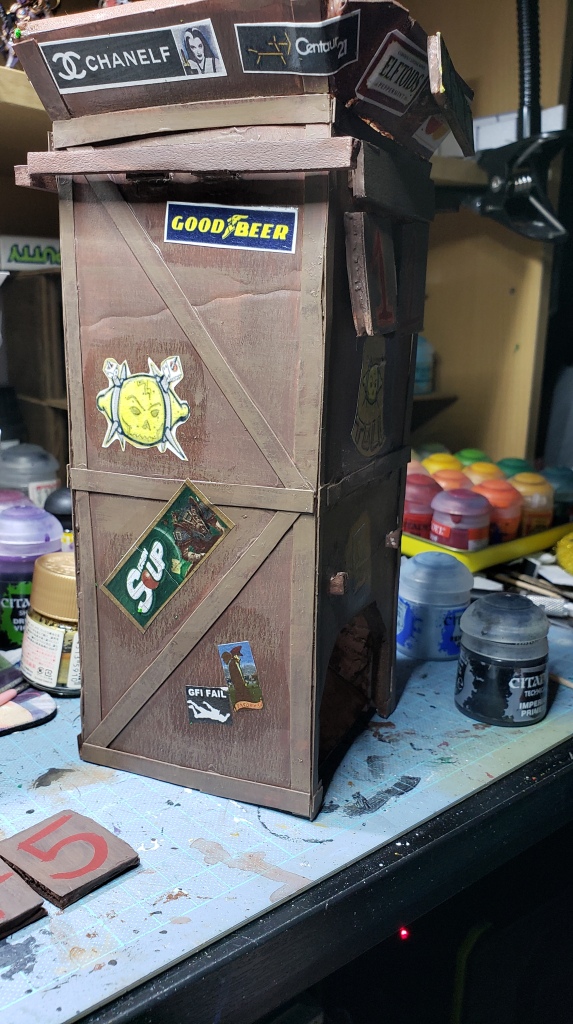
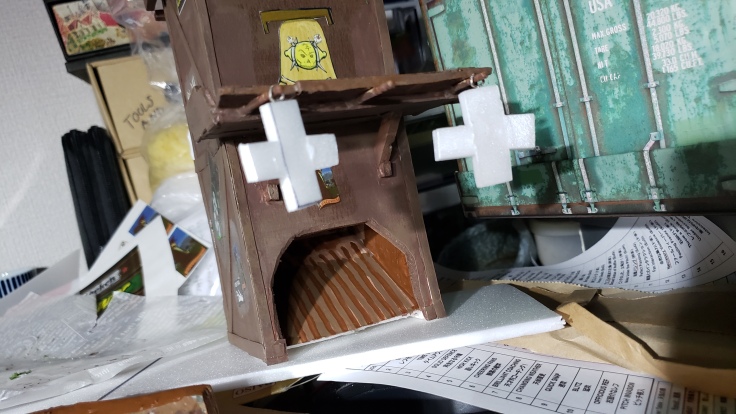
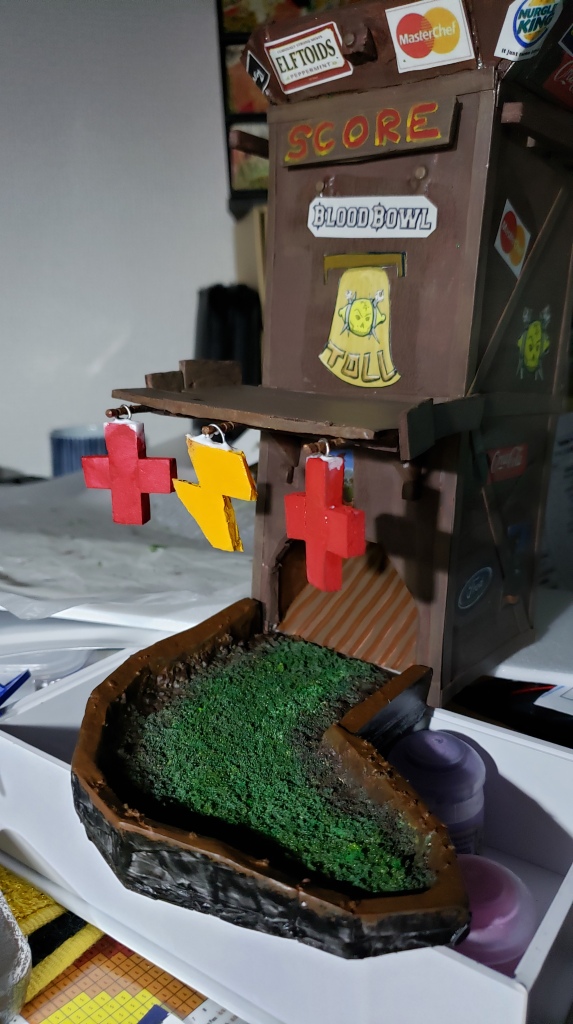
Yeah. That is the plan. And I will get riiiiiighhhht on that as soon as I am done painting another 30 undead blood bowlers haha. Going to get sick of painting after all this is said and done! I think after the human team is done (Or maybe before I start it, depends on how the world is spinning) I am going to put some time into another pitch (Sorry halfling pitch, I will never finish you… Maybe…) or start making some grandstands or vendors to set up during the blood bowl game. The great work will be the stadium and all that comes with it, but I am going to do mine in bite size pieces and spread it over a wide amount of time. Like the dice tower I made. That is actually a scoreboard / weather display piece which would function as kind of an official’s tower or announcer’s box in world. I think I will start to make some shops and bleachers and such which will have functions holding balls and other game elements like cheerleaders, tokens, and refs and what not.
Who knows. Still working on the undead team. If I can get the necromantic done then it will be a triumph. Then the khemri and shambling will follow with little trouble. I still have about a full month until the start of the next season and they don’t even need to be done by then, although they are the team I want to play the most games with if I am being honest. That is what fumbbl is for though, right?
Looking forward to working on the human team in the future. Back to the undead grind and glow! Until next time, dear reader.
Finally! FINALLY! After 10,000 years I am finally free! It is time to conquer EARTH!
Wait, wrong diabolical scheme pronouncement. Let me try again.
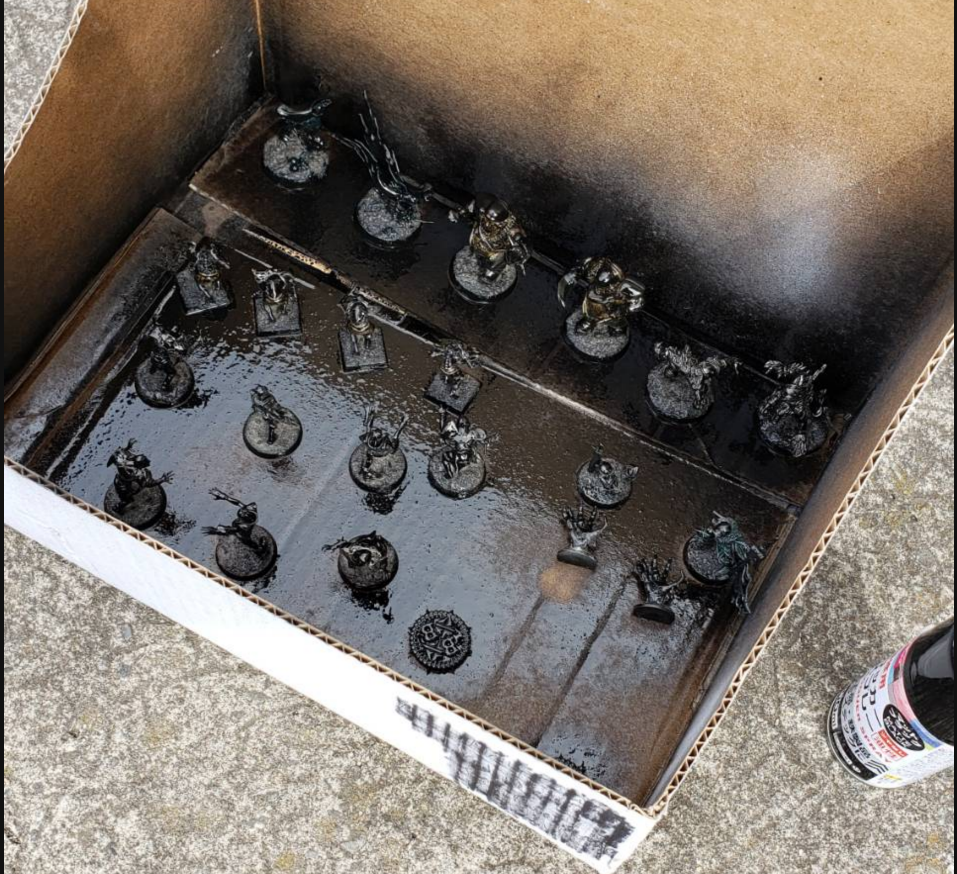
AFTER many long months! It is time to start painting my triple undead blood bowl team! YES! As the kitbash & conversion project finally reached its conclusion I was looking forward to finally spraying all these models and getting them ready for painting. I am reminded of making terrain for wargaming and that feeling of seeing all the random multicolored bits, glued and epoxied hastily together looking like a slapdash effort at best, then after finally spraying them seeing the unification of that effort.
Spraying using my ultra high quality undercoat spray paint (Dollar store) & high-tech spray booth. (Cardboard box)
I started off spraying just the bits I needed for the necromantic team, but ultimately ended up spraying them all since its cold as the dickens right now in my realms and being outside for the like 4 or 5 spray sessions per wave of models is harrowing despite the short bursts it requires. I am not a pro painter by any means so cold, wind, etc. doesn’t prevent me from spraying and I haven’t seen a huge difference. Hot, wet moisture is the biggest issues i’ve seen so far and now that isn’t the case so the spraying went well enough.
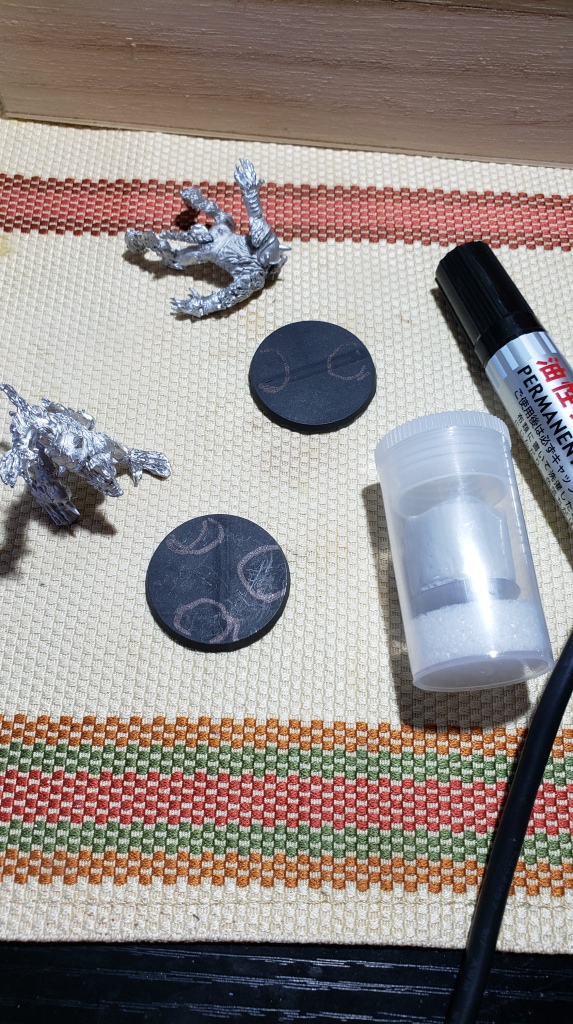
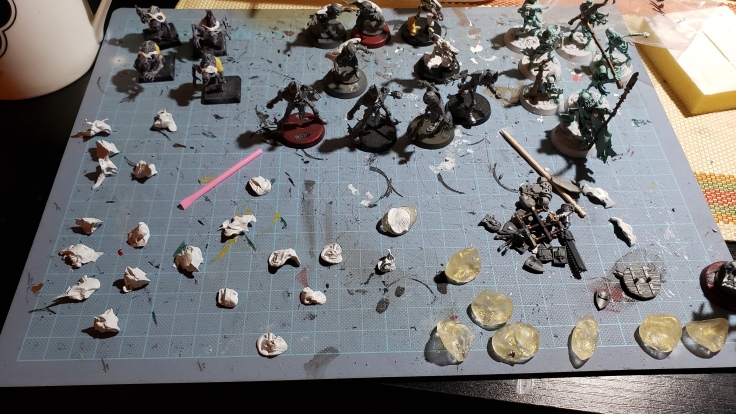
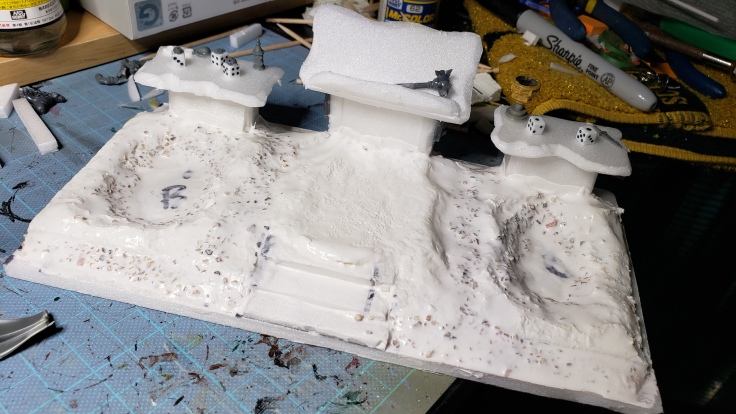
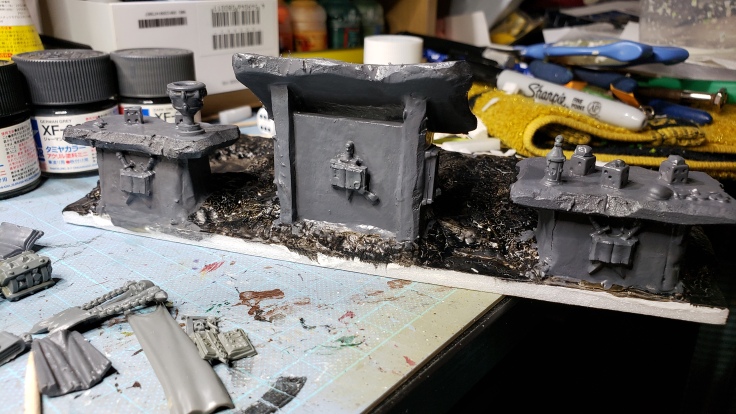
Browning the Bases
It’s been a while since i’ve done a painting project like this and the variety of models is pretty big so I just wanted to get something going and decided that I was just going to do all the bases up first. There are more than a few models that have tight spots to pass a brush through and I don’t want to get done a model only to crap it up with some base painting when I will most likely end up just putting flock and grass on it later. Also, since they are meant to be on gross muddy ground, a little brown ‘undercoating’ at this stage around the feet and hands near the ground will only give a nice dirty look later.
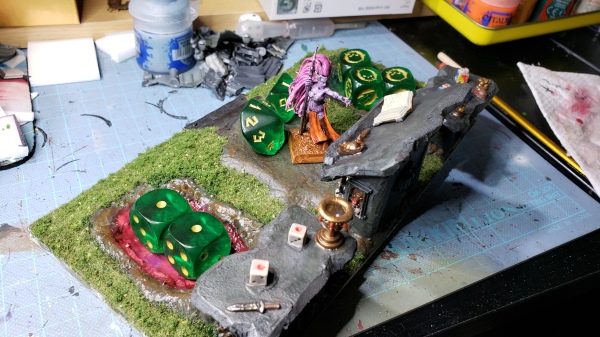
First muddy base (Wet Left, dry Right) Rhinox Hide I think.Drybrushed with a lighter brown (Snakebite leather)Finally dry brushed with reddish brown (Dark Flesh) on the left. Bunch of finished reddish bases on the left.
Overall the bases turned out alright. I told the Magicianess that I spent an hour painting mud and she laughed at me. Haha. I laughed too. What a life we hobbyists lead. She later complimented my mud claiming it looked very much like mud. I then told her it was ONLY THE BEGINNING OF LOOKING LIKE MUD. YOU WILL ALL SEE! Anyway.
The Goal & the Vision.
This brings me to the real issue. The goal with the whole painting project. So I managed to devise a team name and story for my necromantic horror team, the Glowbone Gang. Well, ultimately these three teams are steps in the story of the coach who has come a long way to raise himself and his players from the grave. Just a tidbit of what’s written at the above link, but the coach was once a thrall on my vampire team in their first season of league play, but was the first player killed in the entire league by a khemri tomb king skeleton. I wrote a story there how the undead magic bound him and this and that and clearly I have a bit too much time on my hands but I digress!
When this coach raises zombies and brings undead and fell creatures of darkness into his care, they all emanate a glow from their bones, their insides which shines inside of them. SO I want a team of glowy dudes on the pitch, each different colors to show positionals easily and overall just have a cool (hopefully easily paintable) theme that looks good. I am not going for super detailed paint jobs, I want interesting and clear colors. As discussed in the previous article I am going for a black with gold trim color scheme for most of the armor and uniform bits, but otherwise the ‘flesh’ of the bodies will be colorful and glowing. In the first article, and when the team was growing from a concept to a concrete thing I took these notes:
The original ‘plan’ with some light painting notes.
Erd
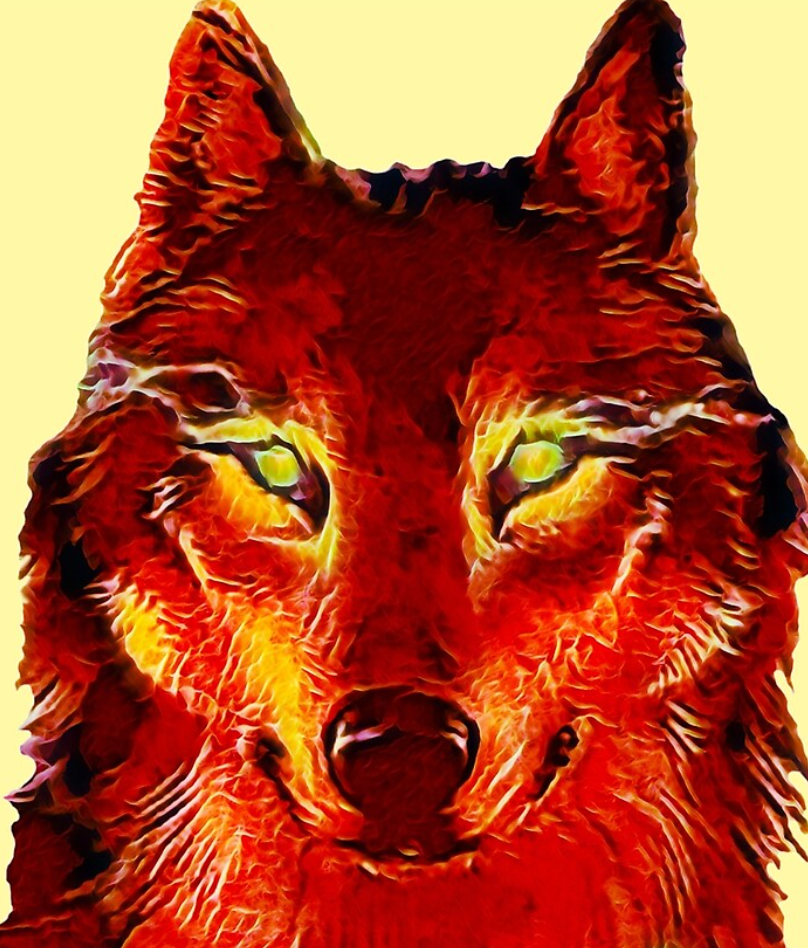
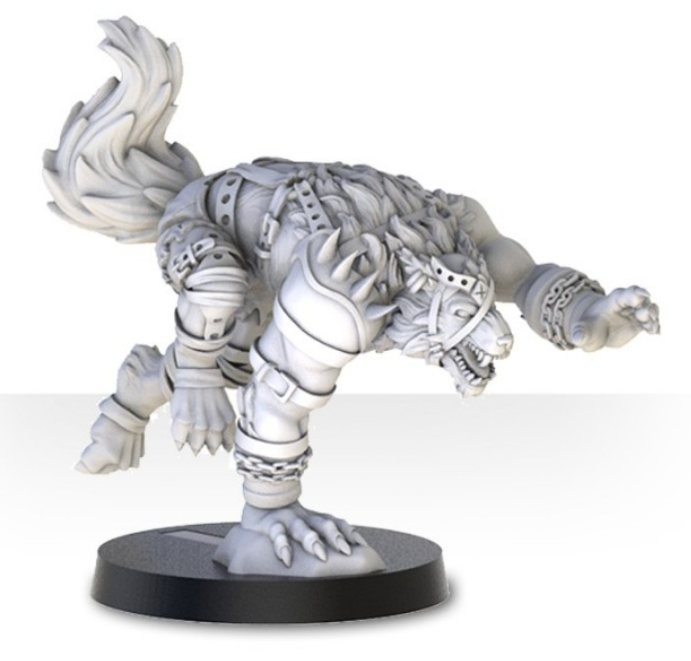
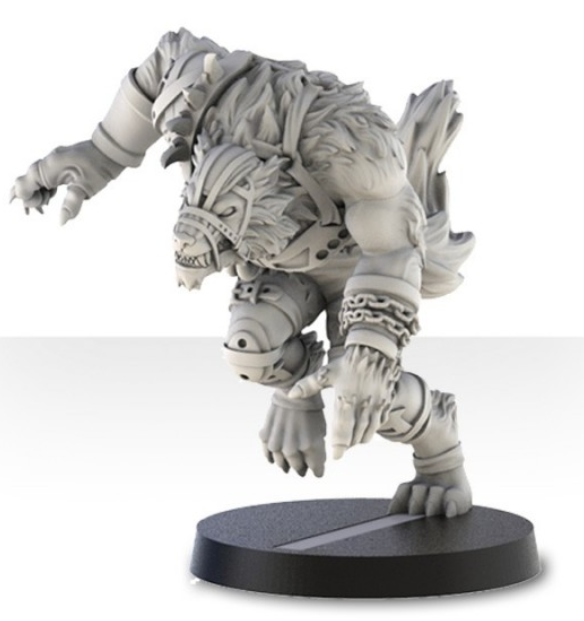
Basically my aggressive players (Werewolves, Wights, Blitz-Ras) were going to have a red glow to them, either in their eyes or their whole bodies as with the skeletons. I think the skeletons with reds and oranges will be fairly painless and doable enough, but the wolves are a concern. I want them to still look like wolves, but want that flaming glowing look from their eyes, mouth, potentially claws and paws as well.
Although a fully red wolf and an orange wolf might look cool, I don’t know. I’m not sold on it completely and might go a bit more subtle. Paint one black and one white or grey with white or something and then do their eyes up glowing.
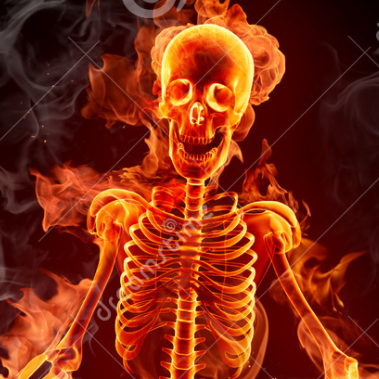
Glowing red eyes with a little OSL might be enough to sell the glowbone gang factor I am hoping as opposed to getting myself embroiled in painting a literal magma wolf. If this was the khorne team and I was painting those neat khorngors all fiery that might be something. (There I go thinking again… Future issue future issue! FORGET (for) NOW!) That should be alright. I will think about what color to do my wolves up, but a pitch black one and a grey and white one sound good at a glance. Solid plan.
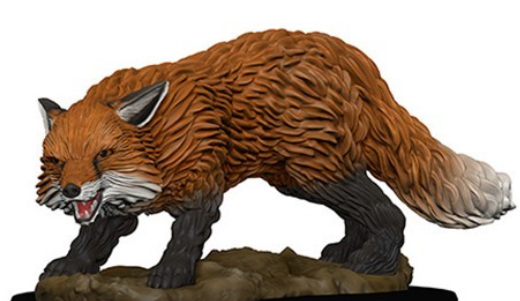
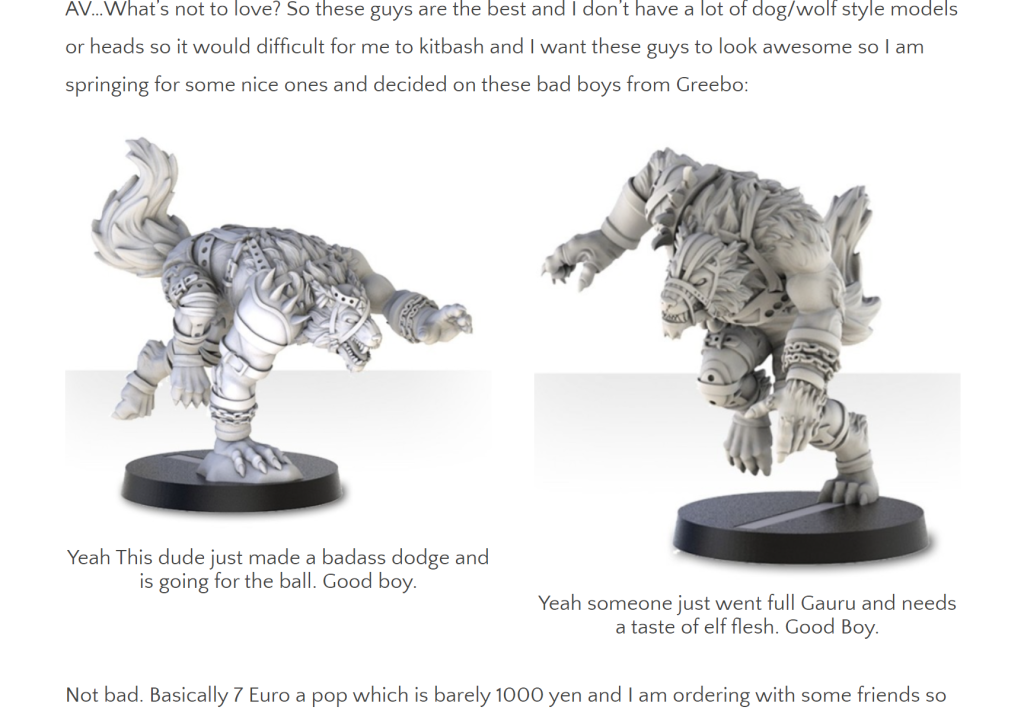
Wolf (& Fox) Related Aside (Added 2.22.22)
Damnit. I was doing some of the writing for the progress on the initial base colors when the bright idea struck me to turn one of my werewolves into a were fox. I have a great love of foxes and this werewolf model is a rare opportunity (and a completely simple and slight alteration compared to everything I did with the tomb guardians and flesh golems. And those damn shoulder pads. Damnit.) I like the werewolves I got and they don’t look bad at all, but for some reason I saw raw pewter and just…wanted to do something to it. Too pristine, too clean, too…unsullied by these magician’s fingers.
The wolves in question. They conveniently go on sale after I buy them of course haha. Still got an awesome deal on them.
I am thinking that top right wolf (the brown one) will actually make for a pretty good target for some simple sculpting and foxification. The leaning down wolf on the left is in a pretty feral position already and seems more wolfy to me being so aggressively posed. I will do up the ears to be a bit more large and pointy, and also bring out the cheek fur a bit more too to get that fluffy look. The biggest bit will be the tail which I am going to fluff up real nice and maybe give a little swoop to. Ultimately it will be paint that separates these and denotes the fox as a fox more than anything. But the putty additions will help sell it and also satiate my (apparent) need to personally affect every model in the team save a few zombies.
I looked at more than a few tutorials for painting black fur, but this single image feels like all I need honestly.
Buddies.
Kind of wonky model, but nice crisp colors.
(3.3 update: I didn’t bother with any additional modifications on my werefox, but it still looks good.)
Bleh
For blue, I am planning on doing up my ghouls with blueish grey skin and have that phosphorescent glowing whitish blue coming from their eyes and mouth like the wolves. Maybe the bits where their bones near the flesh I can get some light glow going on there too to show how thin and papery their skin is. I am debating if I should do my Throw-Ra’s in blue or green as well, but we shall see.
Gurn
For Green I plan on doing the Throw-Ras, Wraiths, and maybe the flesh golems as well. I got some tesseract glow and plan on putting it to some work if I can since there are some really nice paint jobs which take advantage of it. I am also thinking of doing a lot of the staff like my coaches and such with the green as well. Maybe do some darker green here and there, then the tesseract, and then highlight with whites and maybe yellows. We shall see. Got a lot of practice to do yet. Also looking over the colors I am doing for everyone, my shambling mummies may also be green too. I will be trying to get some light peeking out through the helmet visor and maybe here and there along the seams of the wrappings as well.
Poiple
So, I want my zombies to be kind of a more muted color so a glowing purple would be best. Everyone will be glowing so it’s going to be a party on the pitch, but the purples and maybe pinkish action should be a bit more low key than the reds and greens I am guessing. Although the skeleton down there with those synthwave purples and pinks looks excellent. The foot on the ground and glow from the eyes and mouth is awesome. I want to replicate that. Zombies have strange spots where their insides become their outsides and that is a perfect to show their inner light bubbling out. I want to do some purple and green mixed on the flesh golems actually since they are meant to be multiple people sewn up frankenstein’s monster style, and I think having two colors mixed up around in there would be interesting to represent that. Also, most folks consider flesh golems to be glorified zombies on the pitch anyway so ayyyy. Also, since the tomb guardians and zombies won’t be on the same team, painting them up purples and pinks may also be part of the plan too. We shall see. I will most likely save them towards the end.
Yeller
Yellow. I want pretty much all the other line skeletons to be a glowing yellow. I figured it was close-ish to regular bone and also allows me to say that is the one part of the (Khemri Tomb King Egyptian Flavored) desert that the skeletons bring with them to this night rave club scene that is my undead. They will mostly be painted similar to the other skeletons, just yellow.
Challenge Lies Ahead
So. Clearly I have an idea that I want to do a bunch of glowing undead and fell creatures of the night. I swiped and copy pasted a ton of interesting and inspiring images onto this blog and am thinking long and hard about how it is all going to happen. I have an idea of what colors I want for what positionals which is a good start. But there are a lot more to these models than just glowing. Plenty have fur, wood elements, leather, bone/teeth and other cloth and uniform bits, metallic armor, etc. To keep it simple and to give me time to wrap it around my mind and get to know the models, I think I will do all the armor in a dark grey/black first, but then again they are all sprayed black already.
So after finishing the bases for the most part, I need to start doing the inner bits first. I have become more of a ‘paint deep first’ kind of painter going for the guts of inner goodness on a model before doing trim and stuff on the outside. Painting skin then armor, and so on. I will use the term skin loosely since most of these guys are bone or ghastly ectoplasm and such. Let me think a second. If you can’t tell already I am basically planning the road map as I go with this article so I can hit the ground running if time presents itself to paint. I don’t have a lot of time so dilly dallying with a brush in my hand is time I could be using to put paint on a model.
Process Attempt #1
Step 1: Completely base coat innards a medium level brightness version of the ‘base’ glow color.
The base glow color being red for blitz-ras, green for throw-ras, etc. It doesn’t need to be pretty, but I will make it a medium version of the color it will glow. In the case of mummy wrappings and fur I will just do them the base coat color I want them to be. A darker tan/light brown for the wrappings, and a darkish grey or brighter grey working my way towards white with the wolves. Skeletons, ghosts, ghouls, zombie innards, etc will basically just all glow (inner light baby, inner light!) and start out that color.
Zombayyz
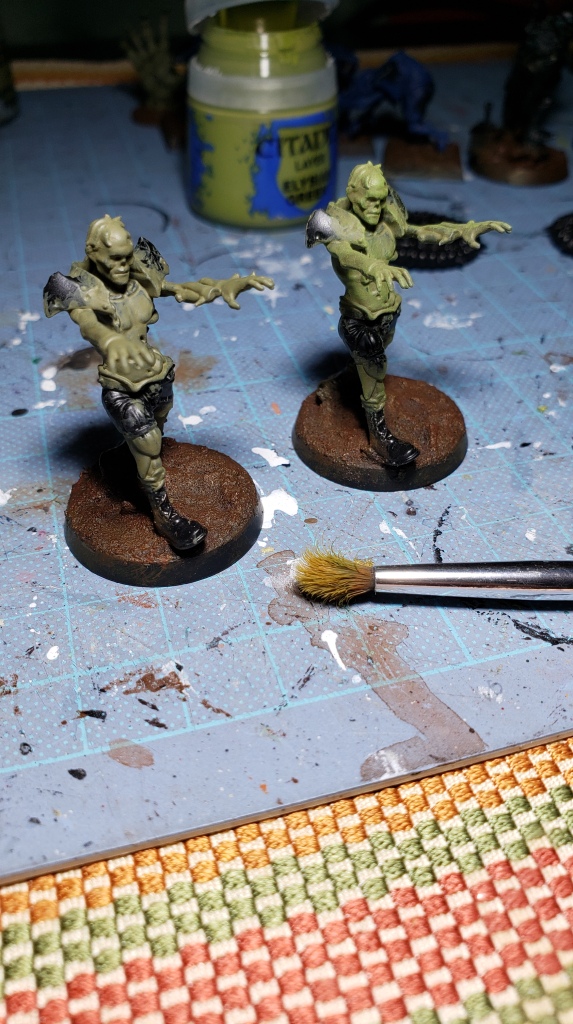
Here are some of my zombies I did a base coat on. They are still wet so don’t look that good actually. Why am I even posting this picture?
WORKS IN PROGRESS BABY.
So I ended up going with my gut and just painting the zombies regular boring zombie green color first, and then will do the glowy bits when I get my base coat down. The urge to soak them in blood for the blood god is strong.
I found it heartening and worrisome at the same time seeing the conga line of zombies slowly approaching me. This green (And the green I have planned for the highlight dry brush is too good.)
In general I think I am going to take my zombies as far as I can since they are literal fodder and I don’t mind making mistakes with them. Then I will post more updates with the positionals.
Flesh Golems
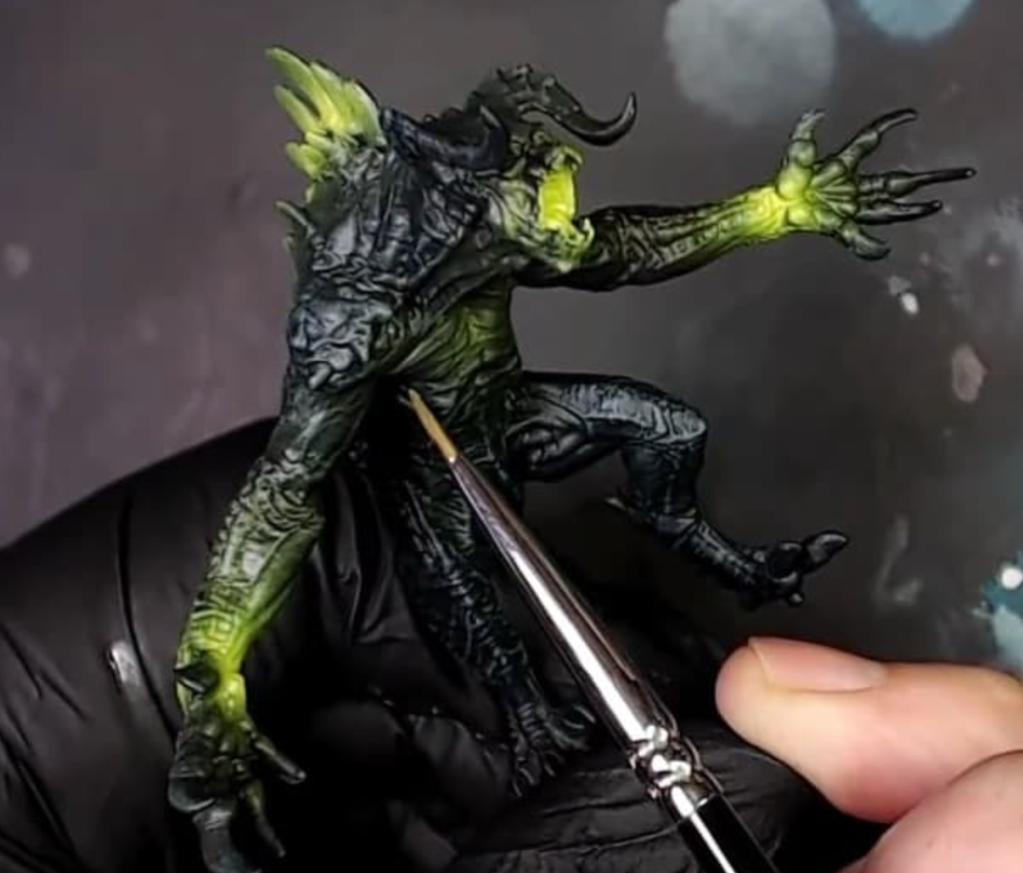
With zombie color already underway, I did up half the FGs with the same color and did purple for the other half. Thinking that doing more stitches would have been cool to add a third patch of color in there, but what can you do. The green/purple looks good and they have some nice opportunities for glowing with brighter purples and pinks. I am going to do glow along the seams like the light is bursting out of them.
Ghouls
Sunlight bringing out the best in them
The blue looks good on them. Nice and dark. There are a a few bone spots and obviously the eyes and mouth which I will glow up. Also, I am going to glow up spots on their spinal column and along elbows and knees, see if I can’t get a neat effect there since they are so thin you can see right through them basically.
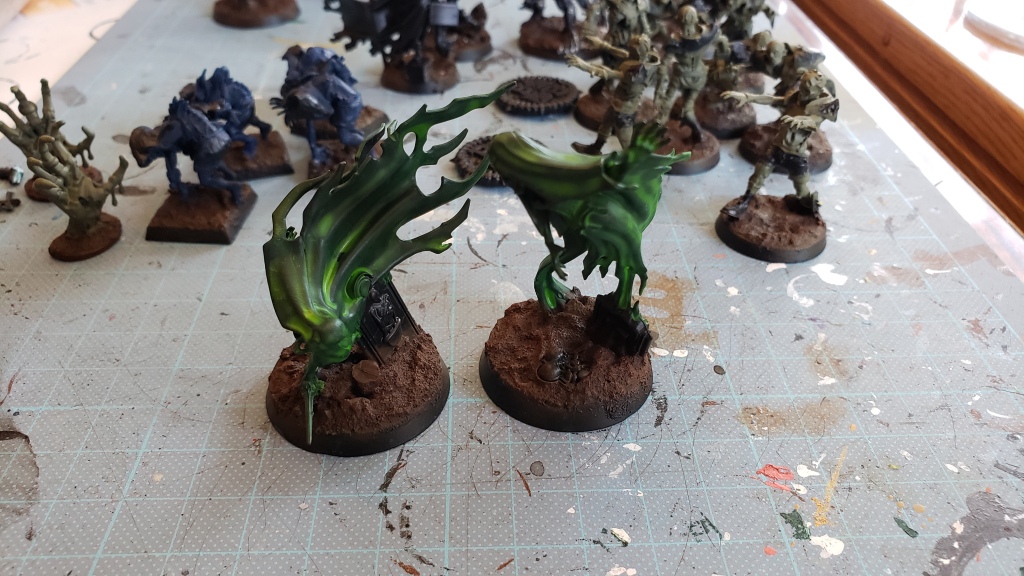
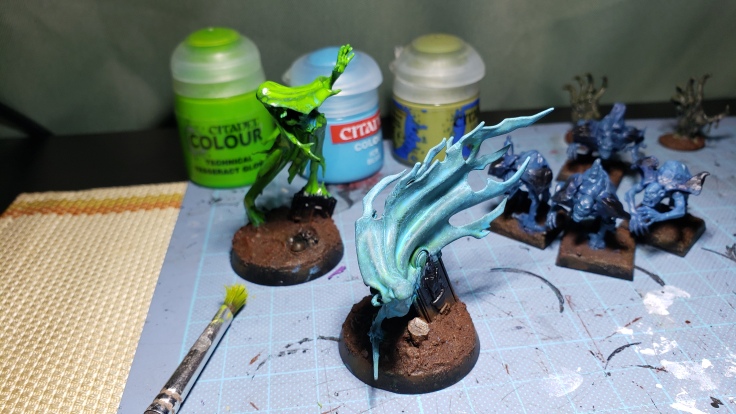
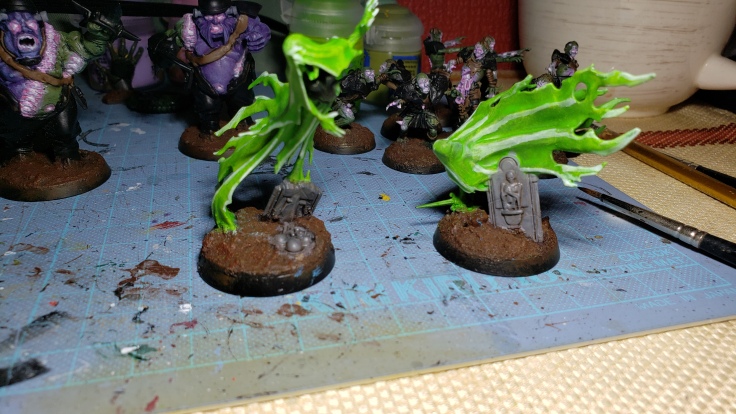
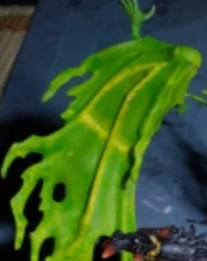
Wraiths
I actually ended up snipping off a bit of the fencing on one of them since it was going to be a nightmare to paint later. Tesseract Glow is awesome, but I need to put a proper base color under it in order to let it work its magic. I already like what I am seeing though. These girls will be the most glowy of all the players since they are spectral.
Even though the base coats are sloppy and messy, this is all according to plan. I like to paint in such a way that making mistakes doesn’t chip away at my mental reserves, time, or make me think I am wasting time and effort. Staying positive and enjoying the process is most vital. Doing that AND also getting a result I am proud of and happy to show of, that is the sweet spot I strive for, particularly on this project. But what of my werewolves? Well, to be honest the whole reason I fell in love with Necromantic was because of the werewolves and after a handful of games on fumbbl, I loved the wraiths too. So I want to make sure that they look really good. Most of that will be dealing with the fur and making that look good. I honestly love foxes and am debating doing one up in Orange. Now I am debating doing up his tail more fluffy and nice and making his arms and snout longer too. Gahhhh what am I thinking! The putty phase was already complete! Yikes. Now I have doubts and ideas and unused putty on hand on top of it all. *Runs off and googles* The tail… the orange color… gahhh.
Zombies with ‘inner glow’. Started with a bright purple and decided that all showing bones, entrails, and exposed places (Eyes, mouth, spots where skin has ripped open) would be the ‘sources’ for the light. I also did a light rim around those areas.Zombs on the left with a dark pink on the more inner bits, some purple remaining exposed. Part of me likes where it is going and part of me thinks it looks like absolute trash. Needless to say, I shall plow forward.
‘Inner light’ from the scars and the eyes/mouth. It all looks like bubblegum to me and I am hoping when I finally get to light pink and white it doesn’t.The ghouls on the other hand are looking pretty legit. Blue was a good choice and they are holding bones or have things protruding from them which was cool to use as light sources. They will have interesting play with the light and with more bright colors and white it should be looking good.
The dry brushing in step 3 is going to make or break it. The colors are very easily seperated and need to be softened on the edges and blend better. I will do some dry brushing back and forth between colors and hopefully soften it to look a bit more like actual glow as opposed to candy-flavored guts. OSL-esque painting is tricky. My only proper practice doing something like this was with a chaos chosen of Slaanesh team I painted a little while back. Here is my coach and my Minotaur:
I tried for OSL on the claws and on the ground near where the hooves touched the tiles and in between them like the ground beneath them was pulsing with purple power. I even tried a bit on the loin cloth draping down too. A bit too much white on this one, but my reasoning was that my Mino was drawing the energy towards themself so it was brighter where they were standing.
The tile glow on my coach/assistant coach model was a but more subdued and came out better than the mino base I think. I will take away from this the feeling that I don’t need a lot of super bright white and that keeping that minimal will be something to keep in mind. (2.25)
Step 2: Wash innards a darker watered down version of the color they will be.
With my base colors sorted, now I want shadows and a free road map. I often use shade and inks for shadow and shading of course, but also the spots where the ink doesn’t settle is basically where I am going to highlight and to a rookie painter like me that is convenient. Thankfully most of these models (except the ones I converted/kitbashed) are of a high quality and the ink should settle in a good spot leaving me with a fairly clear spot to highlight. Not to mention it will be a darker version of the color I want them to glow and represent the spots where the ‘light’ is its darkest. I know in my heart this isn’t ‘true’ OSL, but I just want a decent look, not a super awesome one. I mean I’d love a super awesome look, but I also need my blood bowl team ready in a month or two if I am to jump into this coming season with a chance of playing all my games.
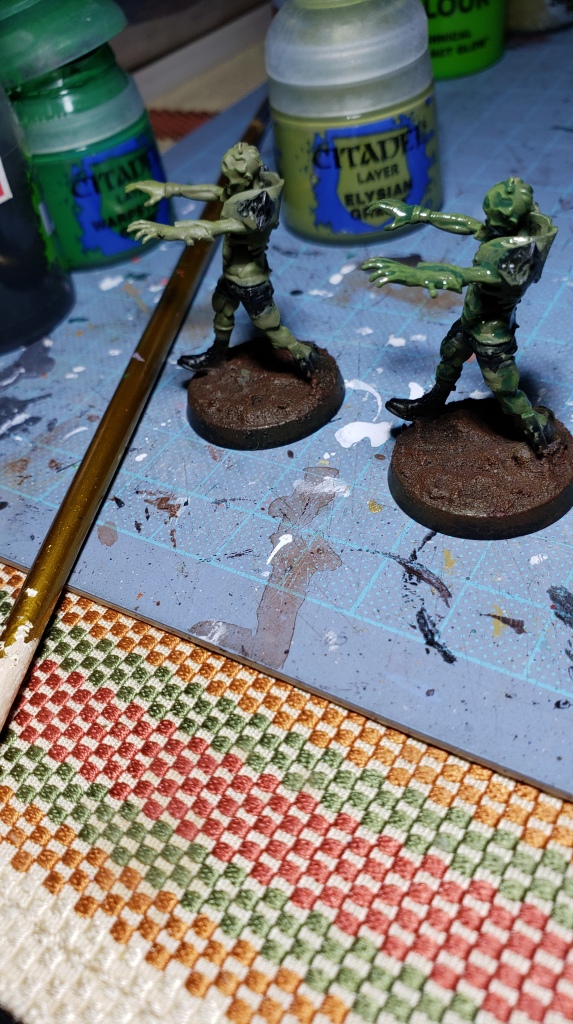
Dry brushed zombo on the right. *Cause this is thrillah~~*
So here with my zombies I actually ended up dry brushing them a lighter color once and then washing them. I will dry brush them again after the wash dries.
I don’t have a green wash so I mixed nuln oil and a little bit of warpstone glow and it worked out fine. I want my zombies more green than yellow so I will be very gentle with my following dry brush to preserve as much of that green as possible. (2.24)
washed zombo on the right *Thrillah nighttt~~~*
Zombies looked pretty good after the wash dried off. I quite like that dark green. Honestly, another drybrush and they would look alright I think. Of course I shall ruin that notion!
Black was too dark a base for my wraiths with one coat of tesseract, so I went over it with some ice blue (fore) and then further did another coat of tesseract (Back). The blue itself looked pretty decent and ghastly, perhaps I should keep one blue and one green? When I do some dry brush highlighting I am aiming they will be closer to a glowing green/white.
THe green zombie wash worked well on the green half, and a purple wash also looked great on the purple half. So far so good. THe coloration of the purple is very very strong so I will need to calm it down with some lightening as I get going.
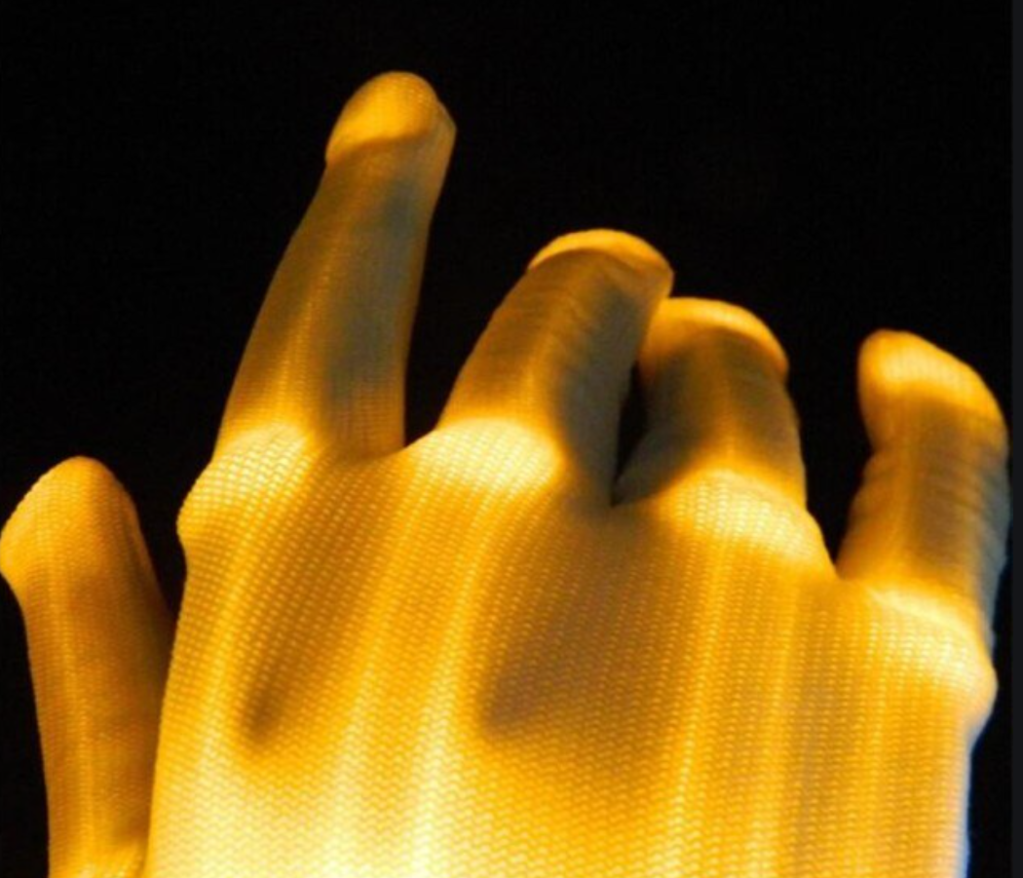
These cheap glow gloves sold on aliexpress or something I found online may be a huge basis for how I paint these guys, especially my bone buddies.
Funny what inspires you and what speaks to you. I have had a heck of a time finding models of people with glowing ‘BONES’ as opposed to the easy to find skeletons with glowing light within the eyes, etc. it must be a pain in the ass to do. Certainly this isn’t a sign of things to come.
Special Werewolf aside zone
Even with the werewolves and mummies/TGs (and to some extent zombies and flesh golems), though, I want to do their glow color as a dark inky wash at this stage. Even though I am focusing on the ‘openings’ with those models, knowing that they have some glowy goodness going on beneath the fur/skin will be interesting to get a glow effect I think. I will need to be a bit more subtle bringing it up to not ruin the wrappings/skin, but it’s worth a shot. If I don’t like it I can just dry brush away mistakes and things I don’t like. Also, potentially dry brushing some dark dark blue on the black armor/outfit at this stage might not be a bad call.
Initial werewolf painting has been going well! I like the color scheme so far and it looks pretty decent at this stage.
Step 2.5?: Do base colors for non-glow bits which are adjacent to glow bits.
Added this step after writing the one coming up next. I figure I might want to get some base colors down on other spots on the model before I do dry brushing all over the place so that some of the naturally occurring over brushing that will no doubt come from this brouhaha of dry brushing will come off as ‘OSL’ as they call it. Hah. But for real, after dry brushing like 40 models in a row I will probably be begging to use a brush for more careful painting purposes.
Glowing Zombie GutsGlowan’Agrax Earthshade Fashion show
Zombies are looking alright! I like the glow and the extra colors I added in here an there (brown for the cloth and leathers, hair, etc. Looks decent.
3.3:
Ghoulin’ Around
Ghoul initial glow and paintwork. They are looking pretty sharp.
Wraiths aglow
Wraith models are just too good and washing them repeatedly and drybrushing with a nice bright color works wonders.
Looks decent in the thumbnail!
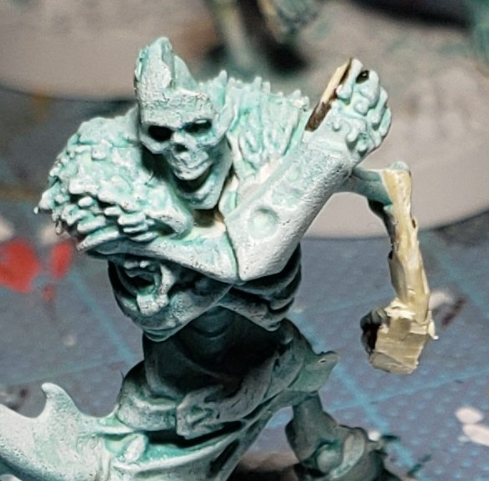
The Flesh Golems are a source of worry for me, but I am in that zone of ‘I looked at them for too long and I don’t know if I love them or hate them’ currently.
Step 3: Dry Brush medium level color again, then brighter. First Highlights.
With the wash/shade down, I can drybrush the medium again. I will be pretty liberal with this I feel to start with and then pick and choose my spots more judiciously with my drybrishing as I get brighter. (See glowing gloves above). As I grow tired and angry of dry brushing (and secretly lament the lost paint on the paper towel like I always do when dry brushing) I should be able to pick up a nice brush and start touching points of super bright versions of the glow color or straight white at this stage at key locations and call the ‘inner glow’ done for the time being.
Step 4: Touch up the models, misc. basic non-glow related highlighting. Gold trim on armor.
After the great dry brushing of our time has come to a close (So I am sure I would like to think when that time comes to pass) It will be time to clean up the model and start to do some repairs on colors that got overly dry brushed, black armor/outfit in particular if I got overzealous with the dark blue. Then do up the gold trim and stripes on the pants, armor and shirts, various accessories, and helmets. Hopefully by now the black armor will have some glow action going on from the dry brush explosion, but with the blue be a nice stark change from the brightness of the bodies. In that dark black base I will do the gold trim. I will no doubt be on the next (or following article) by the time I get to that stage since this is going to take a while I am presuming.
But after this stage I should have models with glowing bodies, basic highlights from dry brushing, and somewhat clean armor with nice gold trim on them.
Step 5: Pick out details? OSL-esque glow? Throw models out the window?
Step 6: Final Goodness, numbers, base rim, etc.
Update 3.9.
Yeah so much for progress pics within the ‘category’ I planned for painting. Ended up doing something similar to that, but it became a wild ride of back and forth between models, different color stages, brushes and paints, etc. I am essentially around step 4 with most of the models.
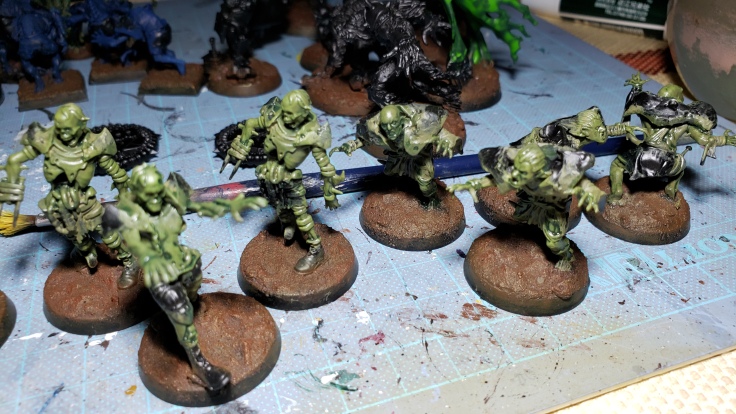
Zombies Nearing Completion. Same model, different lighting, big difference!
The Zombies are all but done at this stage besides clean up, final details, and basing. I am typically staring at them under bright light (Image on the left) so when I took a picture under less light I was ultra pleased with the result. The glow game out pretty good, at least in the picture! Staring at a model for hours will have my brain try to convince me otherwise, but I am happy with them. I think the trick with these guys was after drybrushing them to the point they were pink in the face with ‘glow’, I went over the areas less lit up with a bright green which helped sell the fading light I think.
Ghouls need some more love.
Maybe I was a bit heavy handed on the corrective dark blue drybrushing or bright white spotwork on these guys since I felt like the ‘glow’ was getting away from me, but they don’t look as good as the zombies. I will give them another build up of brighter blues since I lost a lot of the mid tones in my correcting I think. It should be alright.
The big boys
Flesh Golems looking alright. The glow overall looks half decent I think, but they still need some work. Maybe another wash of purple or green on the flat areas of skin to tone down that ashy look. They need to look more sweaty, stinky, and messy I think. This is a hodgepodge of body parts given unlife, and despite how much the maker loves them, they certainly ain’t going to be bone dry like they look now. I also need to touch up a few more details.
Wraiths are alright.
I say they are just ‘alright’. I don’t know if this is a ‘simple is best’ scenario or if they need some kind of special something to really pop. I have my extreme high and lowlights on the model pretty clearly defined so maybe I can try and smooth that out a bit or add in some yellow here and there to give them more pops of brightness. Fading green to yellow and then white may make them stand out a bit more. I also need to think about how to put numbers on them. Most likely the tomb stone in addition to the base itself, but I am trying to devise a way to work the number into the glow on the back of them that isn’t too obtrusive.
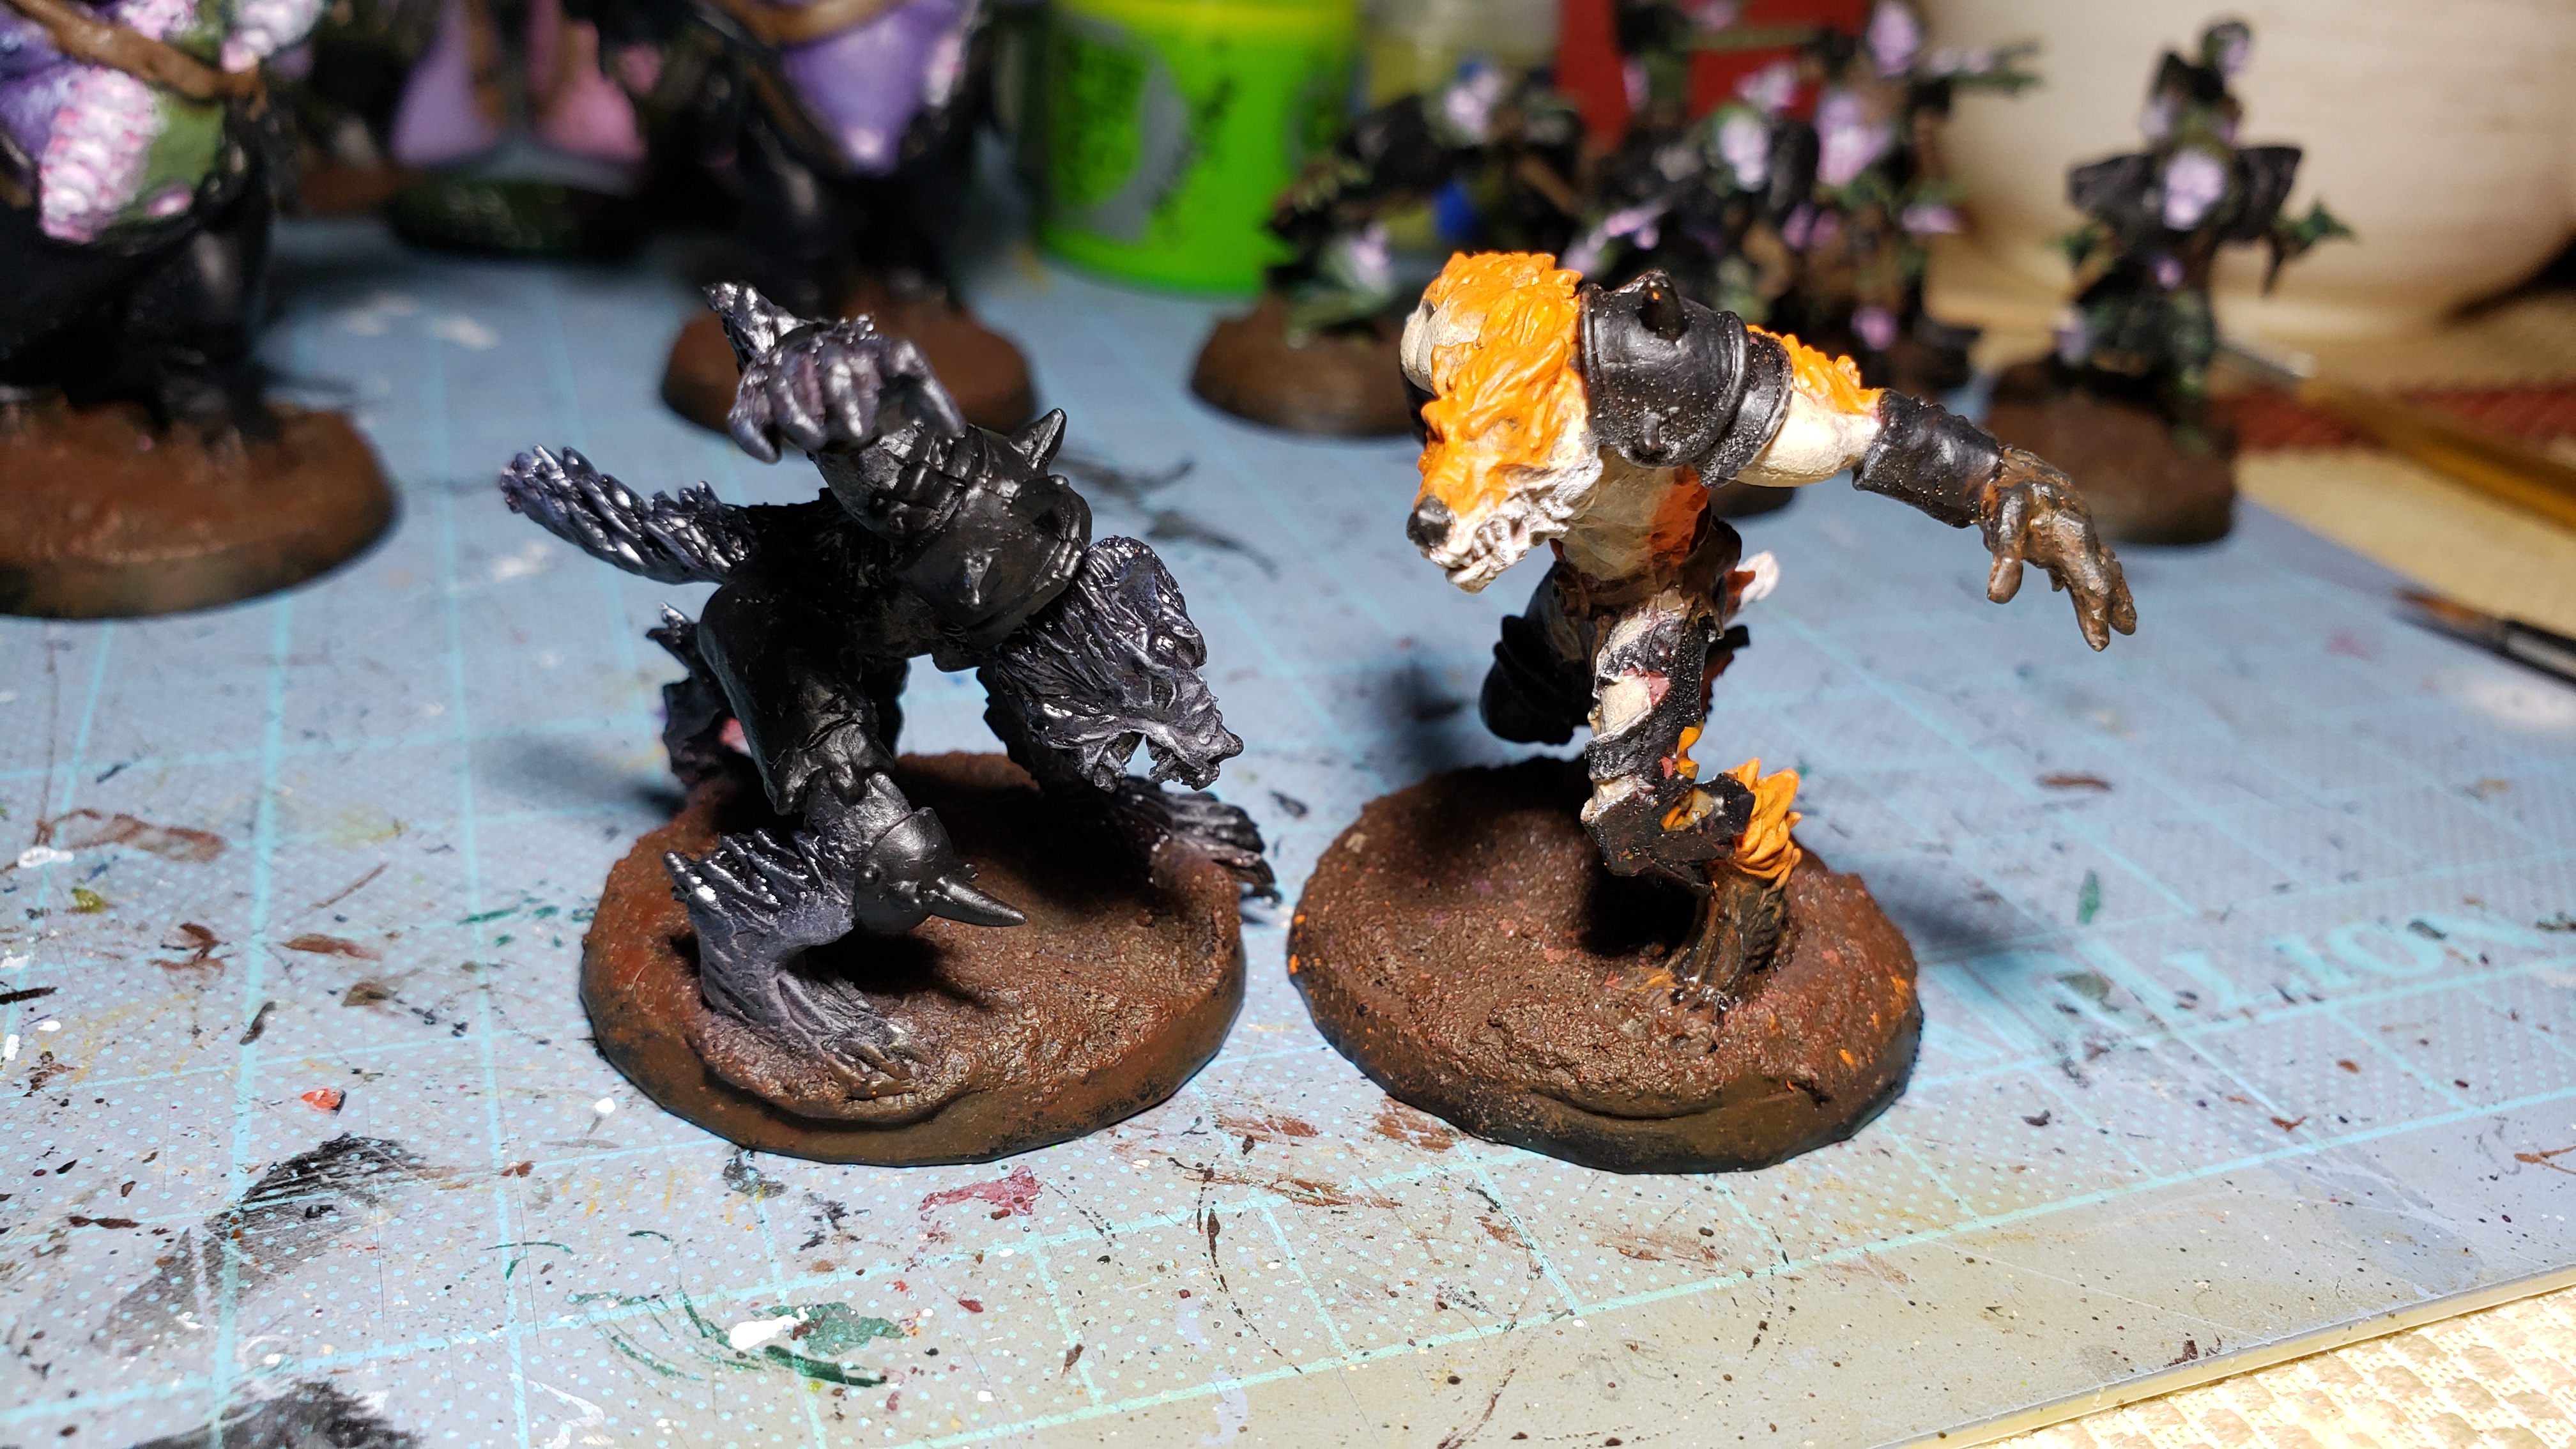
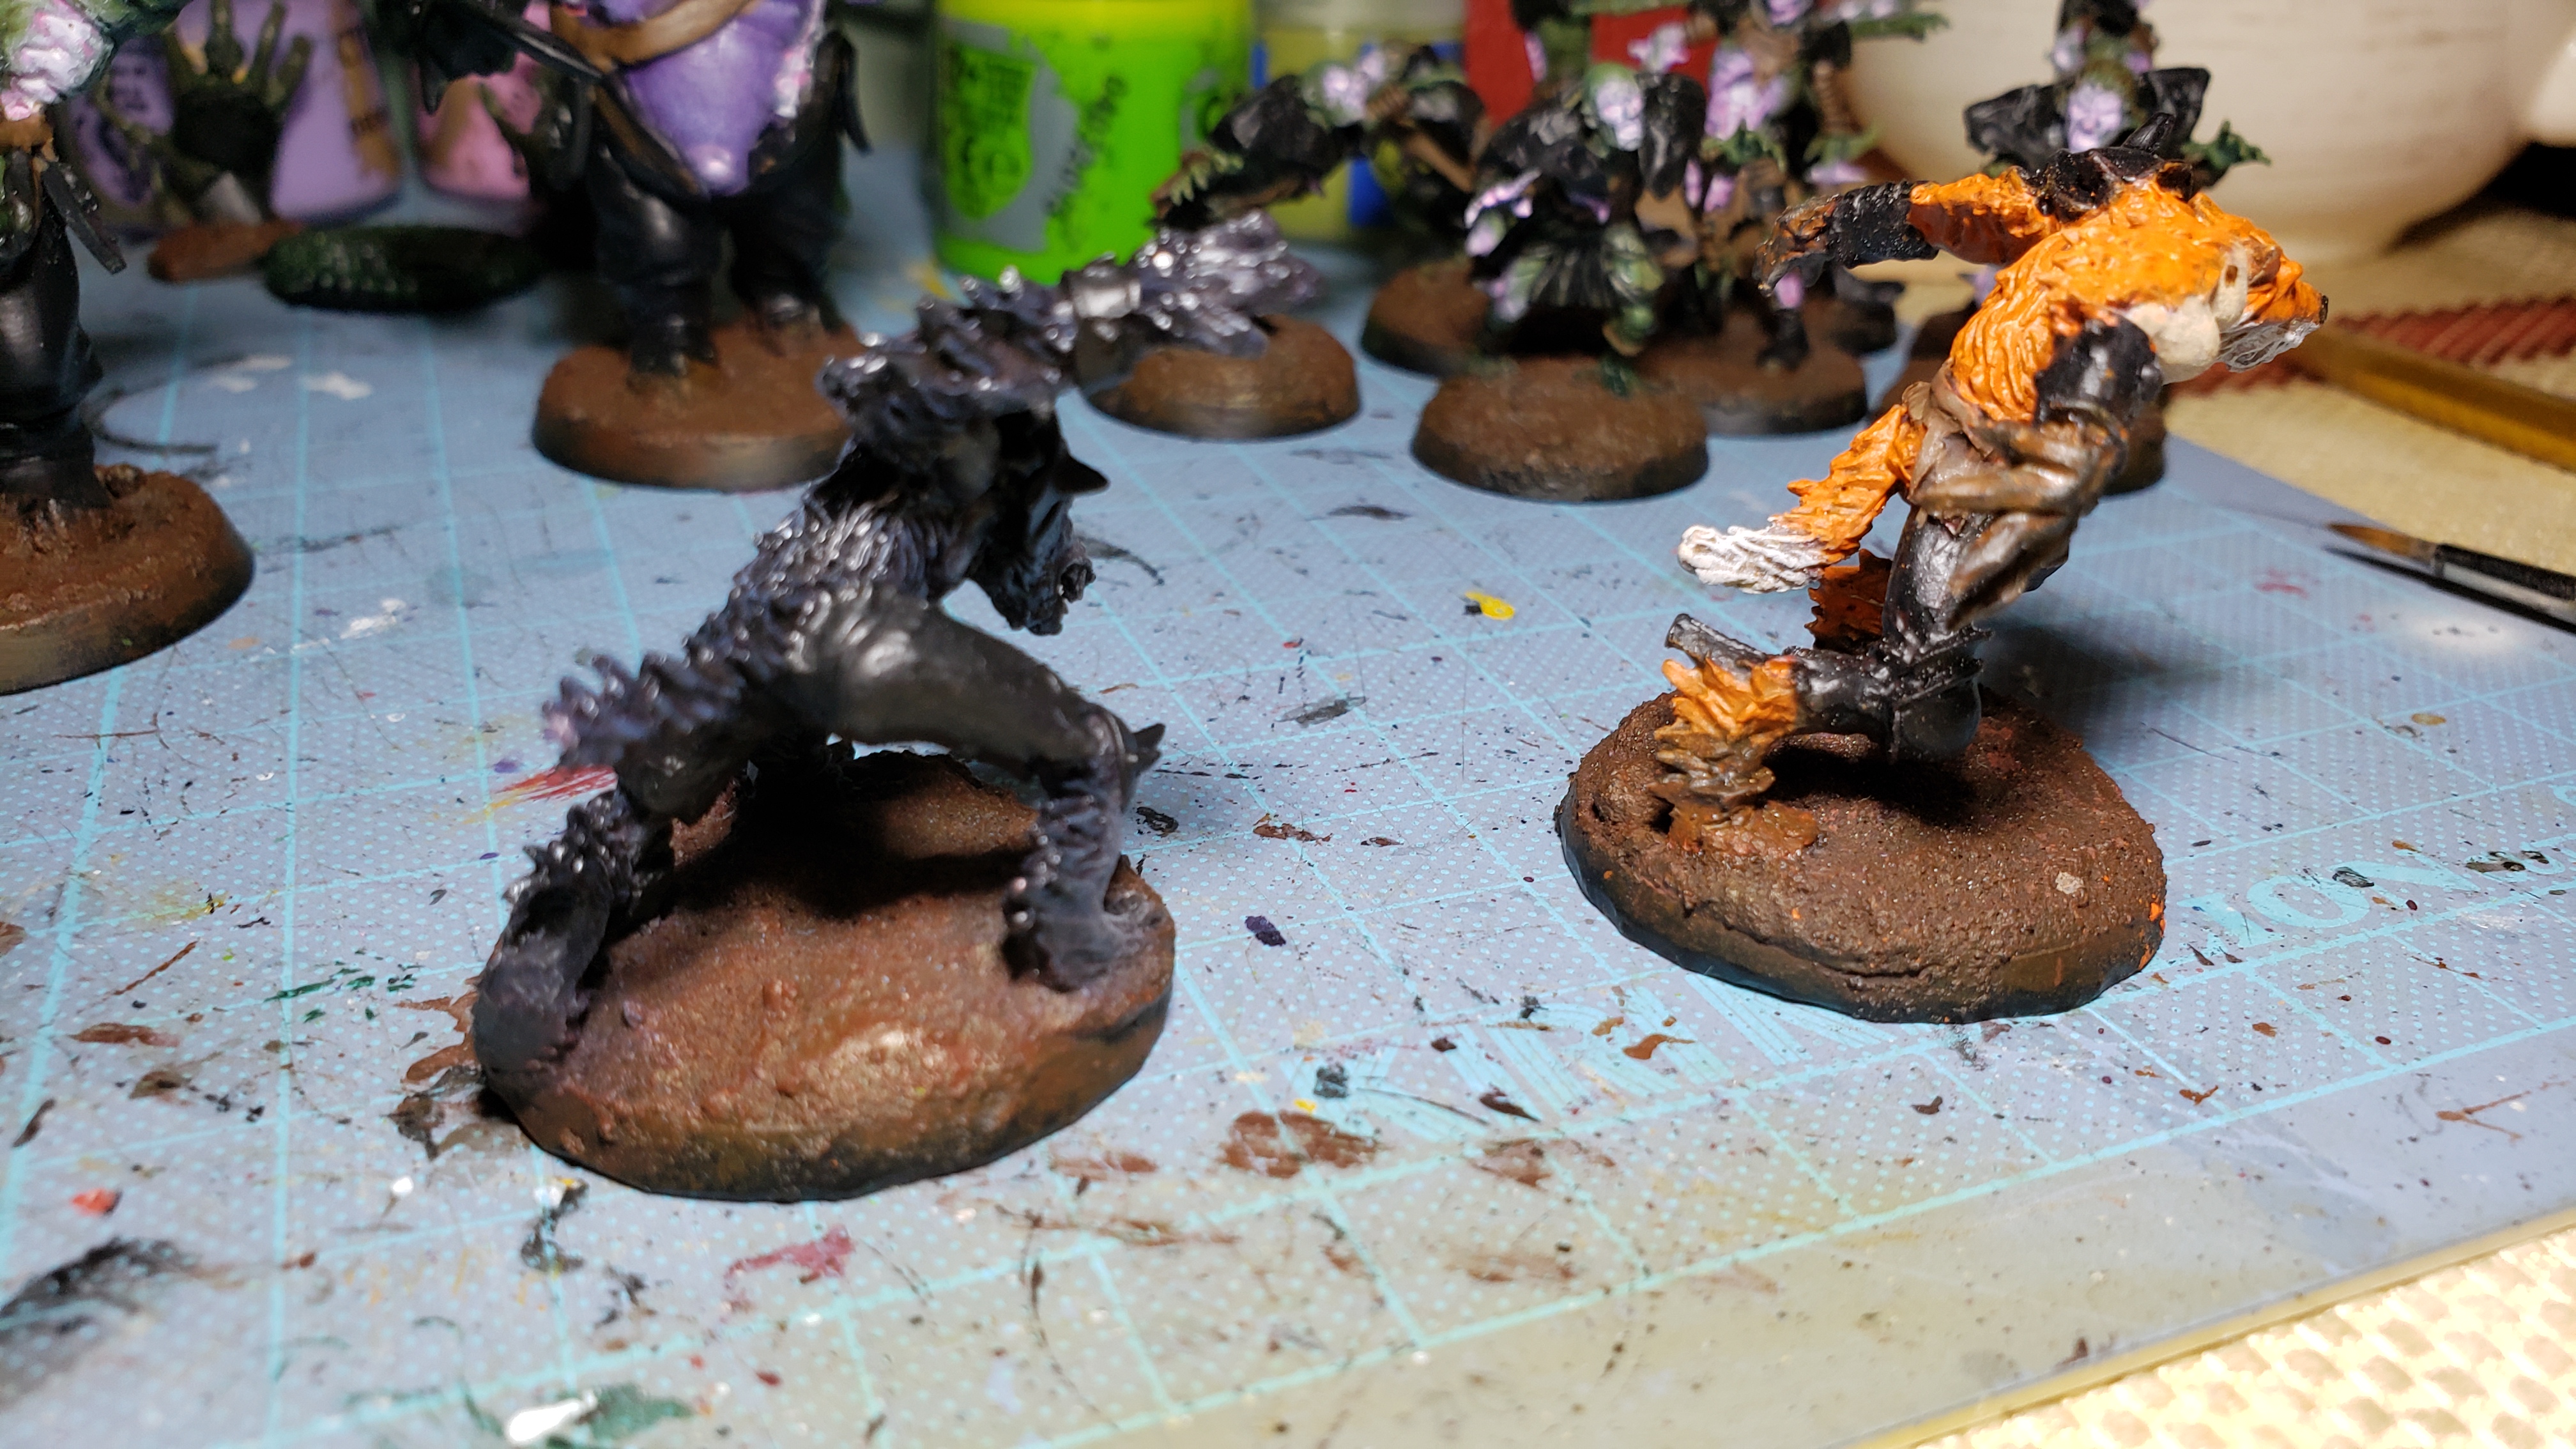
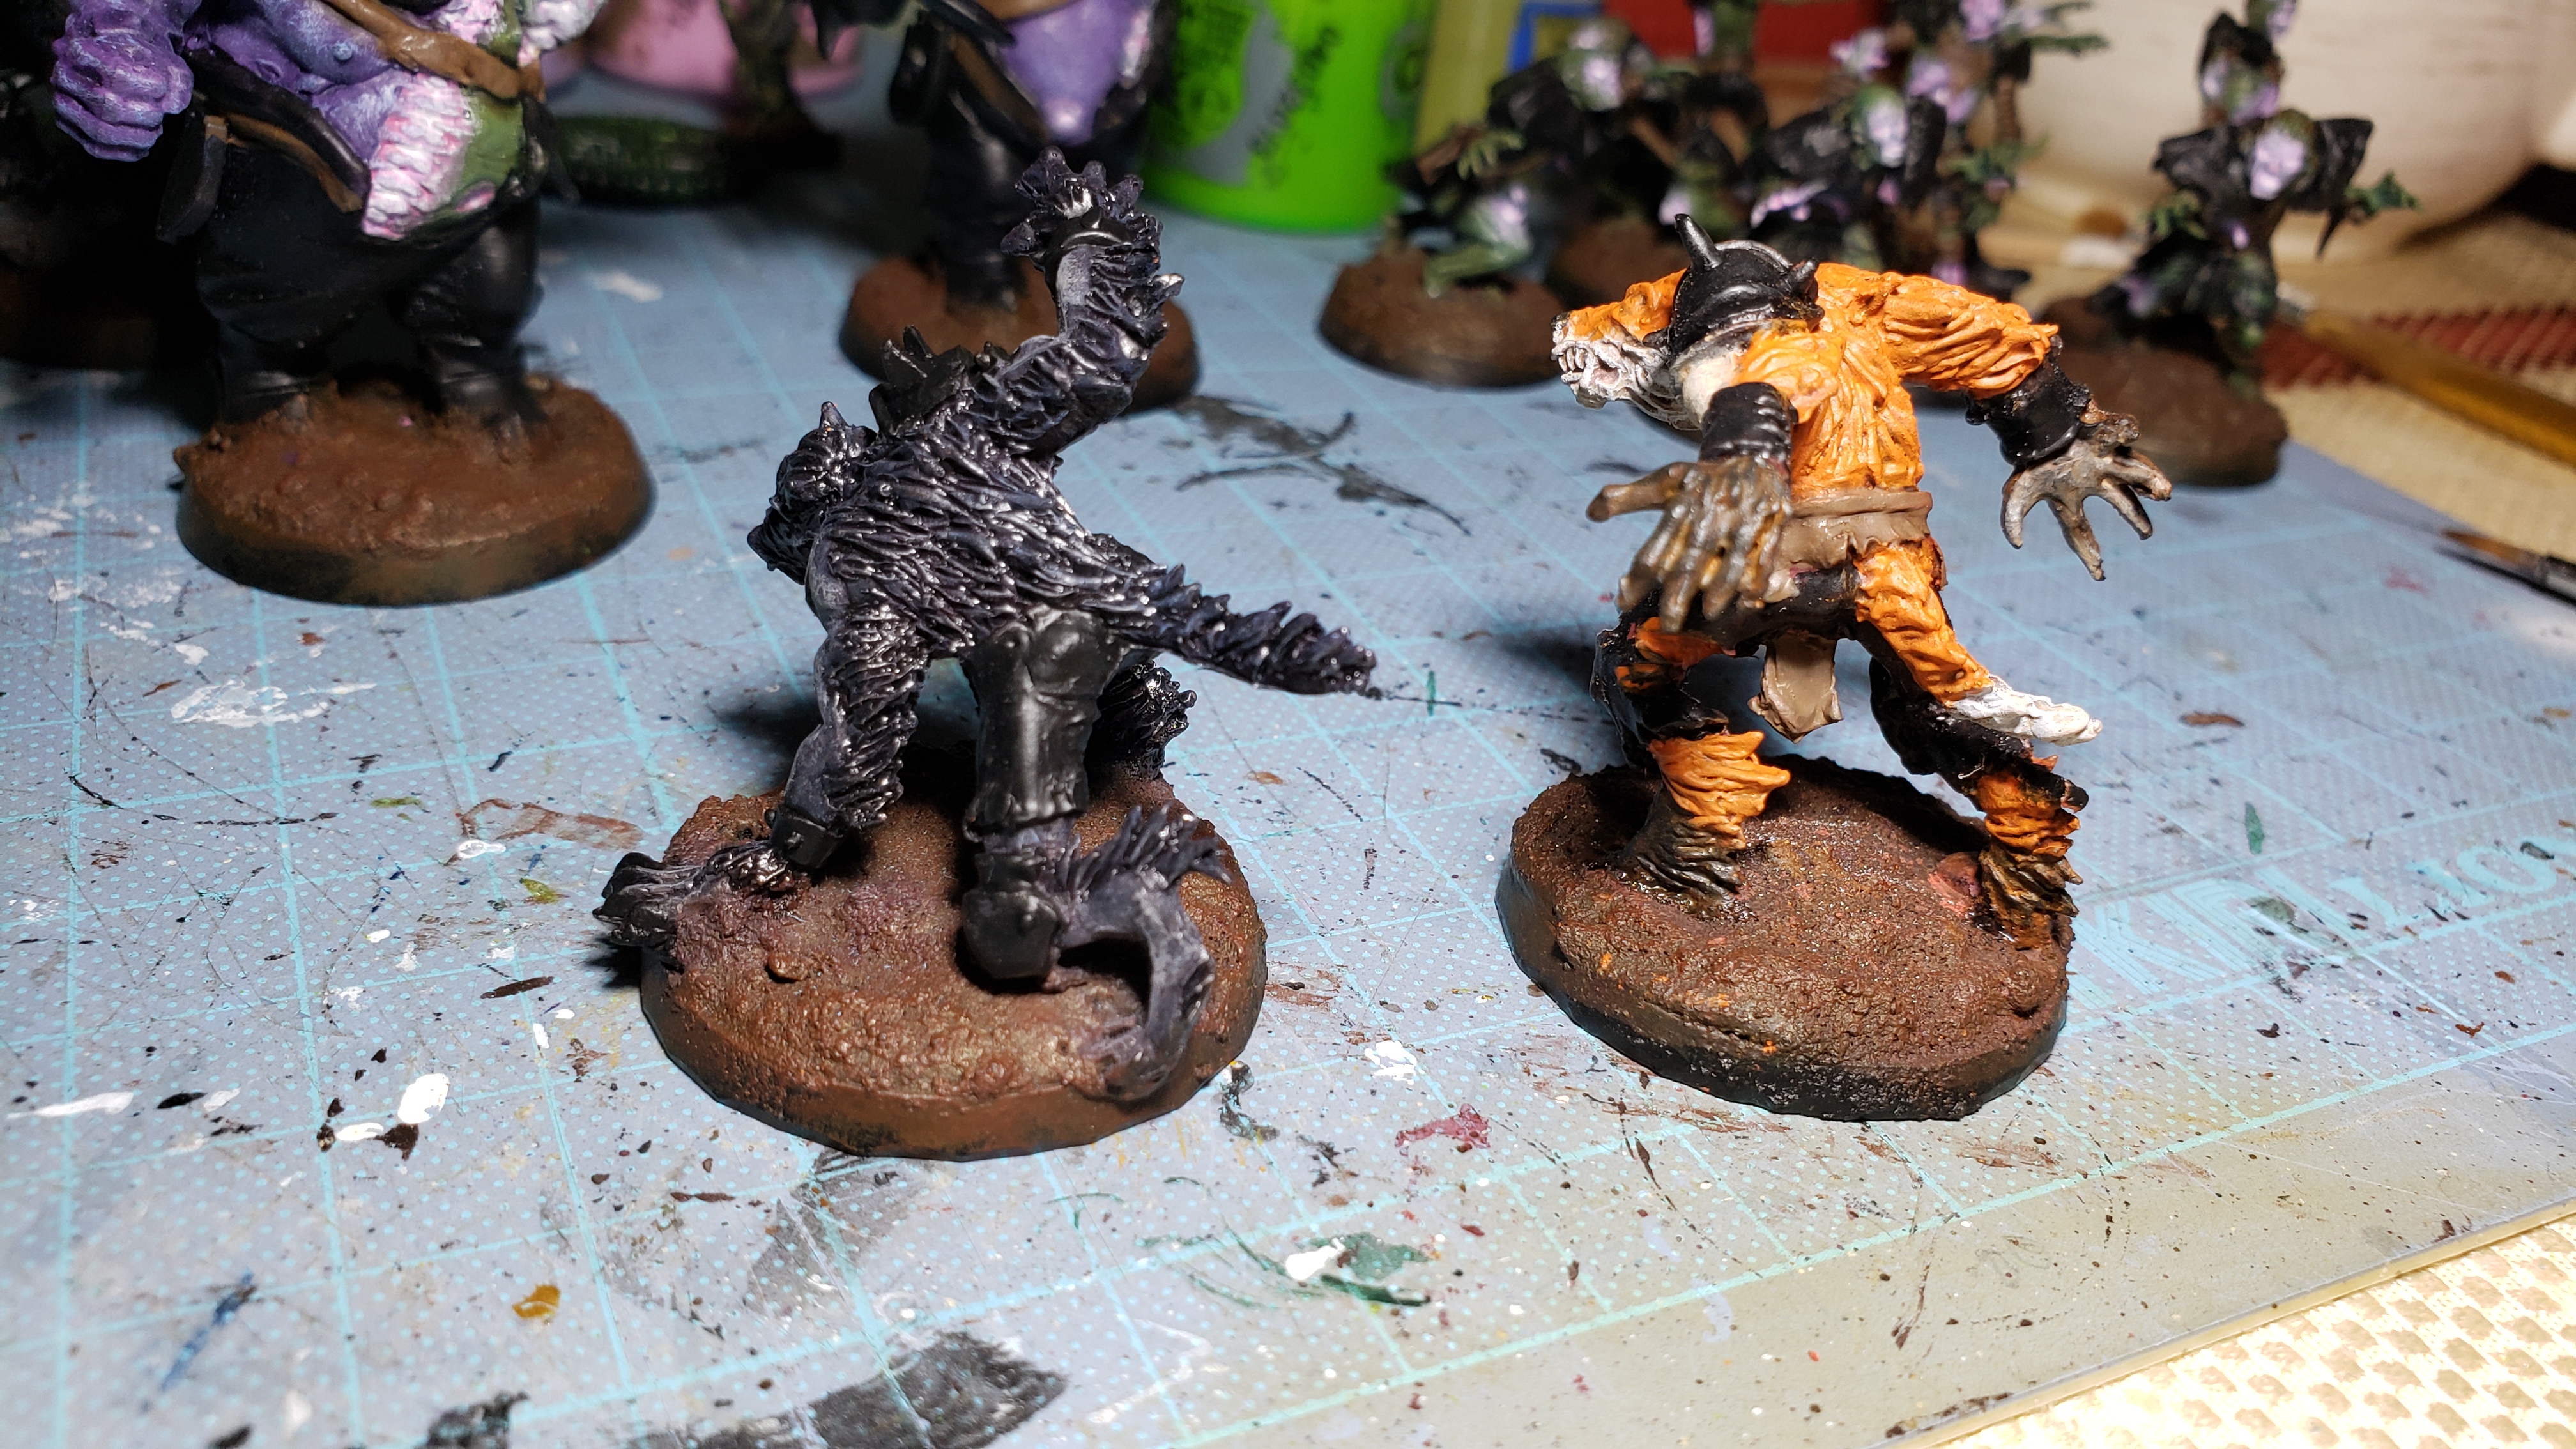
Hell yeah they get their own heading! Wolf Time!
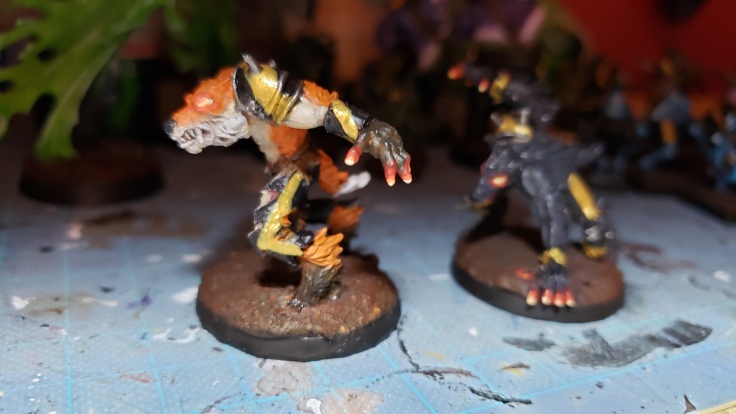
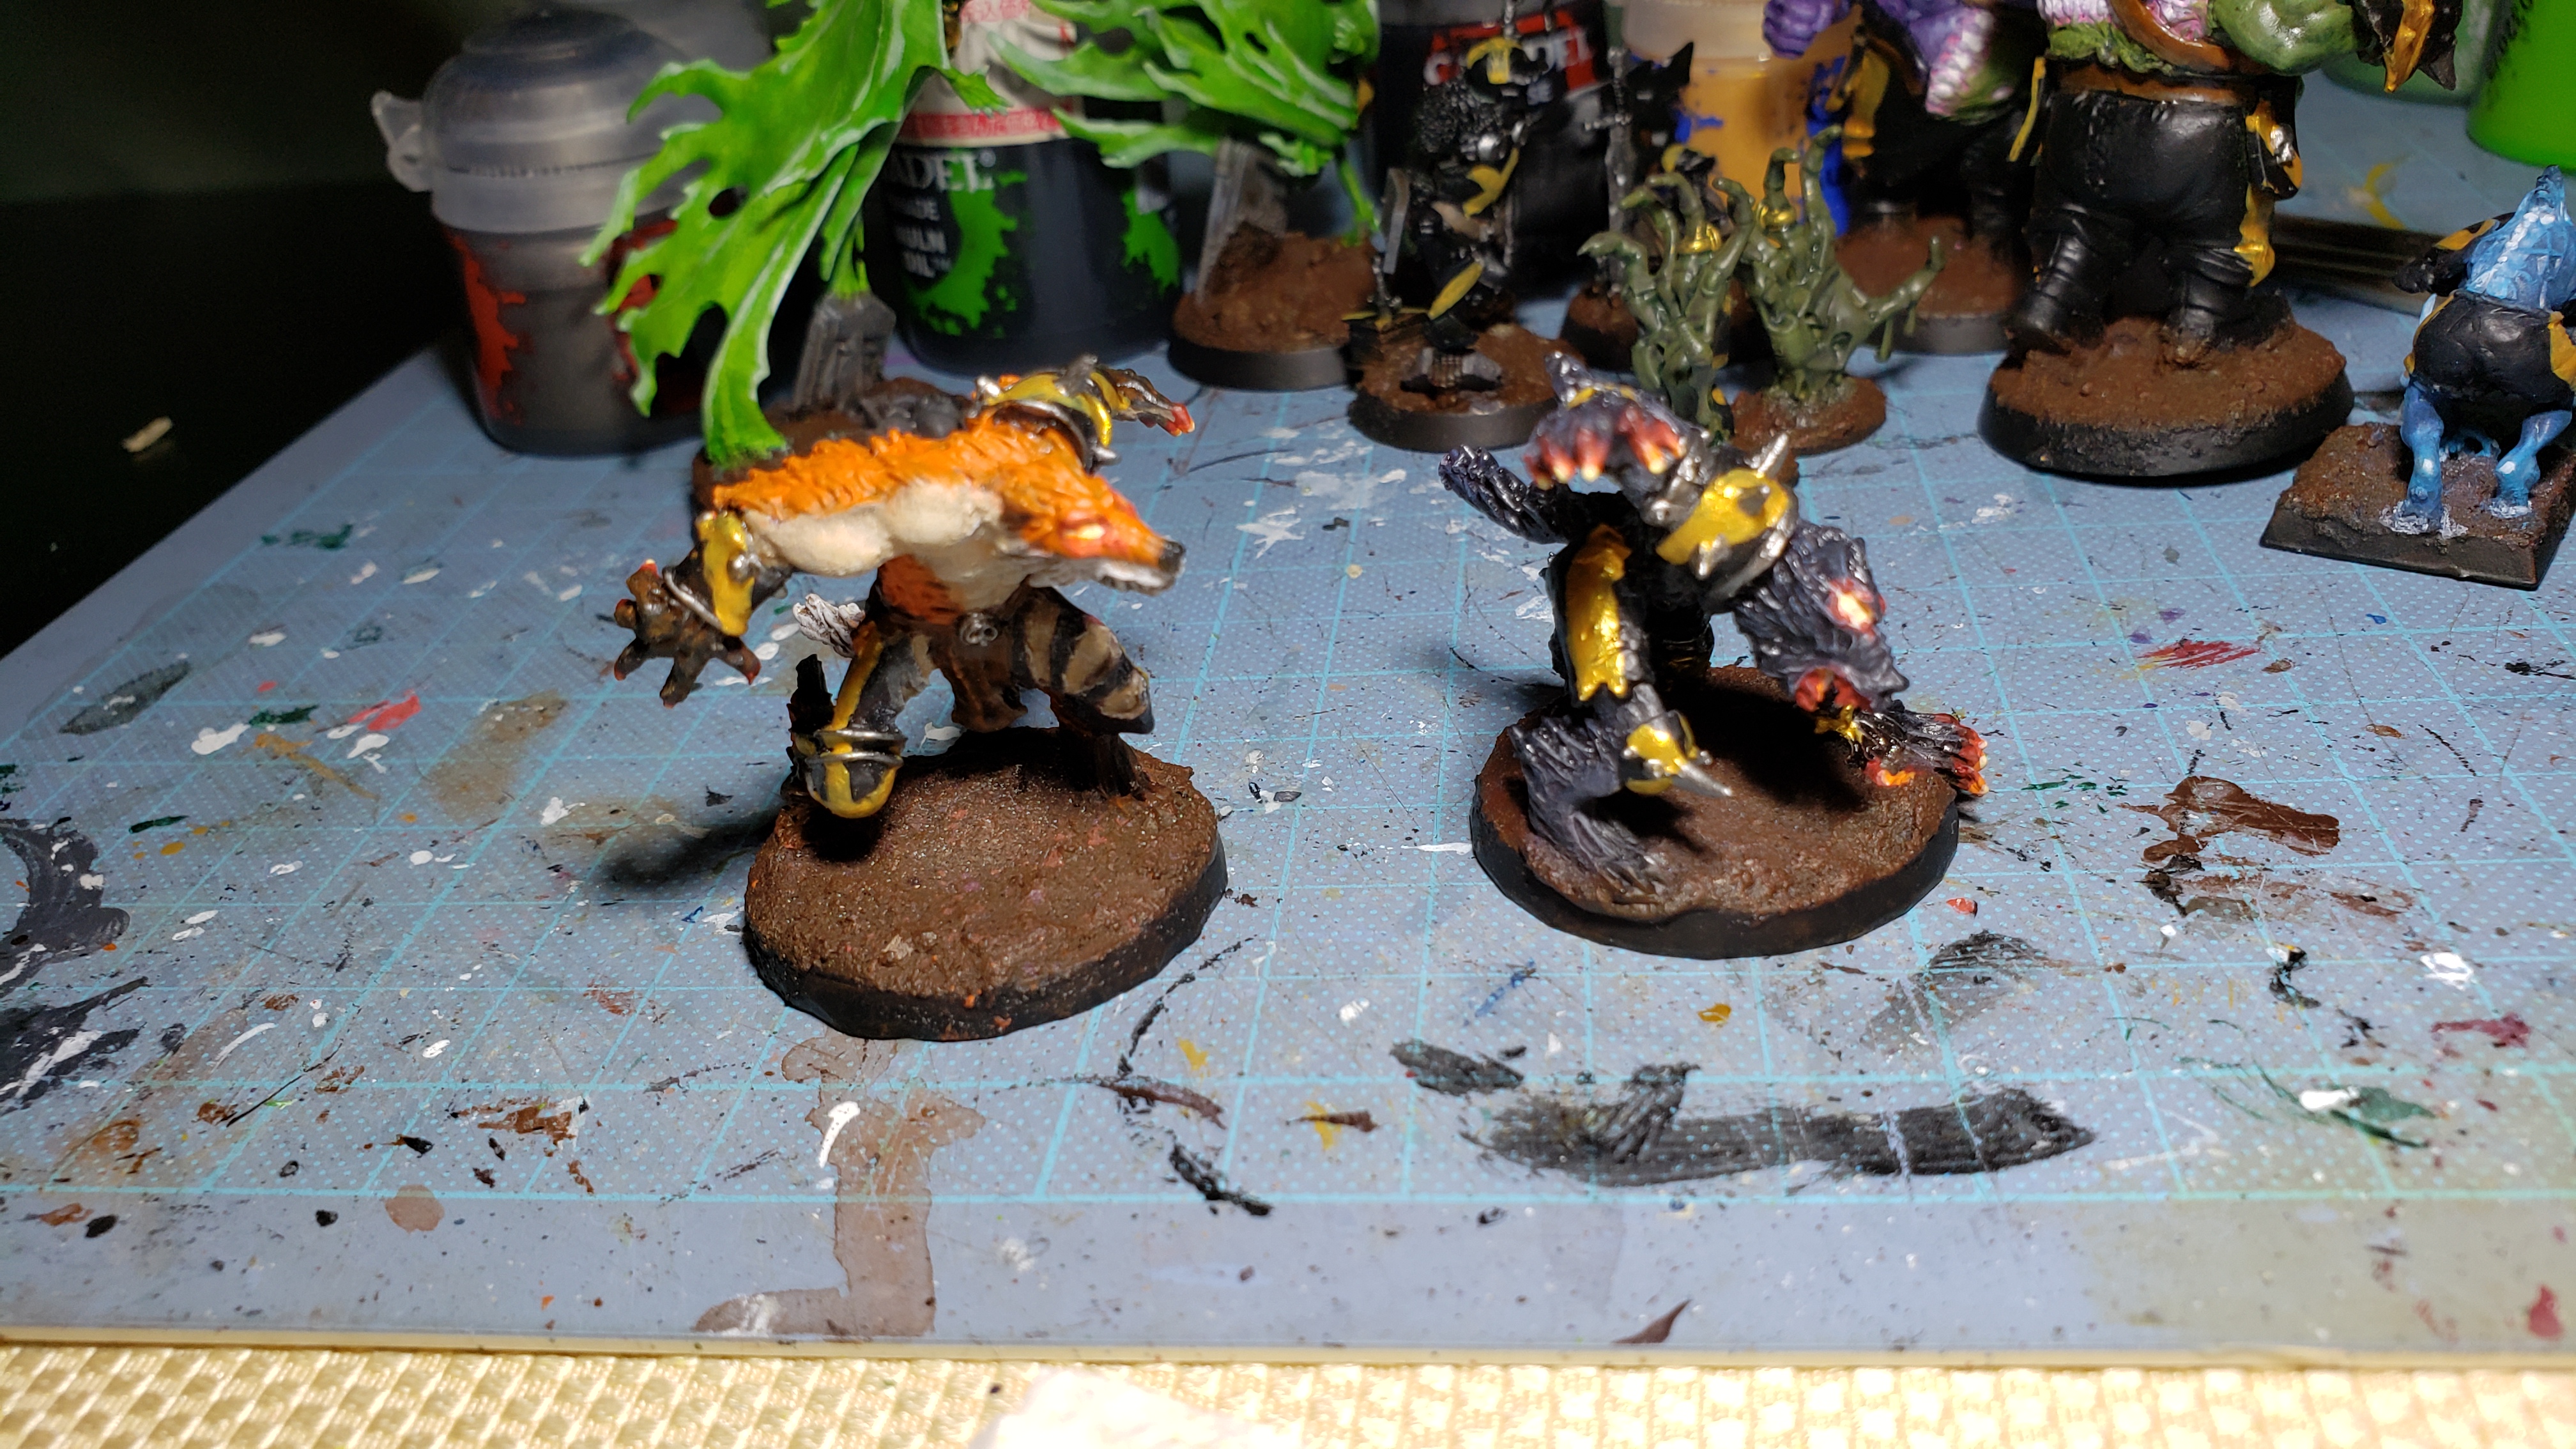
I haven’t really posted a lot of good WIP shots of my wolves since I had them on the back burner for most of the painting project until I got a clearer vision of what to do. Then I knocked them out in like two session essentially to get to this point. Like I said before I didn’t bother to mess with the model any more since I am lazy and they were already base coated. The color is good enough to sell them as a fox so all good there.
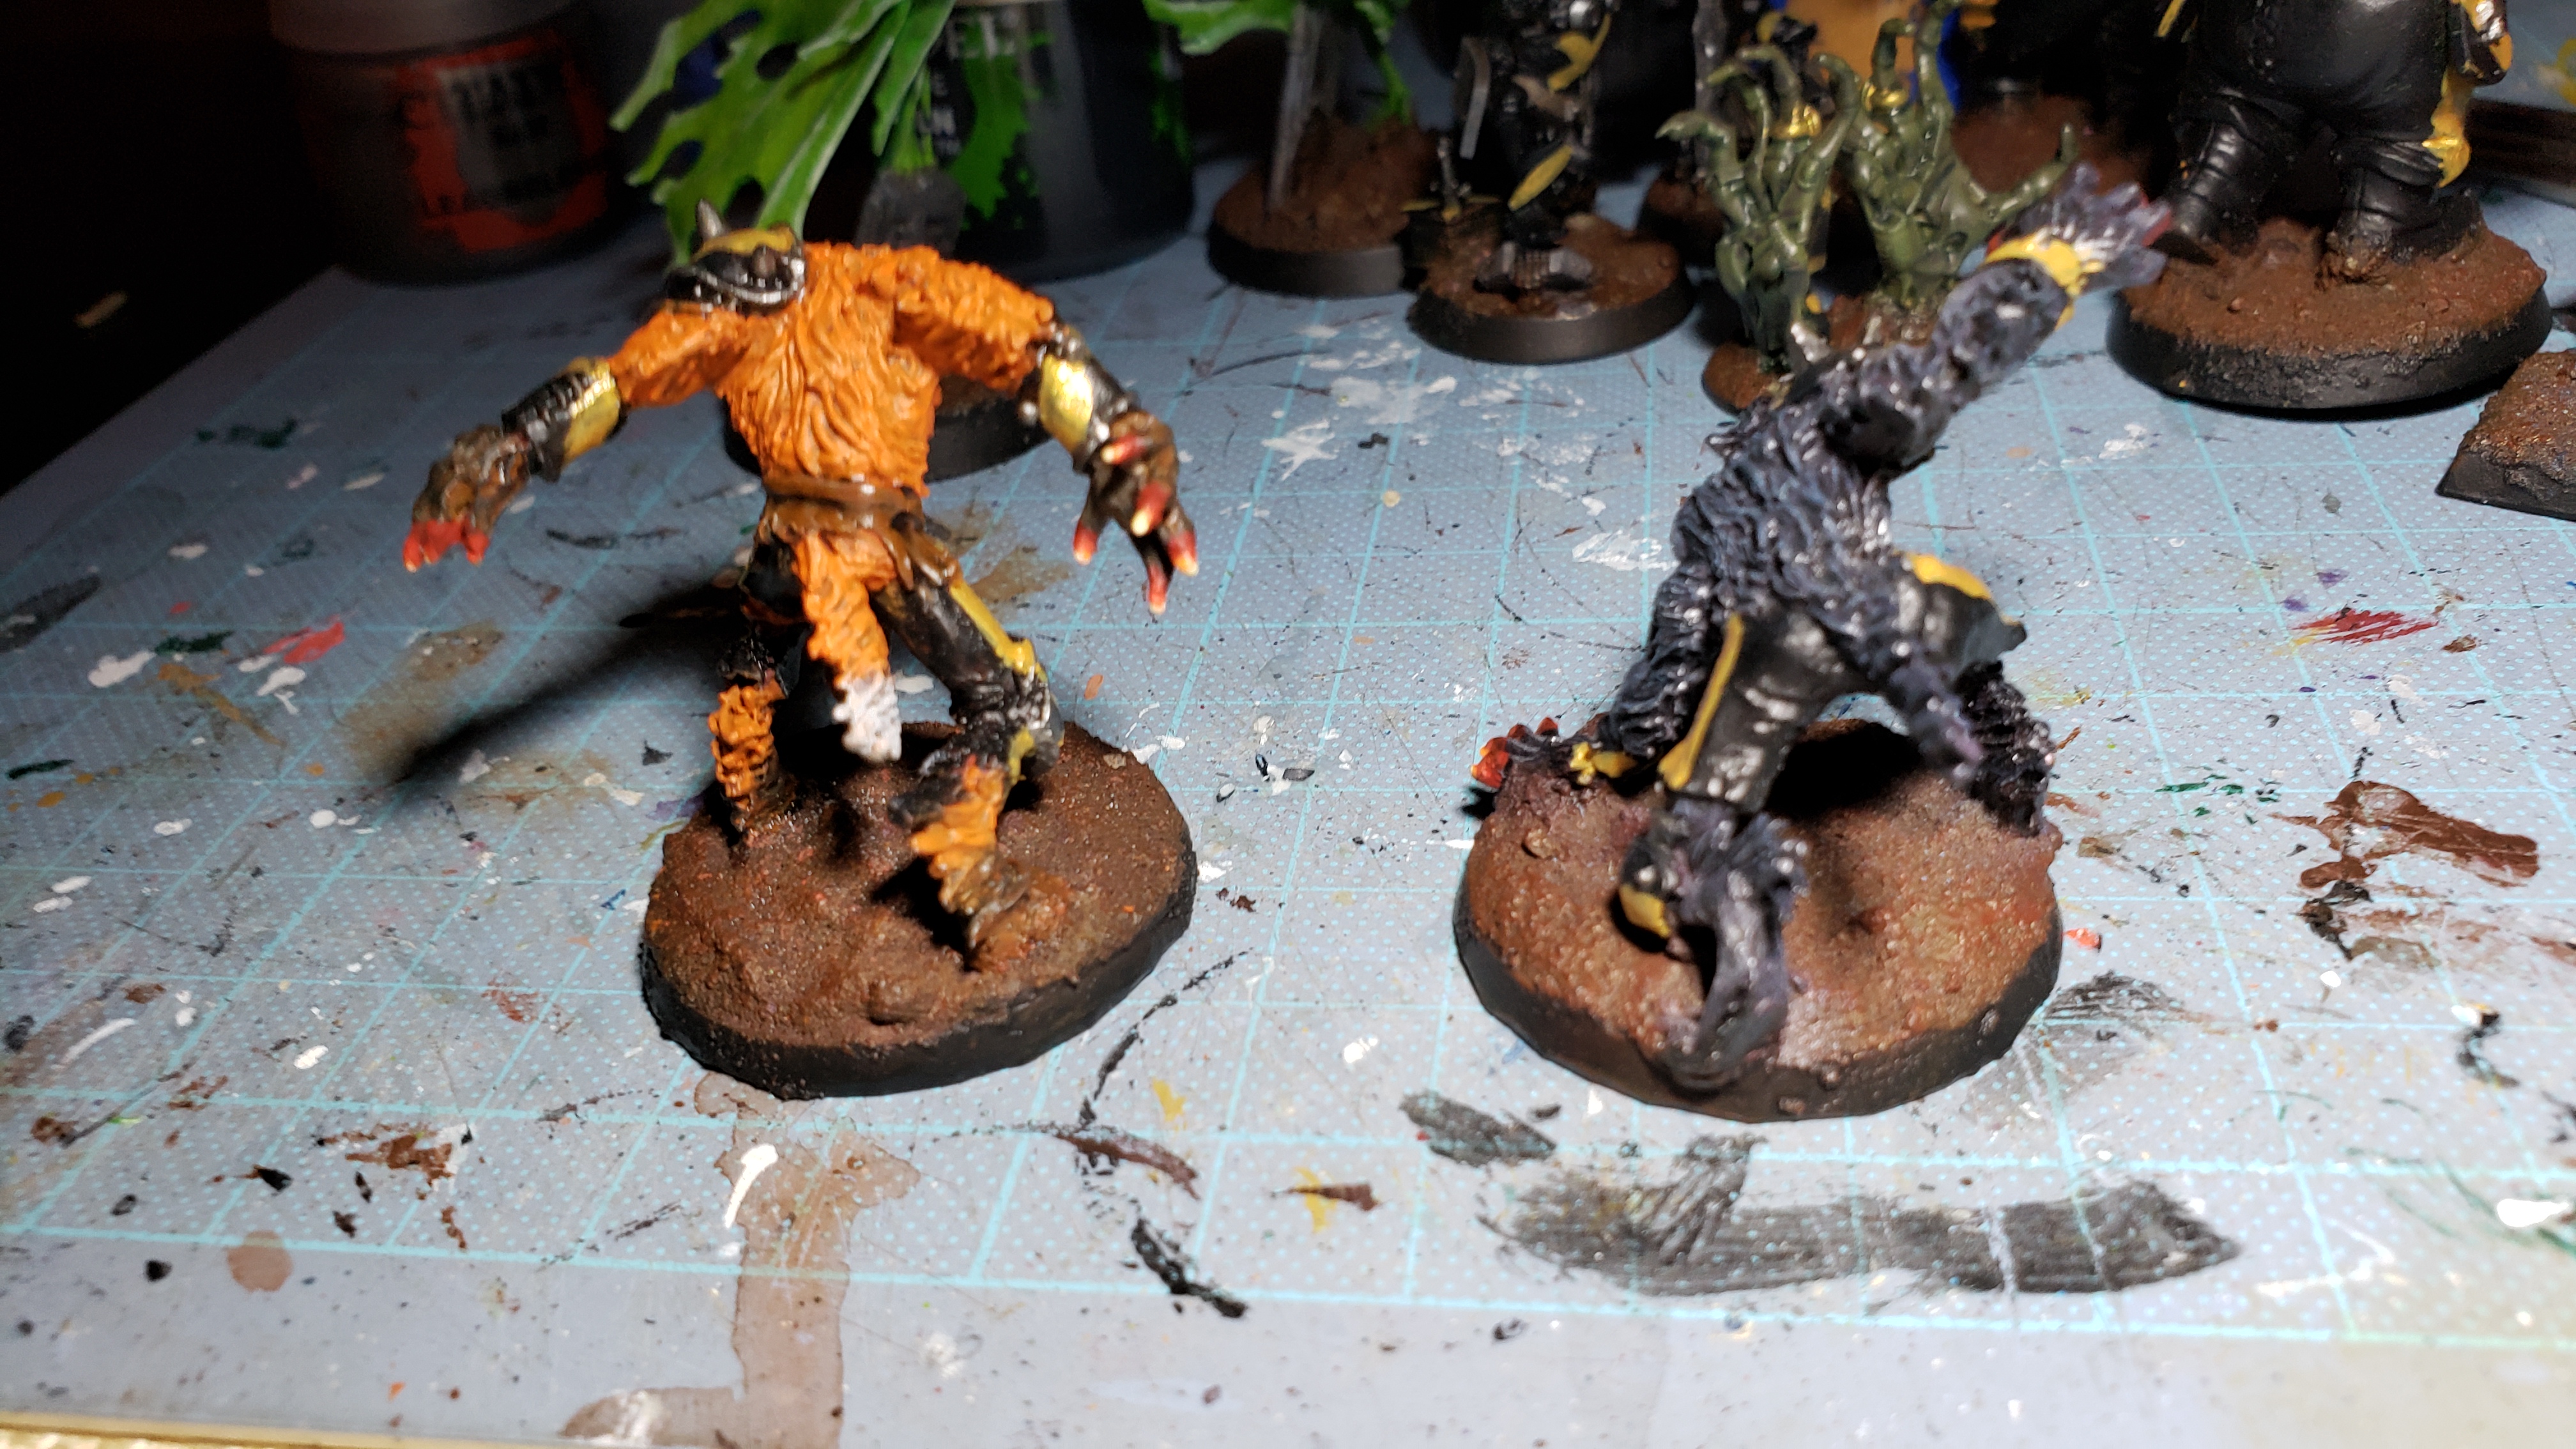
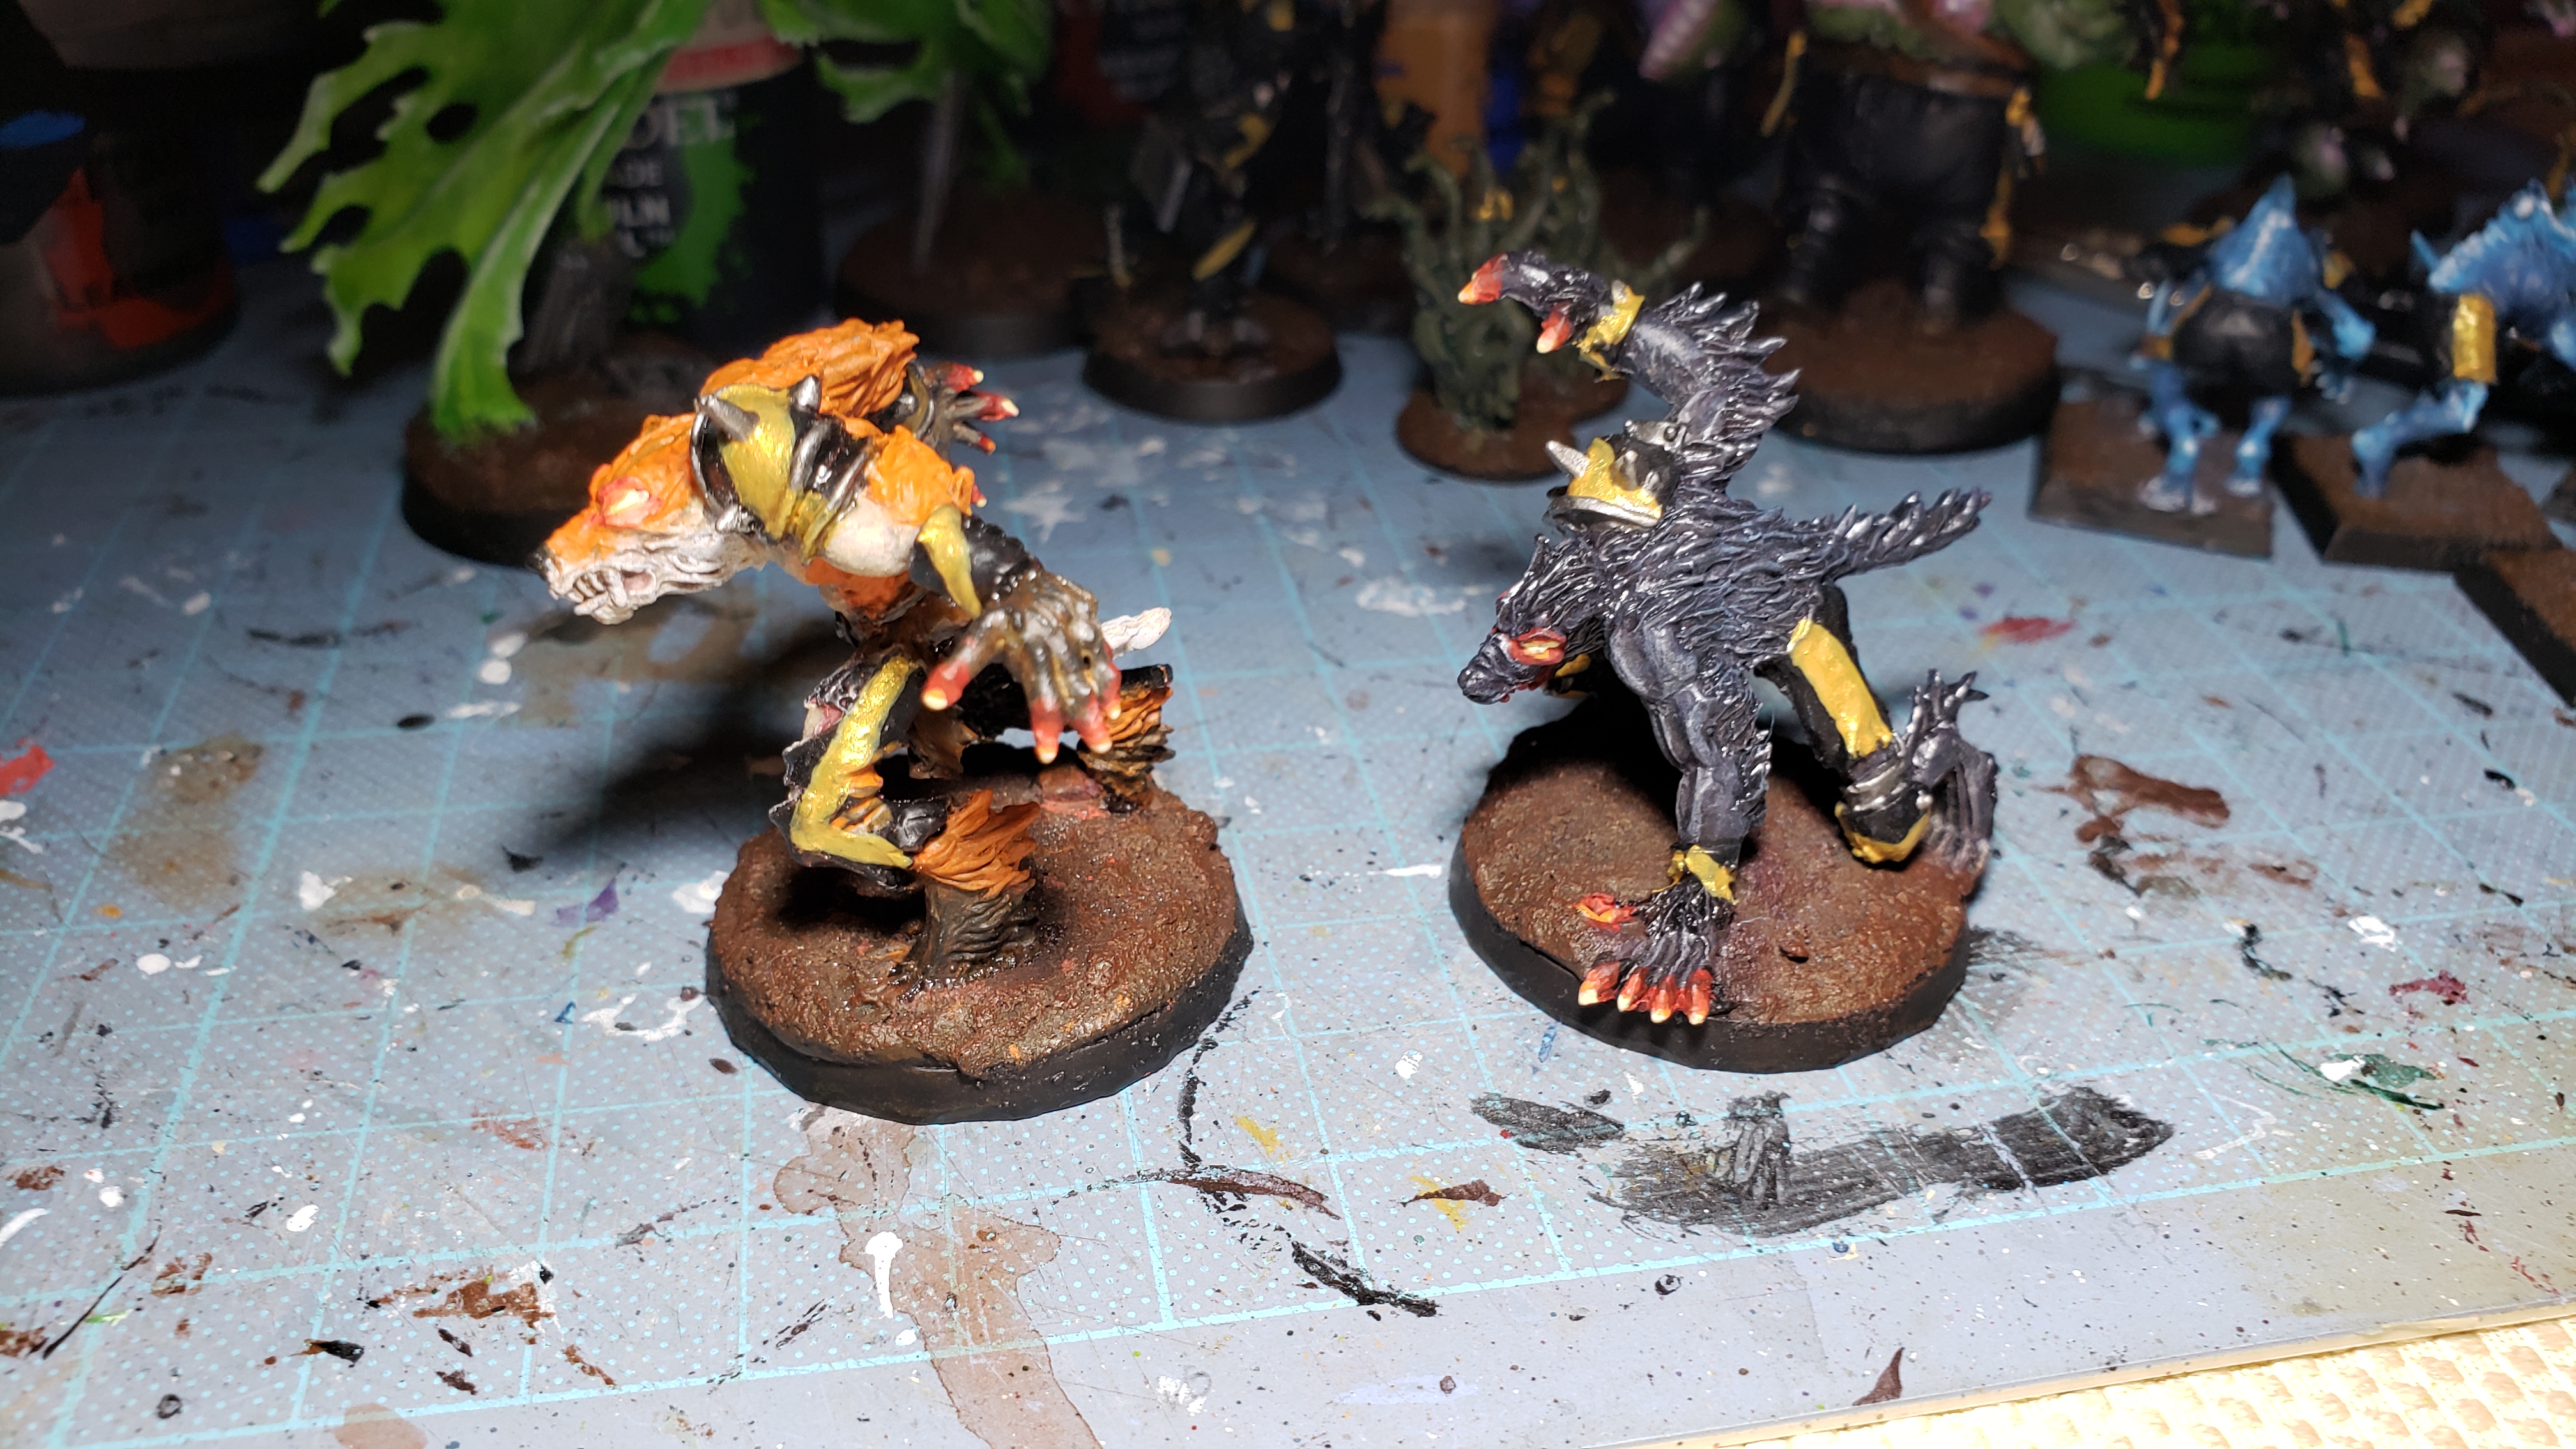
Werefox with the flaming phalanges. Wolf buddy in background.
The red glow worked way way better on the black wolf than the fox. Having orange fur already kind of interferes with the way light plays on the eyes. The brown ‘paws’ look way better, although the eyes are acceptable I believe. Take a look at a few more angles below.
Overall they are looking good. I was super happy with the play of the auric gold on the black spots. I also took a long time trying a few different patterns before determining the diagonal stripe was the best for the job. That, and the occasional ‘X’ here and there. That will all need to be cleaned up, but that is final stages just before doing the details like numbers on bases and armor. Probably the next time that I update this (For you it will be as simple as scrolling down but a few lines) will probably be the conclusion of the painting of the Necromantic Section of the Team. I will link to a gallery where I plan on dropping a bunch of pictures which I will use on the league page commemorating the team(s).
Then I shall begin the Shambling Undead / Khemri section of the team. They will be lumped together since the zombies and ghouls will already be done so all that is left are the mummies and wights. And Wights are just skeletons which means they will go great with the Khemri phase of the project and the mummies will vaguely be similar to the Tomb Guardians. In all honesty I doubt I will play shambling undead, but who knows. Khemri just keeps growing on me though, but that shall be discussed in that section no doubt.
Finished! (Besides final basing.)
So the deed is done. At least as much as I am willing to pour into the necro for the time being. I am happy with how they look and I have a few tiny tiny tiny details to fix up, but I will do all that at the very end of the project in the final pass. Let’s have a look at a few touches I added in and look at the models.
What’s the deal with the hotdog pokeballs?
This is something a coach in my league does and I love the idea and this is the first team I have painted since I saw it where I remembered to bother. Such a clever trick and helpful for game play. Do you know why?
Zombie left, stunned. Zombie right, Prone
That’s right. It helps to clarify if a model is prone or stunned. Yellow facing up meaning prone and red meaning stunned. Since it isn’t a particularly visible part of the model unless they are downed (In which case they have most likely upset me no doubt and their shame should be exposed for all to see.) I didn’t really care that it was messy. Such a clever trick and I am looking forward to seeing it in action.
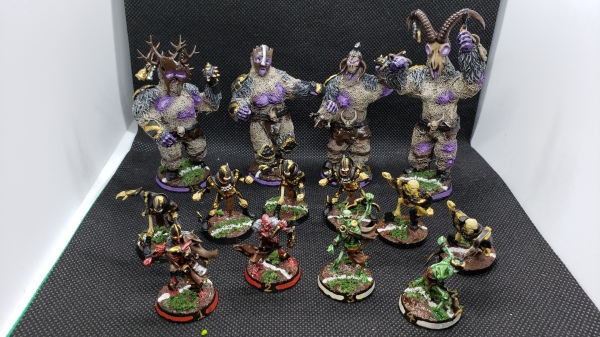
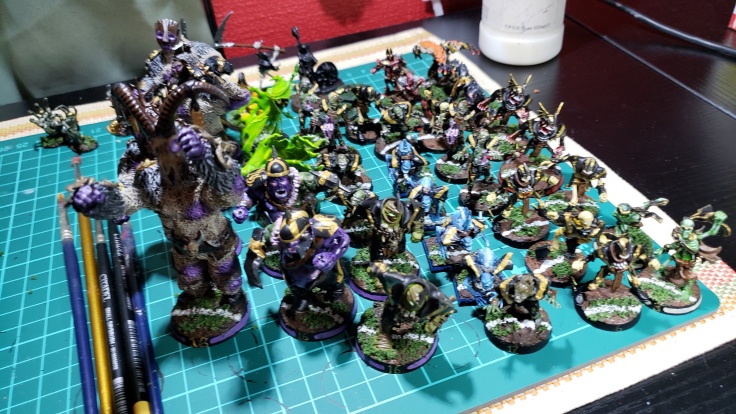
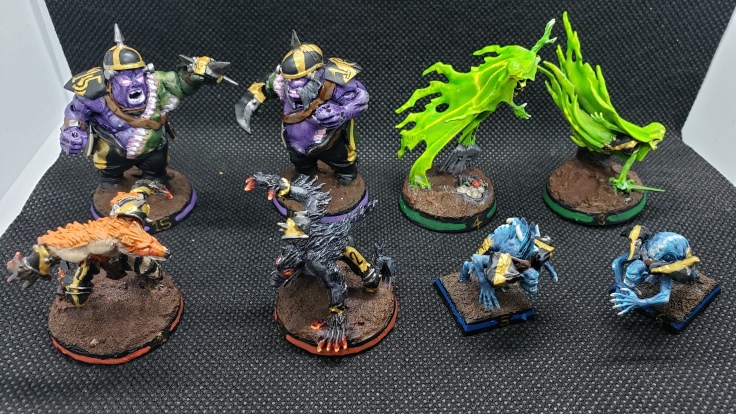
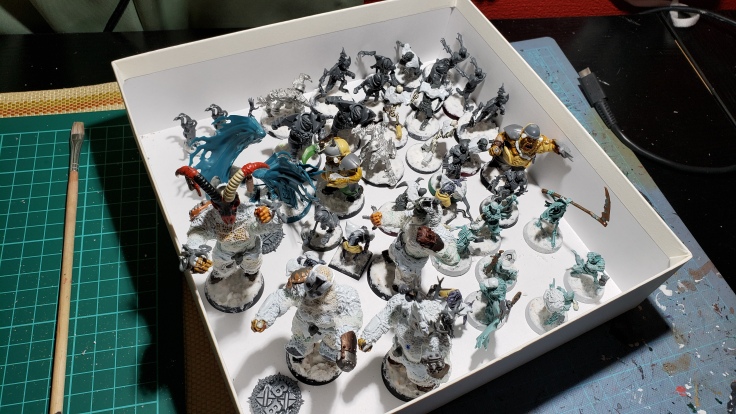
The Glowbone Gang – Necromantic Horror Blood Bowl team
There they are! In their glory! Quite a motley crew to be sure, but the black and gold ties them together quite nicely and I am happy with how they turned out. Lighting in this picture wasn’t anything to write home about, but it was midnight in a darkened hovel where I paint my minis so what can you do. Besides I will be taking the proper gallery images from multiple angles for each positional when the whole project is completed. Buuuuuut… I couldn’t help taking a couple pics of them in my light box so I can post some nice pics on the league page to show off my roster.
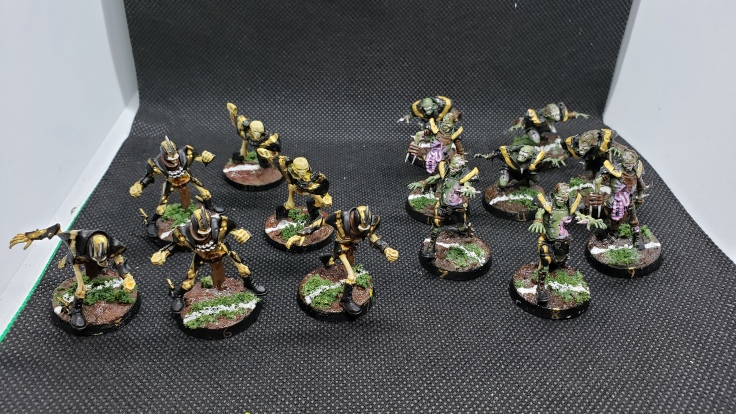
The Zombie buddies. In non-super bright light (Like this lightbox. Oops.) the glow effect looks good.
The zombies look pretty good and I am especially happy with their green rotting skin. Ample washes of dark greens and browns over top of some drybrushing in various greens as a simple highlight gave them a nice look of depth and putricidity. The GW zombies with their guts hanging out also were great since their ‘inner glow’ is on full display. Love these guys and can’t wait to see them on the pitch.
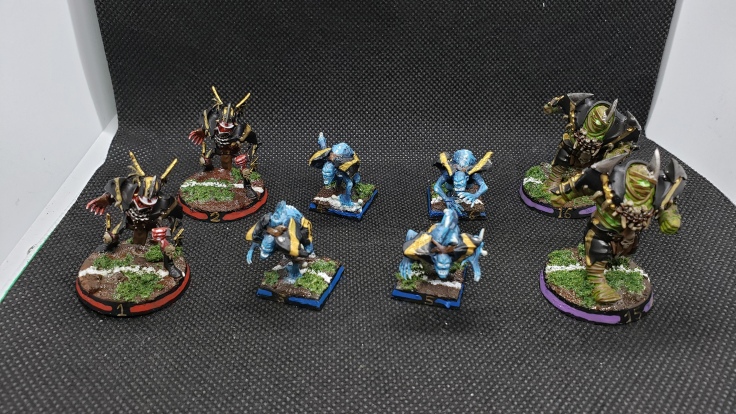
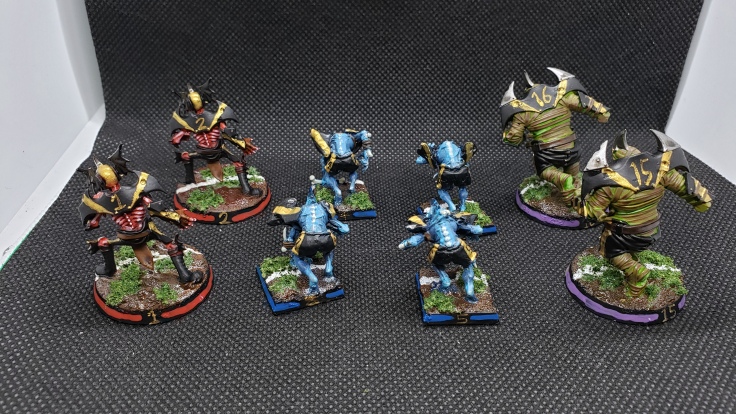
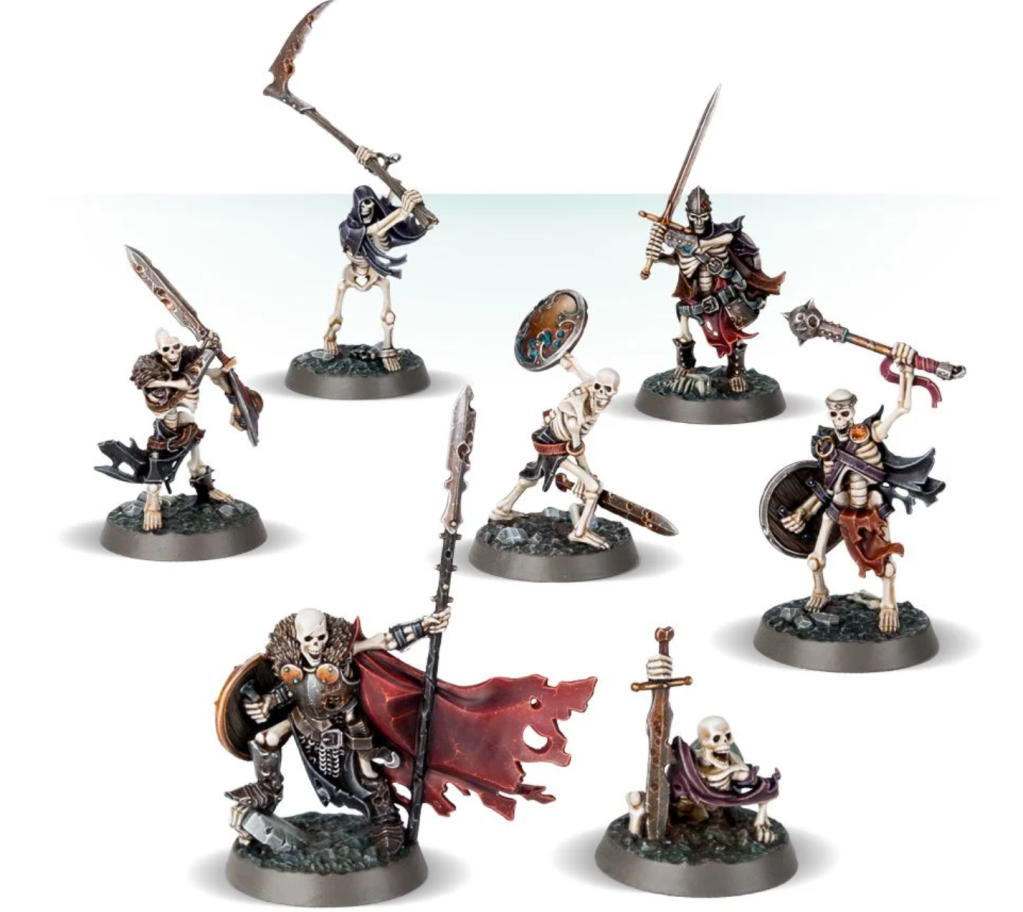
Positionals for the Glowbone Gang
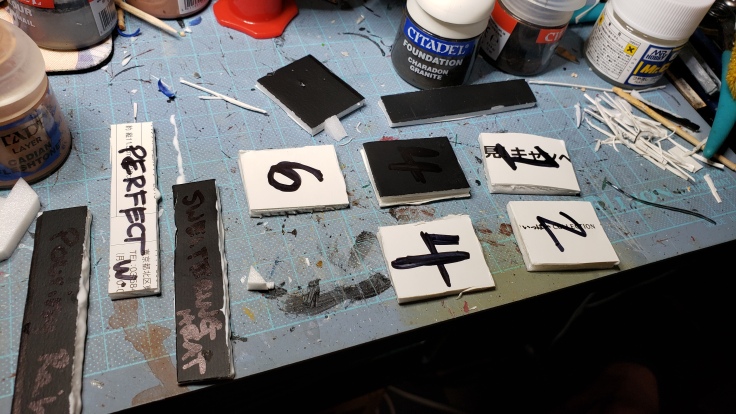
My positionals all get a little love on the base rim. I have gotten into the habit of doing a thin line in a color that marks their position. This is a NAF suggestion:
Excerpt from a Tournament Rules pack citing the NAF’s suggested colors.
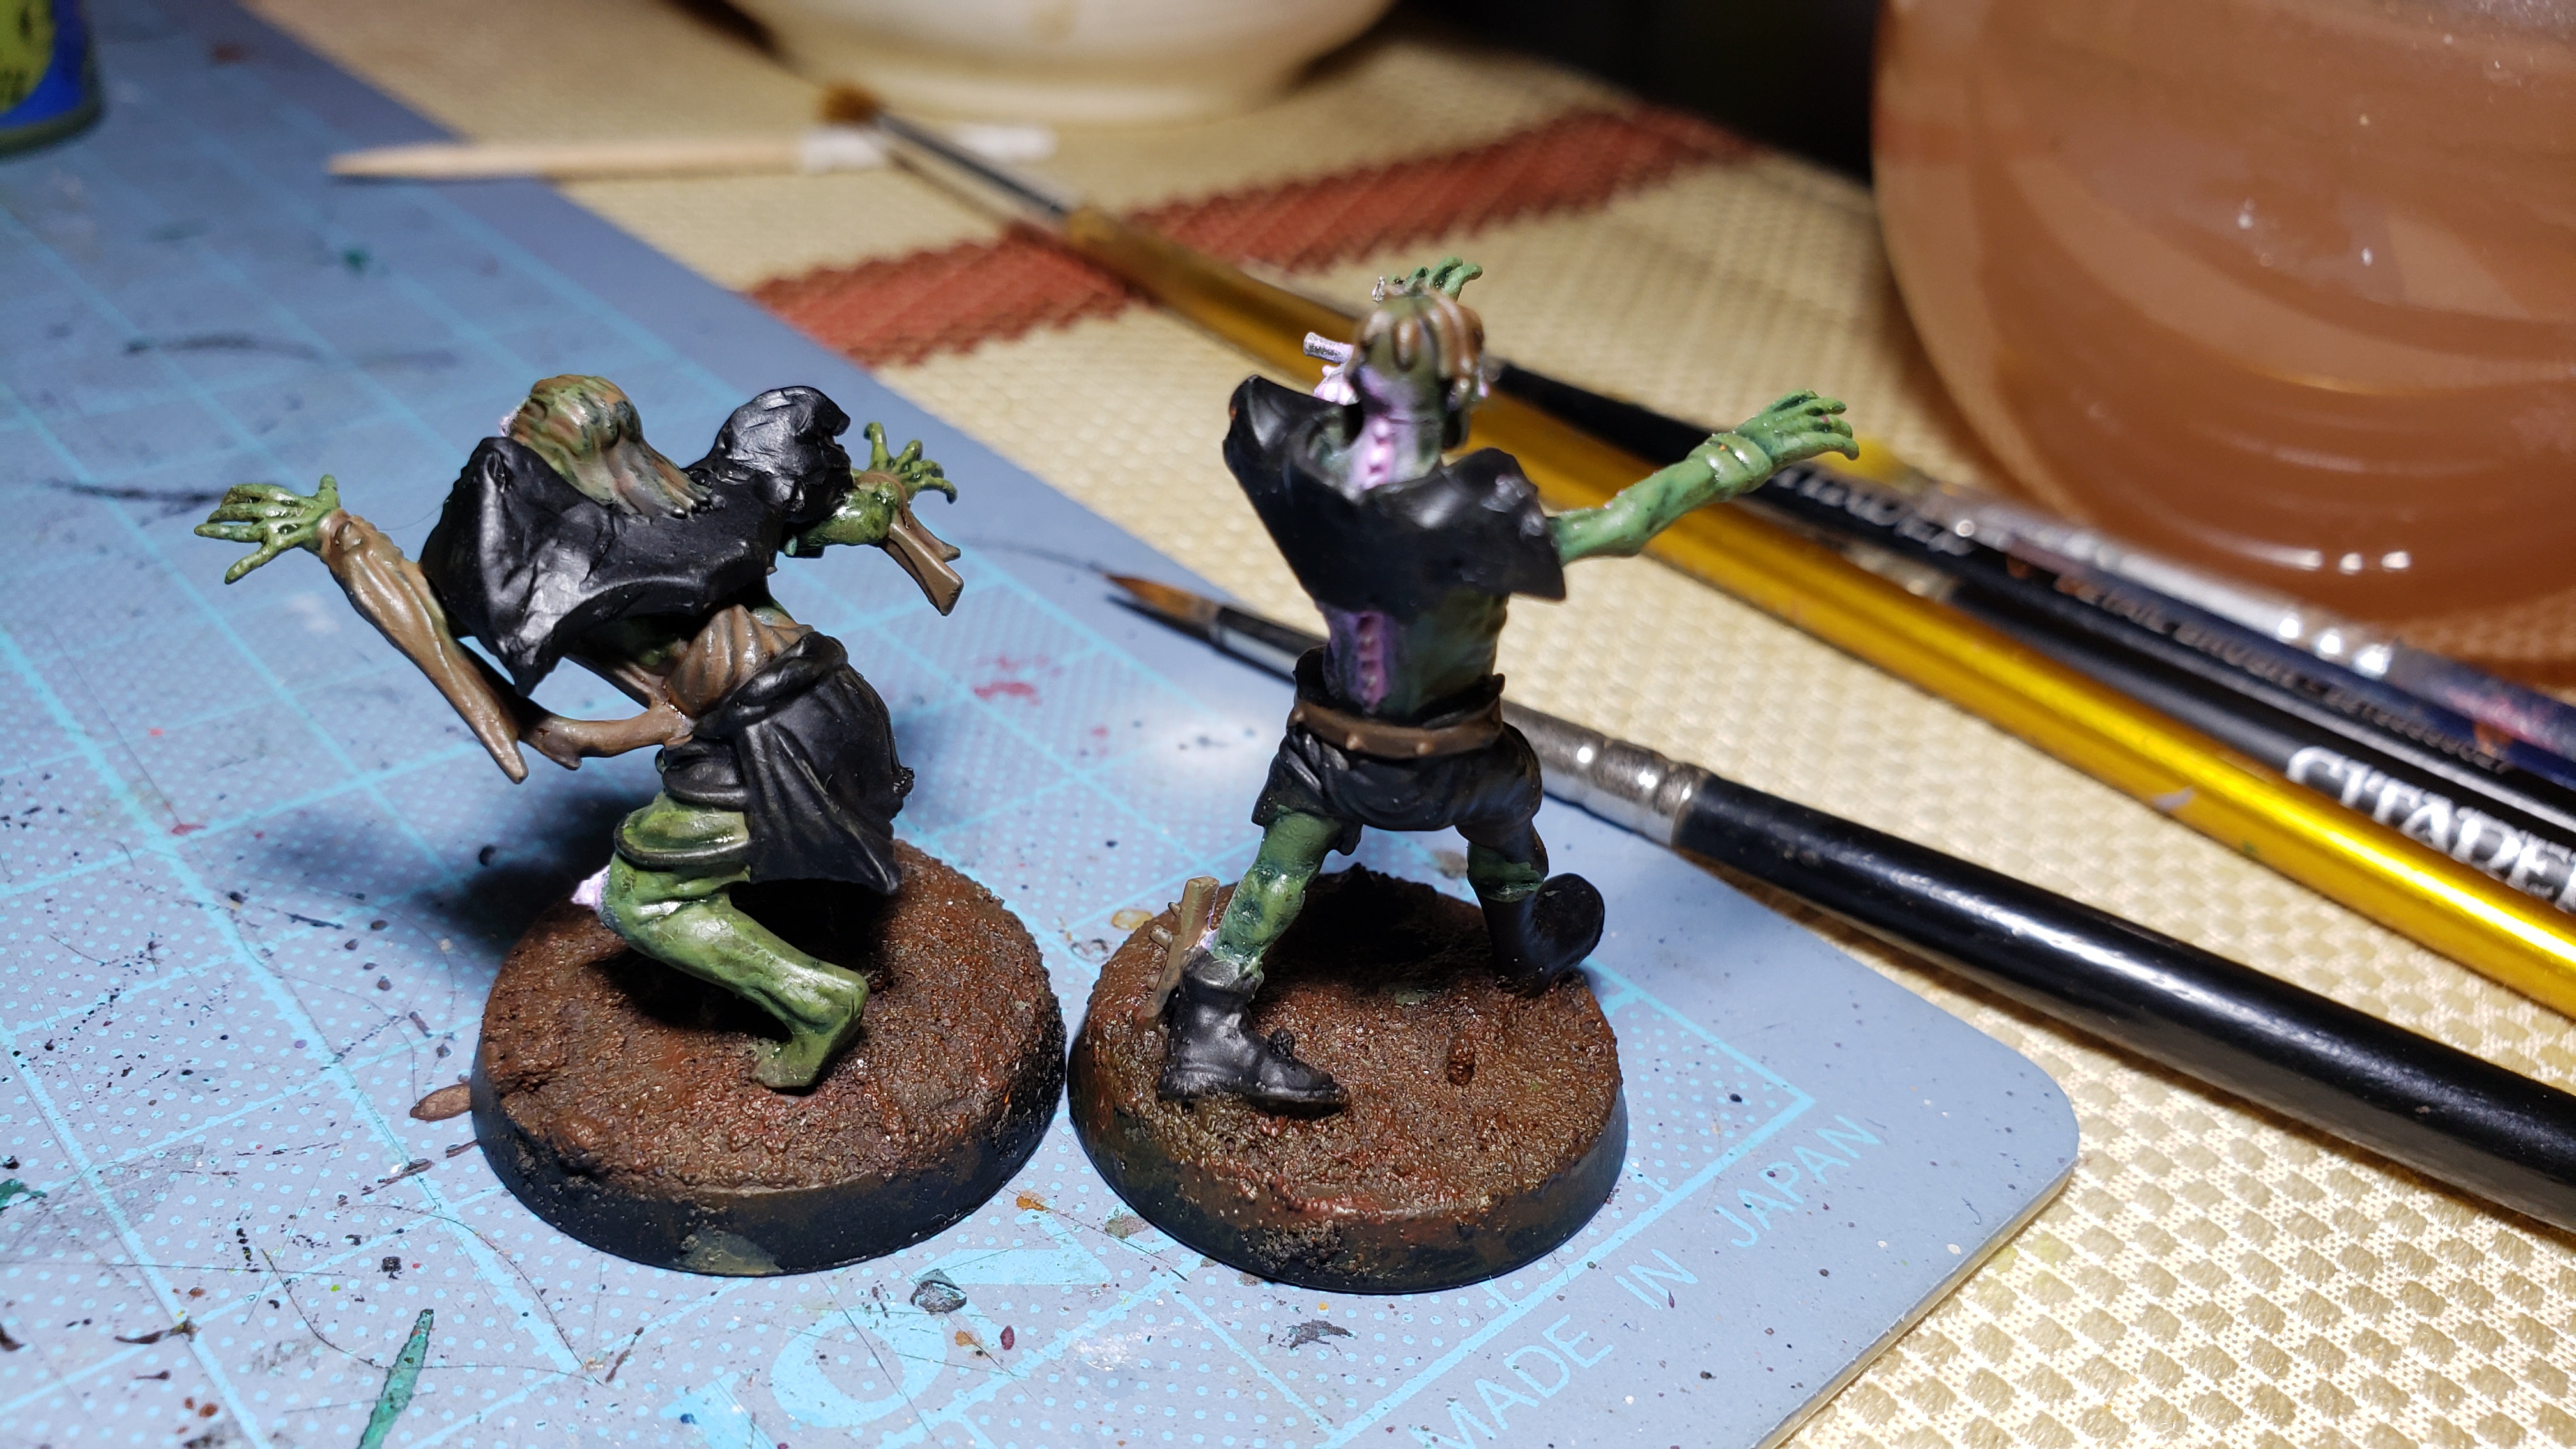
I consider my Wraiths blockers as they come with block. And are green. (Planning!) And my wolves as blitzers in red. Since they have glowing fiery red eyes and claws. They have high movement and frenzy as well meaning marking them as a threat in red makes sense to me and stylistically pleases me. (Ghoul) Runners don’t have a set color and could be considered catchers I suppose, but I didn’t want to yellow up the bases and went with blue instead matching their color scheme. Also the red/green/blue color sequence has deep significance to me in general. Lastly my flesh golems are basically semi-big guys so have no color so I did them up in purple to match their scheme.
Just an aside on positional coloring schemes, I also do my dark elf witches up in purple too since it feels thematic. I like to have the colors be easy to see at a glance and ideally evoke some kind of emotional response so it’s easy to remember what they can do. I am wondering if I should put some kind of marks/dots/squares near the numbers indicating the pre-loaded skills as well, but I use loom bands for that.
Anyway, you can’t see it very clearly from a single picture (Look forward to the finished product when the entire team is complete!), but I took my time doing to numbers on the base rims, both front and back, and also put the numbers on the models themselves. For the wolves and ghouls, I didn’t want to disturb their armor since some of them were spikey and/or had that nice thin stripe of gold. So I opted to do them in black along the gold stripe on their pants on both sides. It was one of the easier, flatter, more visible areas to get a number in and I was happy with it. The 5 and the 6 on those ghouls came out especially well and the #1 on my werefox was horrendous and it haunts me (ayy) to this very moment.
Final Reflection on the Necro Positionals.
My wraiths were a tricky situation. The myrnmorn banshee model doesn’t really wear any armor to speak of besides their breastplates and it is so small and fiddly I didn’t dare take a brush in there and try to write a 3 or 4 on one of the boobs or something. I also talked about working the numbers into the ethereal goodness and you can see an example of #4 to the right here.
‘Four Youuuuuu’
I think it was effective enough and doesn’t take away from the model’s etherality in general. There is a smaller number on the front like, dress-looking area of the model in a similar color as well. With these wraiths, I honestly feel like they look fine with a single glaze coat of tesseract over white or light blue and they are good to go. I managed to try and highlight, glaze down, rehighlight, drybrush, etc. back and forth countless times and don’t really think it did much. I added a bit of yellowish green into the eye and mouth zones and along the fingertips to try and get a little bit more glow action in there. Painting ghosts is both super easy and tricky at the same time. Love these models so much, but anticipate them being far too large to play nice in a regular blood bowl game since they are going to be in traffic undoubtedly especially after they get some guard.
‘EARGH!’ -Left Flesh golem
The flesh golems ended up looking pretty nice as well. I think they might be missing something, or maybe the glow just doesn’t sell as well as I’d like it to, but I love em. Ultra breakthrough was on the shoulder pad number. The stripe was big and thick and I wanted to write the number large and ended up doing a kind of inverted colors look which outlines it over the stripe. Came out great and I kind of want to do it on all my models, but I would need a paint brush the size of a single bristle for some of them and I don’t have the patience.
Ghouls came out alright overall. I liked the numbers on the sides of their shorts. These guys are also the smallest players on my team since they are all balled up and hunched over. Happy with the coloring for the most part even though I didn’t get the glow exactly how I imagined it.
My werewolves, or werewolf and werefox, came out great. I was happy with the models but not blown away when they were just pewter, but they paint up fairly nice. I was also happy with how the two schemes I attempted came out as well and the glow effects on the black wolf were awesome, but got lost in the fur of the fox for the eyes. I probably should have gone for a dark grey wolf instead of a bright orange fox to be honest, but the mood struck me and I do what I please, glowing eyes be damned.
Fumbbl Experiences/Necro Strategy
Finally, and end to the rambling. And to this article which has been kicking around for just under a month or so now! I managed to get that team painted up fairly quickly believe it or not. I posted the previous raising the dead series article on Feb 19th and today is March 11th. Not bad at all. I put a good amount of effort into these guys and the glow was a lot of experimentation so that took some time.
I am looking forward to putting them on the pitch and playing with them IRL as opposed to on fumbbl. I have had a few decent games on fumbbl actually:
Also learning a lot of harsh lessons about the team build and skilling as well. 3 rerolls is a luxury honestly and I could use them, but don’t think I will need them once I get used to my team. Playing on fumbbl makes it difficult for me to really ‘feel’ how each player works so I make a lot of mistakes. I also care little for the results in the long run and it’s just practice and fooling around for the most part. If you saw some of the fool-ass dodges I make towards the end of some turns or idiotic passes you’d tut tut me like an obaachan watching someone walk and eat ice cream. But when those crazy plays actually work a bit, it gives me a strange undeserved confidence to try silly plays. 4 wins, 2 draws, and a 3 losses isn’t bad though.
My skill choices are … aight. And I did a lot of random skilling. I have a lot of money since I got my positionals, suffered a lot of injuries as well. I need to be smarter about how I hire zombies since I have two or three extra players in the reserves box at the end of every game it feels like so firing a couple zombies wouldn’t hurt. Lessons learned. That frenzy/tackle zombie has been a strange and interesting weapon though believe it or not. Ex Chaos Dwarf he was, fitting he found tackle again haha. Or is that just regular dwarves who get that. I don’t remember.
Guard piledriver wraith has been a surprising ass kicker as well. Piledriver is often commented on as one of the worst skills, but I have risked it a few times and it can come through in the clutch after making a big block. Getting dirty player or sneaky git would make Gassy the Betrayer a true threat on the pitch. Regardless, sidestepping block/guard is gross and those guys are just deadly glue that pin players and cause trouble.
My flesh golems ended up as glorified zombies for the most part, but stand firm has been crucial I will admit. Finally getting block on one should hopefully make them a bit more interesting as I typically set them up as pillars one both ends of the central field just before going into the wide zones and leave a small spread out mess of zombies between them as a net. It is basically a swamp of annoying people to get through so it forces players up the side lines unless they can get a few removals or effective and timely pushes, knockdowns, etc. My Ghouls are completely godly with ball carrying and snake stretcher has become a beast with all two random and two chosen skills. I typically will run GFIs with him just for the fun of it since I can. He needs sprint. I usually put one or two ghouls in the backfield depending on if I am kicking or receiving. I like to go back and forth doing handoffs with these guys every turn or two and enjoy watching the opposition try to reposition while my zombies, flesh golems, and wraiths just lay into whoever got caught in the undead net.
My zombies have almost all lucked out severely with their random skill rolls as well. Tackle (Though he has a -1 to MA), wrestle, block, and the beast with frenzy/tackle.
What should I do/ have done before? Fire zombies 9, 16, and sadly potentially #10 (Tackle but with -MA). I am learning with necro that their regen is pretty reliable and zombies, etc. typically make it back into the next drive so the need for a bench isn’t nearly as severe compared to ‘living’ teams. And zombies are free basically when the proper CASes start to roll in. A block, a wrestle, and Frenzy/Tackle zombie are more than good enough to shore up the front line with the flesh golems essentially giving me control of the midfield unless I face some pretty tough bash.
I should have skilled my wolves more carefully. They are more fragile than I thought and wish I had dodge on them. They need to be blodged up. Block or wrestle, maybe jump up would be good for them as an ultra threat. Catch isn’t a bad call though, but I went too far in on it I think. Rolled it radom once and decided to take it on another thinking the ghouls would do the picking up and then hand off to the wolves would run it in. Happens often still, but maybe not catch on both. Maybe strip ball or tackle to make them a bit more lethal. I should probably go ball-carrier with one (Block or wrestle/catch/Dodge/Jump up, etc) and Violence with the other (Blodge, strip ball, tackle, jump up). They are basically hyperspeed witch elves with claws if I can get dodge and jump up on them. And I love me some witch elves. I typically set up my wolves in the wide zones two or three squares from the line of scrimmage. Ready to spring into the backfield to snag a close kick or to receive a handoff and dash away when on offense. These guys and the wraiths basically play around with the ball like a bunch of dogs in a yard until the other team has enough people tied up or removed for me to push hard and open a nice hole for them to get through and run for daylight. (Well, moonlight.)
The ghoul could have probably been leveled more carefully as well, but once I have blodge on them I basically let the dice take the wheel unless they have a big enough game where I can pick. Sure feet and sneaky git were not bad rolls, but I picked sure hands I think. Blodge is a must for survival sadly, and I like to take sure hands on one to avoid any issues. They have such high movement they can get anywhere and pretty reliably hand off to wolves or ghouls positioned in the backfield. Ghouls have the same primary skills as wolves so its tough to say. I like the squirrely blodgestep ghoul, maybe toss in some fend for good measure and that is a player you can’t take down. Reliable ball carrier who is almost untouchable. Maybe give them sure hands after block and then roll on the AG table to see which way they go. Lots of potential there.
I talked a bit about my wraiths already, but guard is solid, mighty blow ideal. Tackle in high dodge leagues, maybe even frenzy. Grab would be fun since they already have sidestep, being able to grab people (And cancel sidestep) as well would be tasty.
The Coming (IRL) League Season
Here is a sneaky peeky at my starting roster for the coming season.
I have read plenty of tomes of information both new and very very old with all kinds of ideas, insight, and strategy on how to play the necro effectively. There are multiple schools of thought, but this is how I am playing it. Starting Budget of a million GP, standard.
For me, two wraiths and two werewolves are mandatory, period. I am a firm believer of anything ghouls can do wolves can do better (Except dodge.) and wolves and wraiths ARE the Necro horror team to me. They is my baseline hence they are #1~4 on the roster. I originally had two ghouls, and more zombies or more rerolls, etc. but I decided based on my fummbl experience that I only needed one ghoul for the time being and dropped the second one (#6), although I came up with a name for him already. I honestly usually start with no flesh golems and work my way towards them, but I liked having them on my team despite being so expensive and will stick with one to start and end up using him as one of the pillars in my defense. I will just use a few more zombies to cast my ‘undead net’ and hopefully have the golem lure big guys and other linos away from the action to try and deal with them instead. Good distraction piece.
So the team is two wolves, two wraiths, a ghoul, a flesh golem, and 5 zombies. That is a zero bench, 2 reroll Necro team, but I spent the remaining cash (30k) on dedicated fans. No matter what my first game I am going to get a minimum of 35 K in winnings even if I lose and we both roll a 1 for fan factor. If we both roll 3’s that is 55k. Pretty much half a flesh golem before even factoring in touchdowns. I think the dedicated fans gambit might be a good one, but only time will tell. If my season goes similar to my fummbl performance, After two or three games I plan to hire my second flesh golem unless another positional dies (Again. Permanently) in which case I’ll need to replace them. And then I will consider if a second ghoul is worth it or not depending on how the wolves/ghouls are skilling up.
If I am really looking good with cash I will go for a 3rd reroll, but I don’t anticipate everything going that smoothly. Honestly, this is my first proper season with them on the table and it will be a learning experience. The best way I learn is to run out of rerolls haha. You learn a lot of things quickly, harshly, and without remorse. This is the Way (Of Nuffle).
Conclusion and Looking forward
And so the Necro team is all but finished. Roster ready, plans laid, built, painted, and looking good enough for the table. My goals with the necro team besides getting them skilled up enough to stand a chance in the ‘tough’ division of that league is to keep my CTV under control and play a lean team where possible. I can forsee grabbing an extra Zombie here and there, but I am hoping that they join the team ‘willingly’ from other teams instead of my digging through the old names and raising them up.
This has been a fun project so far and getting the team I plan on using painted and ready (And before the next season actually starts no less!) feels really good. Going to keep the machine going and bust out the Shambling Undead / Khemri Tomb Kings and paint them up going forward. It is mostly a ton of skeletons so I will need to get good at that, and quickly. I think it should be a bit more straight forward than the kind of mismatched nature of the other positionals as far as sources for the light are concerned, but it will be a unique challenge for sure.
I am mostly looking forward to painting up those tomb guardians since they were seriously the ultimate labor of love in the construction phase.
If you managed to read this far, good for you and have pity on your soul! Hah. Until next time dear reader,
Started writing this the day after releasing my previous post! (2.3) Managing to get so much evening hobby time (And keep up with Book of Boba on top of it!) has been excellent. My sleep schedule and overall awareness lament, but there are prices that must be paid. IN BLOOD.
Epoxy Power
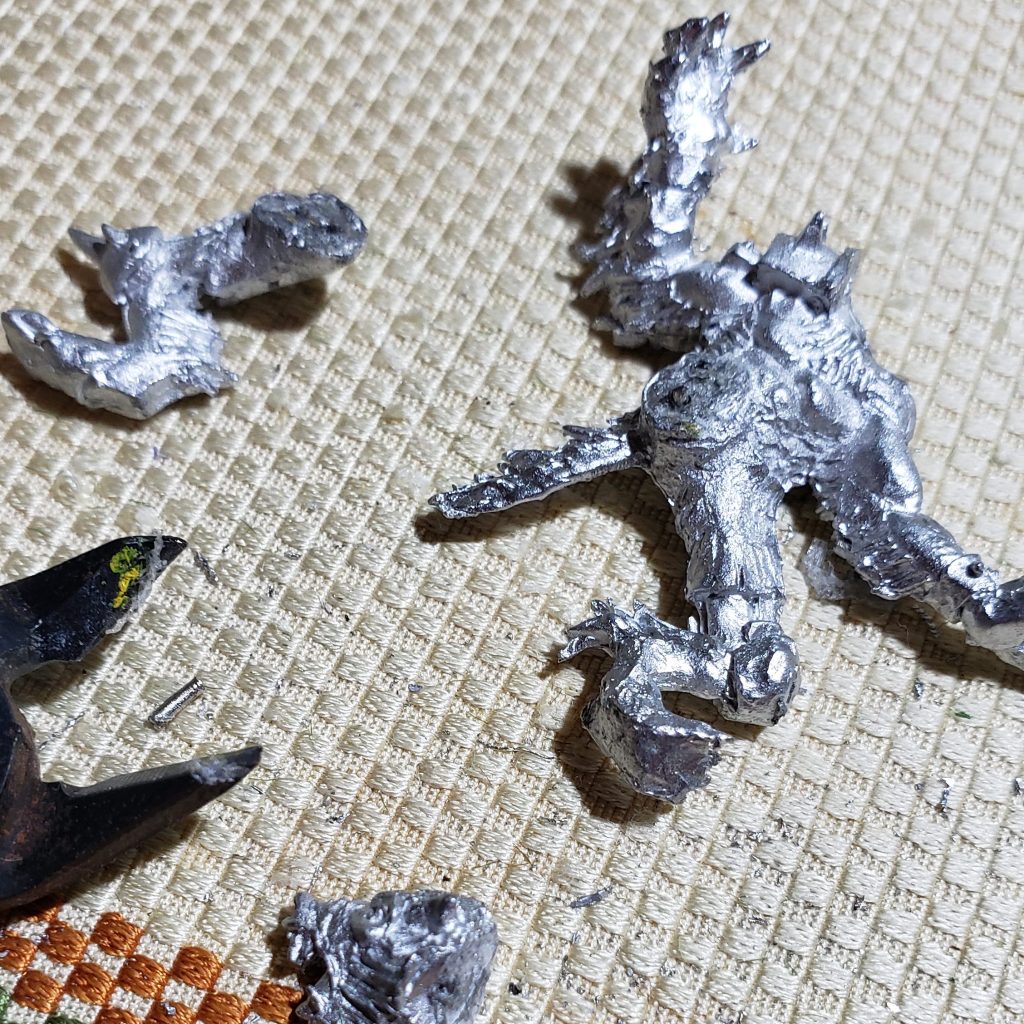
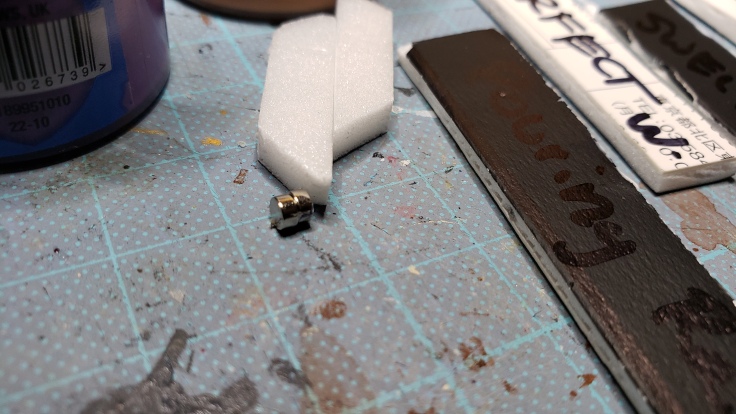
Cut that putt.
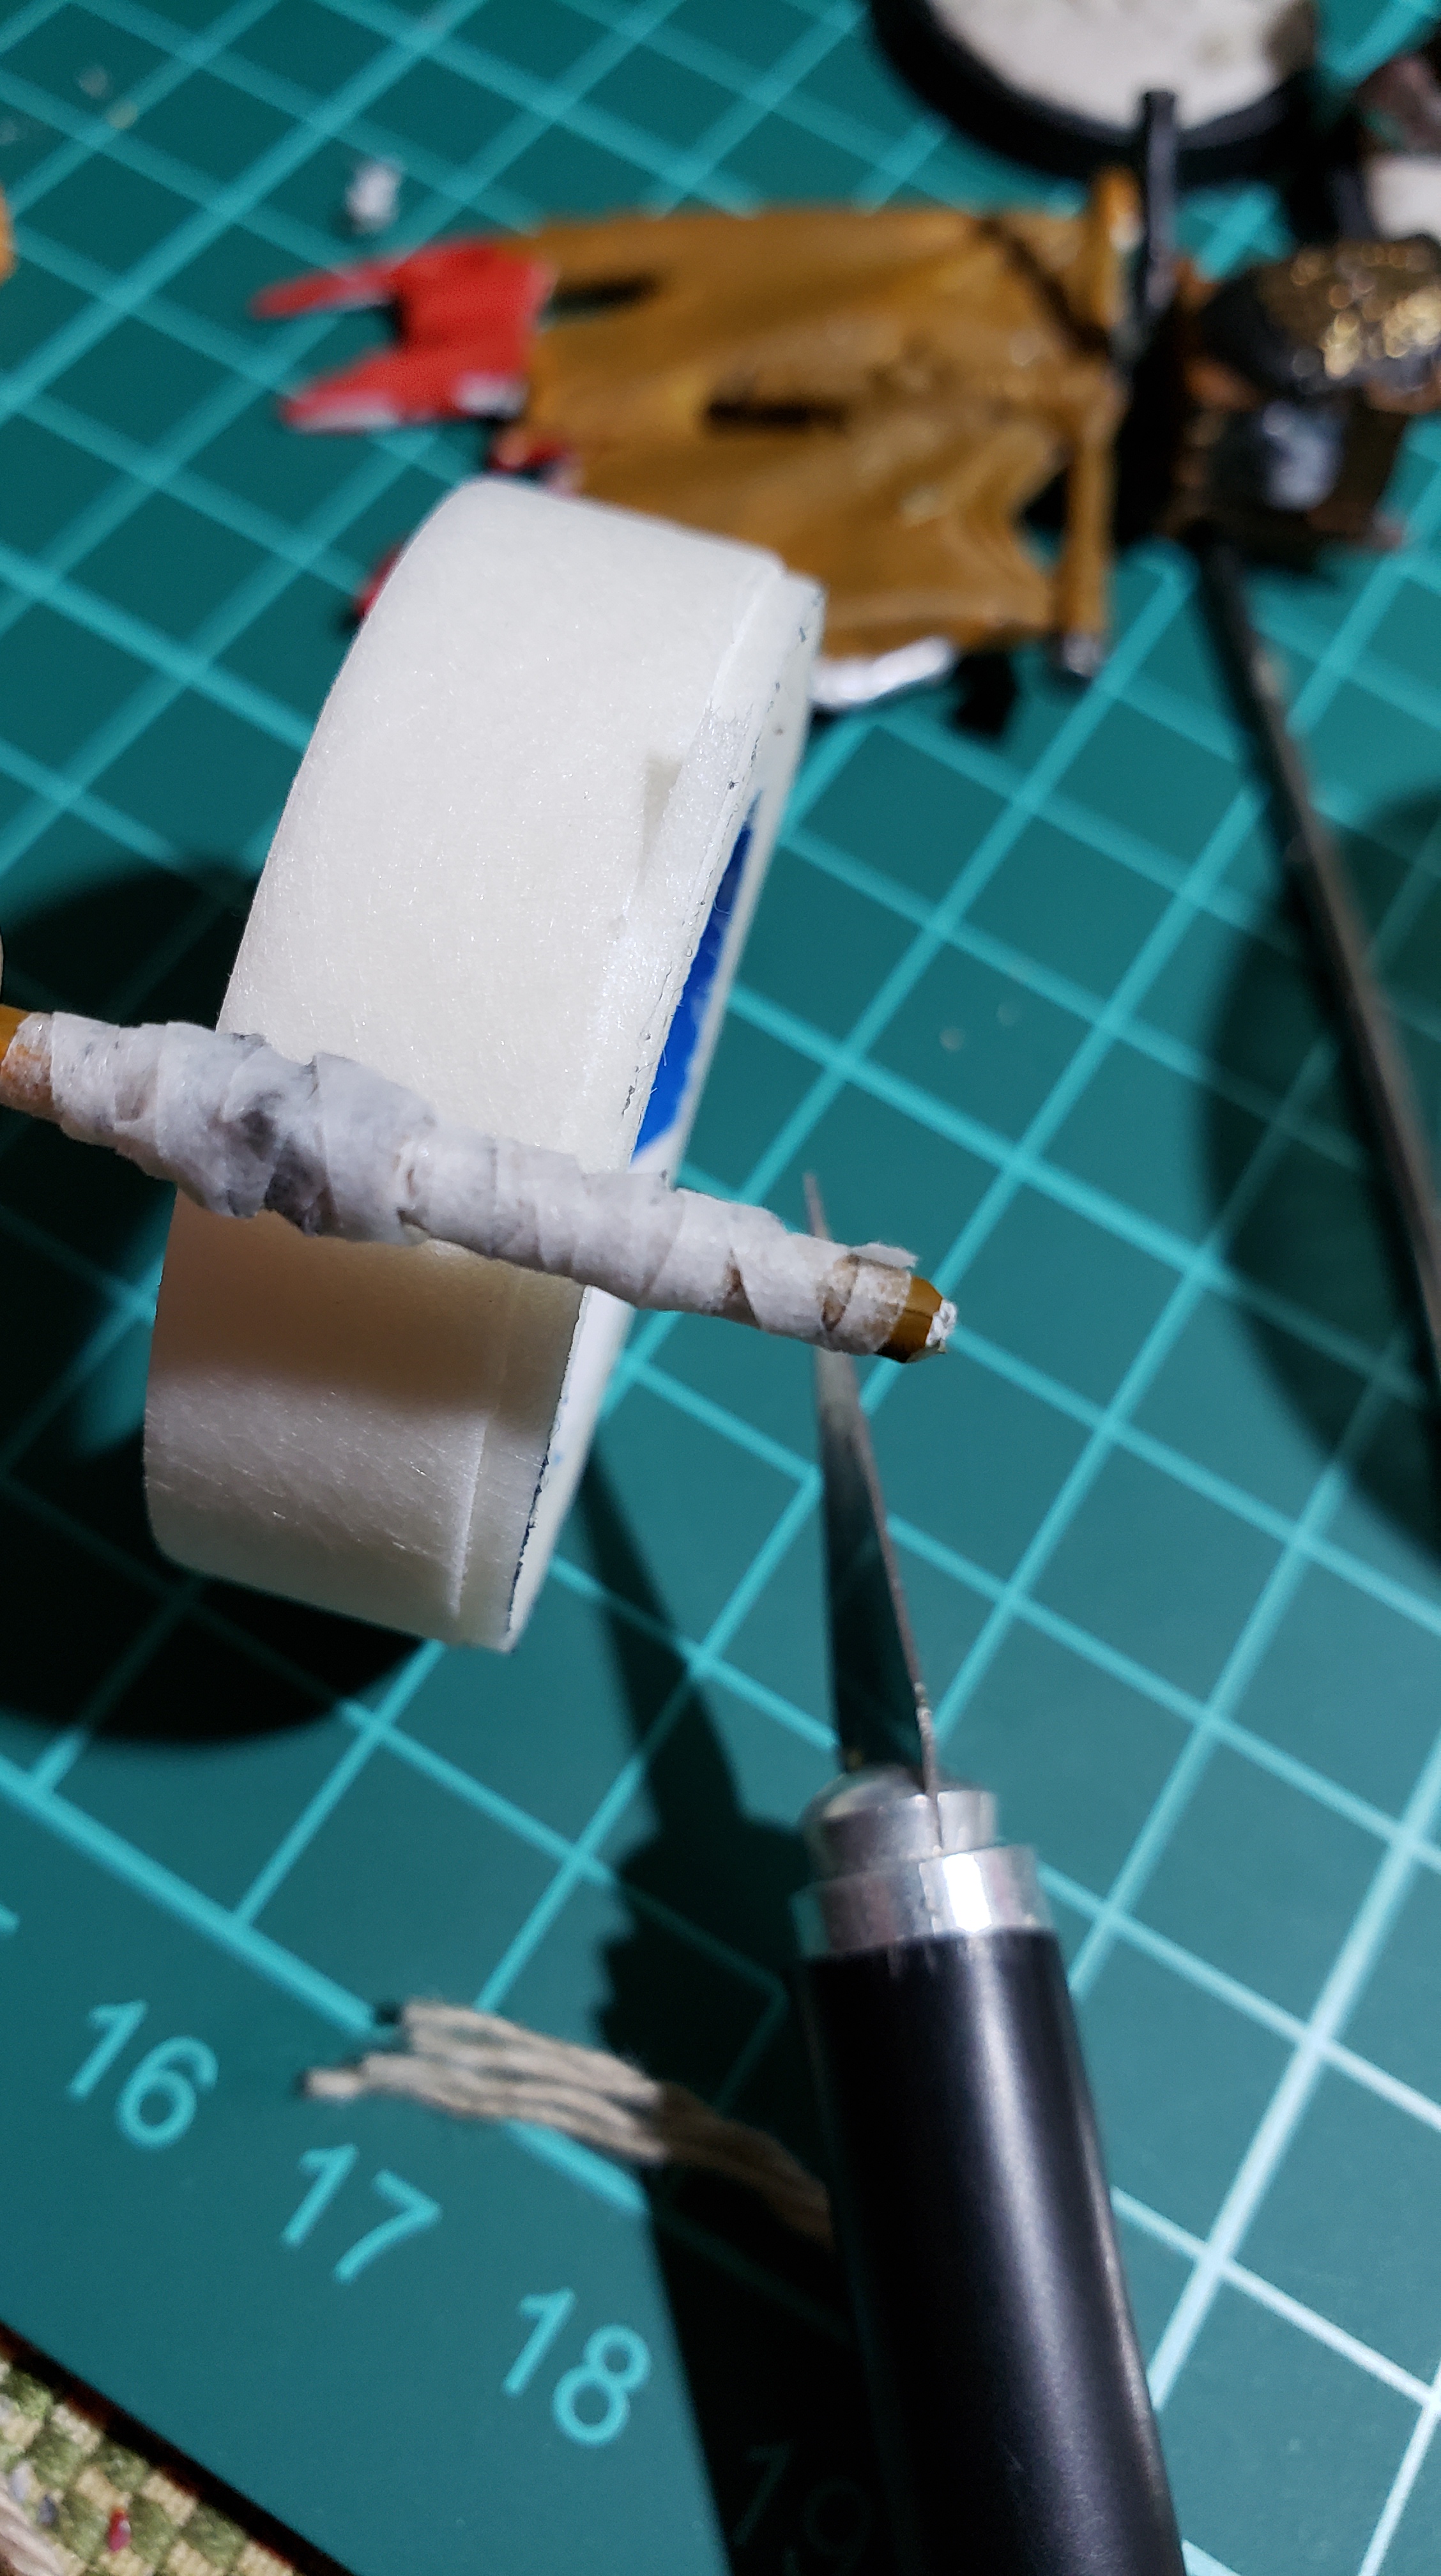
So for modeling and such I have gone back to my normal nice putty, but not my highest quality stuff. THe stuff from the daiso is seriously stinky and makes my fingers smell and is overall more crumbly than the others so I am saving it for basically large use application where I don’t need to be precise. I had a bit of work to do to bring my linos and staff up to reasonable condition. SHoulderpads forever, a few small additions here and there on the throw/blitz ras, and some fun stuff for the coaches. Above you can see the putty after I cut off a hunk, and the (toothpick pack lid) dish I fill with water so it stays pliant and doesn’t get overly tacky while I work.
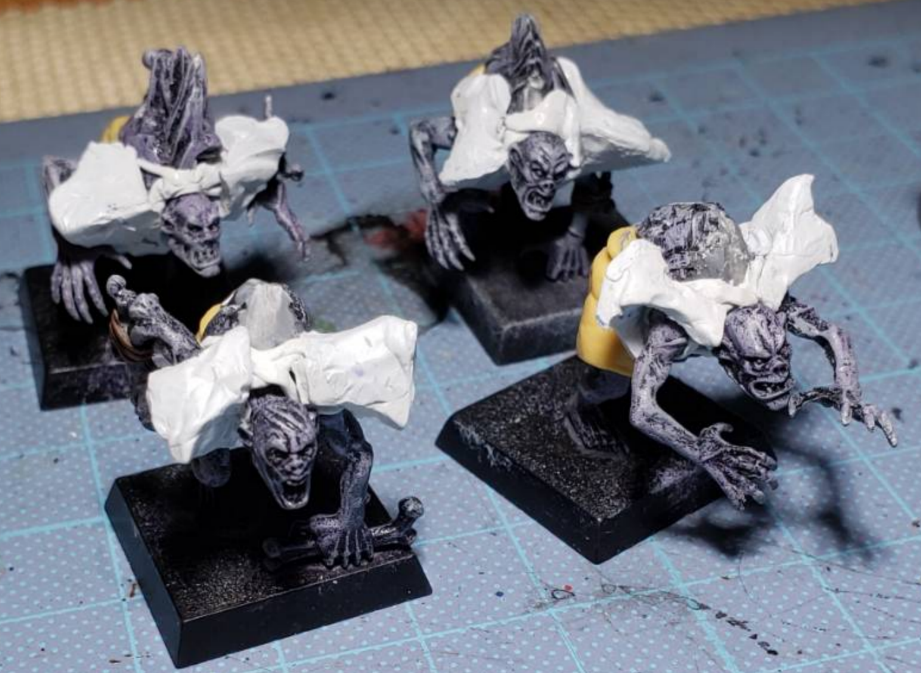
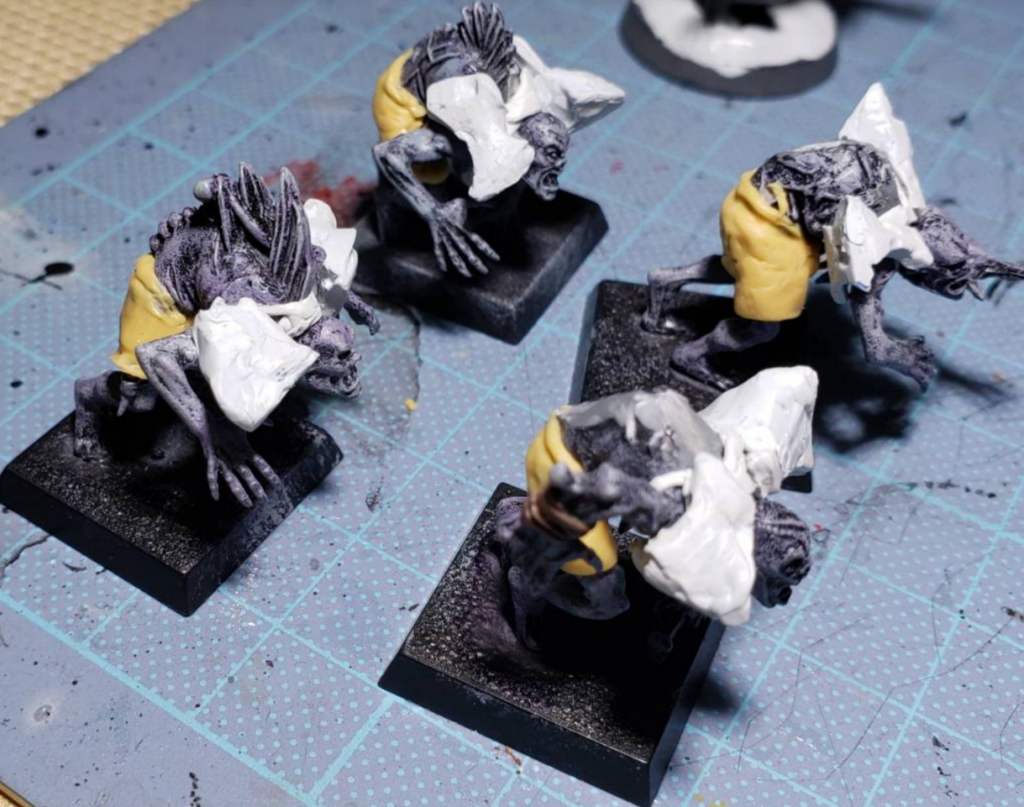
GHoulishly good looking? Mehh. Maybe.
So the ghouls turned out alright overall. The idea is that there are two shoulder pads connected by some basic straps holding them in place wrapped around the shoulders, chest, and back. It doesn’t look like much, honestly none of it does, but paint will have to save the day.
Side shot of the ghoul kids.
So the ghouls looked alright, and actually the zombies and skeletons turned out OK too. After seeing the slapdash effort that was my casted should armor glued hastily to the models, the epoxy actually managed to make them look good. And I believe that having casted them was the right call so I had a base to work off of instead of trying to mold something from scratch which would either a) take a ton of time waiting for layers to dry each time while building up to the final product and b) be fiddly, sticky, or not stick, and just be a pain in the ass overall. Having the base of the original shoulder armor let me get the general feel set already and just need to fill in gaps and add some corrections here and there.
4 Zombs from the front.
So the concept I came up with while realizing few if any of these shoulder pads would end up matching in shape and size was that they don’t match in shape in size. Why not? Think about it. Skeletons and zombies are linemen for the undead teams. They are pretty much dead and getting beat up without fail every match, every drive. Journeymen, freshly raised zombies and the like. Needless to say I highly doubt that any of them are getting the top of the line armor that mummies and werewolves have. I imagine the zombie that previously died was unceremoniously emptied from the previous armor, maybe they wipe it on what cloth is left on the corpse not soaked in blood and hand the still dripping wet gear to the next undead guy in line who curses their horrendous wages under their non-breath (More of a ‘ughhh’ as opposed to an ‘UNnngghh’) and hopes for glory if they still have hopes and dreams left after being raised and ultimately controlled by a necromancer. It’s getting philosophical right now so look at another picture.
I like how the one dude is looking right at the camera like ‘Get my permission before posting that online!’ I didn’t. I won’t. And if you are seeing it, its online no doubt.
Besides going for basically the same overall shape, I also put some dings and dents in it. Thankfully its not meant to be the best armor so it doesn’t need to look that good. And I think I will be painting it a dark color too. Dark Greys/Blues/Purples/Blacks will maybe be the color scheme. Not sure. That was actually one of the jersey colors of my team during school sport. (Proceeds to google color combinations and derail this conversation) Alright. I am back. I think I have a good idea of what I am looking for and I might even be able to keep a similar theme to my (gross) Fumbbl Team as well.
The New Orleans Saints NFL Team
Purdue Boilermakers College Team
See, now I want to do a team up and call them the ‘Taints’. As in they are tainted, but also because it’s yucky. That shall be considered down the line. But I like the black aesthetic since my armor will be so cruddy painting it a real color might be shameful. But the light gold color as an accent is nice. We shall see how she goes. And the players themselves will actually be glowing so the black will be perfect to try my (shoddy, poorly practiced) OSL techniques on. Hopefully. And then people will be focused on the OSL and if it is any good rather than focus on how painfully lumpy their armor is.
We’re back!
And from the other side. I was actually super pleased with the results. Pictures of the skeletons in the background of pictures to come. Don’t worry about it, they turned out fine.
Spooky Scary Skeletons!
Aw yeah. So a majority of my epoxy work was on the armor, but there were a few bits here and there I wanted to do on the khemri dudes and some sideline staff to make them nice.
Subtle, but effective(?) Also, D&D skeleton Linos in the background there.
So, this was a small and quick one. I just did a little band on the inside of the wrists of my blitzers where I added the blocking bracers. The bracers came out alright and the little strap just adds some realism to it being an actual worn piece of gear as opposed to glued on bits. Here’s hoping.
Out of focus, just like I was at 1 AM last night taking these pictures. (Skelly Lino’s cheering in the back)
My throw-ra’s are looking tasty. A single wrist band on the left thrower in epoxy and a headband glued on which was just a bit I had from some WHFB knight helm. I meant the wrist band to be a more proper wrapping, but my patience had worn thin by then (this was all done after the shoulder pads) and I said whatever. The dude on the right got a headband from the same bit, and epoxy on the front to finish it since apparently I am a gorilla while clipping bits and they were old old plastic bits that were hard as rocks and refused to cooperate. I went through two helms to salvage as much as I did. More ribbon (pinned. Ugh) on the right hand to emphasize the throwing motion and some ribbon on the left arm as well. Overall they turned out alright and the headbands alone should denote them as throwers before even getting to paint. I am excited to see what they look like after paint honestly. Getting that inspiration from the black and gold above really got the wheels turning in my noggin. (Blog therapy strikes again)!
Close up of the try-hard thrower and the quite artful epoxy work I did on the wrist.
Yeah I was happy with that. I have a single (proper) tool i use when modeling epoxy and one side has a flat end and the other has a kind of spoony-scoopy end. Flat end did some work and this little, seriously TINY, piece of epoxy ended up quite nice. Those squares on the mat are centimeters for reference. Quite pleased with that.
Coach! COACH COACH COACH!
BEHOLD! The Undead Team Coach and an assistant coach
It is such a small thing and I actually finished it ages ago while casting the shoulder armor, but the simple ball cap on the fantasy model basically transforms any model into a blood bowl model almost instantly in my opinion and this was so great. I seriously love it. Did up a special play/spell book on the staff/spear/magical implement that the Coach Necromancer uses. (Also side note, just did a check and only Shambling and Necro have the ‘Masters of Undeath’ special rule and can raise the dead. Once per game mind you. I didn’t think Khemri could, but it was interesting to consider. Zombies only, not skeletons, I see now. Yeah. Anyway.)
So my coach looks awesome and there are a couple other goodies on there as well.
Book of plays/rules, etc by his feet and the quick play display armband as well.
So I wanted this guy to be holding a clipboard that I could draw plays on. Coach models with clip boards covered in x’s and o’s please me to no end, but I would have had to exert effort. More effort than I had in the tanks, when it hit me. QB’s in American football often have wristbands with plays and such on them and I thought that it might work. Slapped on a slab I use for armor and such and will print out something and paste it on there later. Should be good. The book on the ground was also for effect. But I love that guy. That is a coach model I am proud of and will need to bring all my other coaches up a few notches to match that since most of them are just glorified fantasy/40k models painted in the team colors (Which is enough, but not ideal. This is the first time I was in the modeling phase of a project and had my coach at the ready.)
GUARDIANS ON THE (tomb) GALAXY
So with the rest of the team pretty much sorted, I can proceed to the next and (potentially) final phase of modelling. Building up the 4 Tomb Guardians for the Khemri Team. They will be big and scary and chill out on 32mm bases (If I have 4 of them) and will generally be badass big guys I can swap into other teams as well I hope. As an Ogre or what have you. Seeing as they are Ogors already.
The concept: As discussed in article 3 , I am going for a mummy/viking hybrid concept to mesh with my positional players (The blitz ras and throw-ras, coaches above) but still have some mummy goodness. I have a friend (My dear sorcerer of the S&M Podcast) and they are aficionados on a great great wide variety of trivia including viking lore. Moral of the story, no horns in helmets (Unless they are general visigoths) , but death masks are OK. I shall see if I can’t find a balance between all those things that is easy to model. (Still haven’t been to the dollar store to find proper wrapping material for my mummies.)
Since I am still in the planning phases, let’s attack google and see what we can come up with to supplement my inspirado.
Apparently the mask of Loki from ‘The Mask’ is Norse! THat is also a severely doable design too.Bull Ogor’s carry this cool beast skull and I got one or two of them. That is pretty legit if you ask me.
Now this is a sexy one. Made of Bark, dangling runes? Antlers! That is sexy alpha foxtrot.The Classic helm with chain mail flowing down.
So, I was going to go full helms across the board, but this mask idea has gotten into my head and I think having a variety of different masks and headgear will actually make them stand out and give them personality. I will also go on record stating that the one mask with the horns is a mask and not a helm, so fall back. Ayy.
The plan is this: Bust em up, then used loads of epoxy to elongate the parts and create poses. Then, wrap them up almost entirely. At this stage I will have mummies. Then, I need to forge and affix the armor, bracers, and masks. Maybe pants or loin cloths or something since I kind of want to do belts too. At that stage see where we are at and then determine if I can do up the bases or not then move on to paint from there. Yeah!
Bust ’em Up & Elongate
Alright! Back in the proverbial saddle after taking care of a handful of business for an upcoming league and have also been able to get some proper work in on the TGs. (2.9)
4 Bull Ogors (Not for long!)First round of chopping. Doing my best to pop off arms properly and remove those obscenely huge belly plates. Even got a snotling/gnoblar for my efforts!
Side note here, that little basket the gnoblar was chilling in (Just on the top edge of the picture.)looks an awful lot like the crow’s nests that cameragobbos use in blood bowl when transmitting to Cabal Vision. Inspiration strikes for the next fun project.
Hacking them to bits. Very thankful I don’t have emotional investment into these models.
I don’t know how kitbashers and converters do it to new models, man. It felt so dirty slicing and dicing these bad boys up, but it had to be done!
Cut em’ up and trim em’ down.
After the initial cuts, I further cut the waists in half and trimmed down the legs, sacraficing some pretty sweet dump truck booties in the process, but all will be well. Rest in peace dat booty. Also trimmed off a fair amount of the pants on the lower torso and popped off the heads too. I mostly just want the legs for the feet and a strong base and the torsos as a means to drill pins into.
A leg to stand on.
At this stage I got out some bases, puttied up the bottom and plopped the feet on.
I decided that I was going to make these tomb guardians from the ground up, and I meant it! I ended up supergluing a few spots to secure the feet to the base, but most of them were good to go using just the putty alone. I pushed a bit of the putty over the feet here and there to lock them in place in a few spots.
Getting a leg up.
Already I can get a slight feel of motion for some of these models and I feel like the legs and feet set the tone. I tried to do a few in moving/walking poses. I don’t see tomb guardians dropping the hammer, but they do have a respectable MA 4 despite being big ol’ sundabits.
Heads up!
Taking a bath in the gauze hot spring.
You can’t really tell, but I drilled a hole in the neck, and the base of the skull and popped some paperclip in there to raise the heads up. I want these dudes towering so the head needs some extra height. Debated leaving the heads floating, but only for a moment. Also, attached that bone mask instead of the head and immediately my ‘alpha’ was born.
‘Waist’ing Time. (That was a good one.)
Making new waists
So I grabbed a blob of epoxy putty and made some waist segments to connect the legs and add a bit more motion to the model. Seeing which models are standing, which ones are moving forward, and which one is kind of drunkenly stumbling forward.
Another angle, closer.
So my game plan is to just block out the basic shapes and then sculpt more over it later to add definition. This is all going to be wrapped up later so it doesn’t need to look amazing. I like how there is already personality coming out through just the legs. Got the thin dude in the back next to the kind of smarmy side lean guy. Got the falling forward boy on the left and the ‘ready to rock’ legs on the right.
Neck and Neck (Not such a good one.)
Did up the necks while I was waiting for the legs and generally just wanted them to have a general shape.
They look a little bit like either nuns, or, dudes with (textureless) chainmail habits on. Actually exactly what I was going for.
Shot from the back. How often have you wanted to linger at your own dump truck?
Stand Tall My Mummies!
Torso time!
So i ran out of dollar store cheap putty real quick and didn’t realize how much I would be using apparently. But it is so cheap and I don’t need fine details from it so I figured I would go and buuy some more. But it was sold out. At two places. So I ended up getting some of the putty (Which sets exceptionally quick by the way.) that is supposed to be used with leaky pipes and is water resistant. I hope that doesn’t affect glue or paint too much, but I just rolled with what I had and am honestly already out of the couple of tubes of that stuff I got already. Still smells funky like the ‘all purpose’ stuff (That whiteish beige colored putty), but comes together more nicely into a more pliable and less crumbly putty with the only issue that its more sticky (water remedies this) and the working time is much shorter (Maybe 10~20 minutes tops. I started doing small batches (Two torsos at a time) and things worked out alright.
HOnorable cheap dollar store water resistant epoxy putty.
Throw some hands.
BEHOLD! HANDS ON STICKS!
So I am using these super thick paperclips that are like 2 or 3 inches long and almost 1 wide. The thickness is great and it matches up with one of the dremel drill sizes I have quite well. Only issue is that I have been cutting them with my old ‘for trash and bad cuts’ snippers, which are just a bit too weak for the job. I ended up hurting the palm of my hand after cutting like 10 or so cuts before realizing I had a proper (can’t quite cut a bolt, but clothes hanger size was perfect) bolt cutter. The change was night and day.
Right: Handy Ouchy. Left: Handy Happy.Stick arm people!
So after doing some metal clip snipping, posing, and placement I super glued the arm wires into place and came up with that. It wasn’t perfect, but I think it is pretty legit. Again, they don’t need to be perfect and most likely they have been sitting around rotting and displacing inside of some coffin for countless years so if one has a wonky arm that is a bit longer or has a questionable rubber elbow, so be it.
Armed and Dangerous
Woah baby
At this stage I did the arms up in the water resistant putty, used all of that, and then moved on to my more high quality stuff I get from the home center. It has a longer working time, takes detail better, and overall is just nicer to work with and doesn’t stink like deadly chemicals. All plusses. So I did up a few with more feminine traits and a few with more masculine traits as well. I did some more thin and some more muscley and overall just tried to get a nice mix of body types and make them a little unique before adding any of the extra trappings on there. I will admit some of the putty work is questionable and the anatomy and bone structure beneath those questionable muscle groups is suspect as well, but whatever. It’s blood bowl and these are scary zombie mummy monsters.
Three of them were also re-blessed with dat booty.
At this stage I was ready to wrap philosophical. How did I manage to solve that dilemma?
Wrap em’ Up
While I was getting the models prepped, waiting for epoxy to set or glue to dry I started to think about the end game and did a few wrapping experiments. I took a walk through one or two dollar stores and didn’t find anything that met my expectations of what I was hoping to find. Ultimately I scavenged around the house, namely my first aid kit and found a few options which intrigued me despite the fact I knew that it could be a pain in the ass.
From the Left: Thinly cut surgical tape, thinly cut gauze, wrapped yarn.
So I ended up buying some yarn from the dollar store to see how it looked, and all of the above were applied in the same general process using watered down white glue to stick them on and then give them a healthy coating to harden them and make them easier to paint. Take a look at the process to prepare them below.
My three methods for making mummy wrappings.
Yarn, wrapped around the target and then doused in enough glue looked really good! But only if I was trying to replicate the look of rope, which it looks like. Not mummy wrappings. I was hoping that maybe if after gluing it, if I flattened it down it might look more like flat bandages rather than round cord, but what can you do. Worth a shot, and only cost me a dollar. Also, I will be using this rope technique when I make the camera gobbo perches and various other scenery for my blood bowl experiences.
2. The surgical tape method actually looked half decent. I ran a blade around the tape roll essentially ‘pre-cutting’ a length of tape however deep I managed to cut it. And just taped around the target. After doing that I doused a bit of watered down glue to fill in caps and cover it in a nice more easily paintable layer. Ideally I would have sued this method, but with that cloth-like woven gauze tape like you put on hockey stick handles or wrap around wires. Looked for it, couldn’t find it, here we are.
3. Gauze. I had a muslin cloth/cheesecloth type of gauze that is for large wounds and usually covered with tape. I folded it and cut small strips of it with relative success and the cutting wasn’t as annoying as I feared it would be after discovering that technique. Some glue on the model, some gauze on top, use glue water to move and place the gauze a bit and ultimately looks pretty good! Also it dries quite nice and has a cool effect as well. Real gauze is the winner this time for me.
All wrapped up, don’t know what to do!
So after wrapping once up real good, I was pleasantly surprised with the result. This is the most stumpy and lumpy of the mummies and it shows, but hopefully the extra bits of armor and other trappings make them look a little better. Straight mummies look decent, but they need some flavor for sure.
Booty intact!
So you may notice a few spots where the gauze isn’t fully covering the body. That is partially on purpose. The idea is that these guys are all glowing internally so the open areas will expose some of the glowing flesh beneath and hopefully give me a chance to spice up the models a bit. I really don’t know how well it will turn out, but that is why they are left open. From the back I think that this one actually looks pretty good.
Hands, feet, and a bit of the face poking out.
This is bloodbowl, not just eternal burial rights. Gotta see where you are going and use those phalangies for poking out eyes and tearing face. Let’s get to the good stuff.
Forging & Affixing the Regalia
So the main menu is this: Masks, shoulder armor, bracers, belts, and potentially pants or something else. I got a lot of work in the last few days (今2.16) so let’s go over it starting with the masks.
Looking a bit more imposing without just having wrapped up ogor heads.
Since I had the one head all done up already with the skull from the end of the ogor pike, I got to work carving the loki mask and other bark-like mask from some of the leftover epoxy I had when I did up the buttocks and chest bits. It was kind of a ‘Well, maybe it will work’ at the time and after carving out the eyes and mouth, scratching up the face to make it look a bit more wooden, and snipping off the jagged edges it ended up looking pretty legit I felt. I also found another pretty demonic looking head which would potentially be a mask, but was a bit more low key compared to the alpha mummy. I am getting a Raphael & Leonardo rivalry vibe already. That wa sa reference to the ninja turtles by the way. (Antlers is Donatello and Loki Mask is Michaelangelo in case you were wondering. Oh dear is this cannon now? Just… Just let this pass for the time being. Resist the urge to put headbands on them all.. ahhhhh. Anyway look at all the masks up close:
The masks came out alright overall and I think with a careful enough paint job it will read as wood and bone a lot more than light blue epoxy putty, haha. THere were also a few spoilers in there for the next part or two since I was in the heat of the moment during creation and sculpting and didn’t take WIP pictures. Let’s take a look at the finishing touches for the helmets (chainmail), the pauldrons, the fur throws, and other misc. bits.
You’ve got Mail!
Making the chainmail bits
Chainmail was basically a flattened and stretched out bit of putty that I stuck on there and essentially poked a ton of times with a mechanical pencil’s hallow metal tip. When I took my time doing lines it looked a little better, but ultimately going crazy and making sure it’s been poked all over will do the trick. I made peace with the fact I won’t be going to the Golden Daemon with these guys long ago so a little sloppiness with my chainmail links will be fine. I did the larger, like, bolts on the top with the same pen, just with the metal tip retracted using the plastic part. I started there to secure the putty on the model and then used a flat edge tool to poke around it to look like it was leather or some other non-chain bit holding it onto the skull. I wasn’t as careful or thoughtful with the other helms in hindsight.
Shot of the back of Leo and the side of Mike showcasing the mask strap I did up.
I did a strap for the Loki mask since we can’t all be Stanley Ipkiss and have it magically seal to our face. I suppose we could, but I just wanted a strap to break up the model’s fat head a bit more. Needless to say I think it looks sssssssmokin’!
Raph’s chain mail flowing nicely into the fur throw/cloak.
Pauldrons & Pelts
So I ended up using the belly shield from the bull ogors as pauldrons since they fit pretty well and had a fairly non-descript bitey-mouth zig-zaggy pattern on them which I thought could work well. Also, I can get a big ol blood bowl player number in there with little to no trouble at all which is a bigger bonus in itself. Also I had a handful of they laying around and they were fairly uniform. THere were one or two with more fancy designs on them, but I was glad to have 4 regular ones.
Both securing the shields onto the body and forming the base for the fur cloaks I used some epoxy putty. I used the flat end of my tool and tapped a ton of zigzag lines into it and then took the corner of the tool and began to cut down and pull to the sides here and there to get that pointy fur look. Tease it around a bit, try to give the fur a general ‘flow’ and it ended up looking pretty good and will hopefully take to shading and drybrushing like a champ.
Making the fur cloaking bits. My tool and the WIP shoulder cloak.
So I got the chainmail headpieces done on most of them and got the fur cloaks on most of them. I like the look of leaving some of the mummy wrappings exposed since they are mummies and I did wrap the whole thing and that took a bit of work. But I also think I need a bit more fur to make them look like full on pelts as opposed to just convenient putty placement that looks like fur.
Backs of my four tomb guardians so far.
I think you can seethe one or two in the middle have the fur bits draping down in the middle and it doesn’t look very natural. More like a scarf of fur as opposed to a full on pelt. I am looking for something more fluffy and badass. Besides layinging this fur effect on top is completely painless compared to the shoulder pad nightmare I went through with my zombies and ghouls. I will probably thicken it up and add on stuff with my next batch of leftover putty.
Belts and Baubles
Coming to the final stretch of the putty element and ultimately the conclusion of the construction of these bad boys and I need to add a bit more. Namely, the trousers and belts, as well as the bracers and other misc. baubles.
Belts will be added to every single mummy undoubtedly. Breaking up the funky proportions, but I don’t think I will be doing pants. It defeats the purpose of wrapping them up completely and I want the mummy factor to be clear. So I am thinking tattered cloth draping from the belt as if they were wearing pants, kilts (Norse/Viking/Scottish culture has a lot of crossover and this is fantasy on top of it. But I am wary of doing a tartan pattern since it may influence the look too heavily), skirts, or tunics. I am thinking just tattered cloth should be enough so I can strategically cover up mumy bits I don’t care for and leave others exposed as well. Doing up a belt on top of that will look pretty legit as well. I have a bunch of skulls and other baubles which will look good as belt buckles and on the belt as accessories and such.
Also, the other skeleton positionals for the khemri team are mostly clad in ripped cloth over their former loinal zone as well which matches nice.
Lastly, for the bracers I have a fair amount of old skaven and fantasy shields which when layered or chopped up should look like decent makeshift bracers, although doing them from putty may also be more effective and save me time since they don’t need to look super incredible and just get the job done. Writing this right now has inspired me to do it and I think I have a plan for it as well so putty it shall be. I think I can do it all in one sitting as well which is how I like it. Maybe I can mix a bit of both so it is like a wooden bracer with a metal rim and the fur bits cushioning.
Finally I am debating some kneepads or potential wrappings, but it looks like the vikings also just did bracers on their shins like their forearms so I can use the same technique for all of them if I wish. I will see how I feel and how much putty I have mixed up and ready to go and factor in how much of a huge pain in the ass it is and probably decide from there.
Progress after another two hours in the putty mines.
Got some work done last night (2.17) and touched up some of the fur cloaks, put belts and tattered cloth and belts on them, and also began to do some preliminary armorying to mixed results.
Questionable kneepads
I got the bright idea to put kneepads on one and after doing them up to look like a metal plate over fur, I didn’t really like how it turned out. Partially because of how I ended up doing it and partially because I think too many of my mummies have stubby legs and the knee location reads strangely to me.
Everyone laying around with their initial kneepad placements.
I went as far as gluing the knee pad bit (A gong I cut into 4 pie slices you can see scattered on the bed of bits above) on each mummy, but I ended up pulling them all off except the one I had already puttied in there.
Two TGs with belts and tattered cloth.
The belt and cloth scrap bits that were once pants or skirts actually looked pretty decent I thought and was a fan. The little skull belt buckles really sell it for me and add another point of similarity to their more skeletal team-mates and just look good. With paint it will sell as a belt much more I think.
Such fury.A look at the arm bracers I rigged up
The arm bracers ended up looking a bit better actually and using only putty I think was the right call. They are meant to me a metallic plate with a rim of more metal and then fur underneath them. I put this on two of them so far before I ran out of workable putty and decided to call it a night. I will need to do up some bands/buckles on the inner arm ‘holding them on’ but it will be painless.
The four as they stand after another evening of work.
There are 4 more forearms which could reasonably use bracers and I think I will do that the next time I get a moment to work with putty again. At this point I feel like the models are pretty much good to go and paint will tie them in nicely with their fellow players more than enough. But I also want to do a bit more with the arms of the unadorned TGs too. I have plans for Leonardo, and want to do a few more adornments here and there, but also don’t want to overly clutter the models or make them more difficult to play with than they already are since they are gigantic. I will need some proper tokens to mark when they are prone or stunned.
A conclusion of sorts!
Tasty fur trim on that gauntlet
Got a bit more time and spent some of it basing all these minis and one special chunk of it doing the final bits of putty work. Could it go on forever? Certainly. Will it? I can’t allow it! New Season starts in two months and I need to paint at least the necromantic part of this team up by then!
Mohawk happened. And arm spikes
Ended up making a mohawk for this dude and extending his head chainmail a bit more. The arm spikes felt alright and I didn’t want to make another bracer from scratch.
Double arm guards
Main dude got these cool ass horned skull bits which fit on the arms nicely and came across as decoration and also deadly spiked knuckle dusters.
Couldn’t help myself
Also, I hung some trinkets from the antlers despite the player in me saying how annoying it will be to move them around, etc. I liked how it turned out and I also have a few tokens which I can use for prone and stunned for these big mamalams.
If it seems like I am being short with this last bit (Yeah right, if you slogged through this whole article give yourself an A+ for effort.) it is because I am! Its like 1 AM and I think if I get lucky I can get some spraying done tomorrow. I actually based them all using a baking soda/white glue/water mixture which I used as snow for another project and really liked the texture. I will use it as really wet mud for these guys. Not a dark blackish brown mud though, I am thinking that lighter yellowy tan light brown mud since it will contrast my uniforms better I think. Patches of wetness and grass here and there to keep it spicy and moist looking. So I did that the last couple days as well.
And without further ado, here is a triple blood bowl team!
Damn
Yeah. Damn is right. Its something like 37 models. I will do the stats breakdown in a real conclusion article showing them off, but for now I did the work and I am happy with it. My tomb guardians look a little wonky overall, but those masks really pack a punch and draw the eye and will hopefully strike fear into my opponents and distract them for the 6 turns it takes my thrower to pick up the ball. But I love them and they are mine. Looking forward to that feeling I get after doing a scratch build terrain project when you spray it all black and it just becomes something totally unified and much of the doubts go away.
Ah yes. Spending far too much time waiting for werewolves and fretting over making shoulderpads. But such is life. Well, in any case, the wolves finally came in and they ended up being the spur kick to the side I needed to get this wagon train moving again.
Rraaghh! There they are! Ghoul for Scale But these aren’t the same as the ones I was planning on getting…
Turns out they discontinued (Forever?) the wolves I had planned on buying from Greebo right before we were able to order them, so I scooted around a bit and found a decent deal on a pair of pretty good looking wolves on comixninos made by Meiko Miniatures. Don’t worry, I get zero kickback from that link since I am not terribly monatization-minded. But they look decent! Here is a side by side of what I wanted and what I got.
Close enough. I kind of dug the chains on the originals, but these wolves will be just as good.
Pewter? I barely even knew er’!
Yeah let’s both forget I just typed that (Yet it remains…). So when my wolves came in a full on month and change after ordering them (Pandemic + Year End Holidays. Whoops) I jumped right into it.
Glue (Not the right stuff for Pewter) and my cheap chinese dremel (Right tool for the job).
So I jumped into it excited to work with pewter again! I hadn’t touched or properly built a fresh metal model in decades so I wanted to do it right. My friend ages ago talked about ‘pinning models’ and it sounded like dark sorcery back then, but I have been doing it like crazy since I snagged this cheap dremel and got to work.
Wolf: Fathherrr….. whyyyyyy ammm I innn pieeeccessss
Drilled in the leg zones and the head and tails for both my wolfies. Glued em up and posted them in strange positions so they could try properly.
Just hangin’ out.
But apparently I didn’t use the right glue and these wouldn’t have lasted a single game of use and I pulled them apart in impotent rage. Not realizing that I had the glue I actually needed literally within arms reach in a drawer behind me, I decided I needed to go out to the home center the following day and get some glue that can tame metal proper and get the job done right.
Yes… hahaha YES!
This stuff did the job. And while I am not sitting around huffing glue or anything, it smelled exactly like zap a gap I used to use literally 20 years ago on my old ass models when I just started up warhammer. And just like zap a gap, it worked like a charm!
So they got build in no time thanks to the pinning and proper glue. Then it was time to think about basing.
The bases for my wolves are 32mm, (New)standard blood bowl size, but despite that, Meiko apparently does the same thing that GW does and that is make certain that every model has half their foot hanging over the edge of the rim of the base. Ahh, it’s a little annoying, but when you want a big mini on that size base there is little you can do besides roll with it. (Thanks Pillowcat).
But I had a plan. I recently obtained some ultra cheap (And …stanky) epoxy putty from the daiso and have been experimenting with it recently. And it hardened super quickly (Stinkily) and was very firm as well. I intend on having kind of mostly muddy bases for these undead since it is the way and a solid plop of putty won’t be a big deal. After I sketched out the location where I needed putty carefully, I then proceeded to just putting way more than I intended on in the first place. It all worked out, but one wolf-knee is far closer to the ground that I would like and it will affect the painting process I believe.
Nice. I pressed in the base points which would touch, pulled it off and then slathered super glue on the still pliant putty and put the model back on the base and snuggled the putty up around it where possible and waited. Worked like a charm and has a fairly decent effect. When I get into the basing stage of this hobby adventure I will come back to that, but I actually do really like affixing models to the base using this method and I may revisit it in the future.
Anyway! Wolves are done! How about those skeletons?
There they are!
Skeletons look half decent so far and I am pleased with them. Awesome models regardless and got em for a good deal so I am thankful for that. The weapon/shield clips look a bit rough right now, but I did some carving here and there and only some of them look meh. These will mostly be positionals on the Khemri version of this team or sideline staff. Or if I go crazy needing skeletons or something and there aren’t enough line skeletons. Here is what I am envisioning going forward.
(Left) Assistant coach, (Center) Apothecary, and (Right) Head Coach.
I have plans for the coaches to make them more blood-bowly, but the apothecary will most likely remain a straight up reaper since, well, apothecaries aren’t terribly reliable or spoken highly of in the fluff and it’s cool. Not that I can use one on any of the three teams these dudes may represent. I just realized that now. I shall ponder that orb.
“Grraaghhhh” -‘Blitz-Ra’ Annointed Blitzers
So these two dudes are going to be my blitz-ra’s. THe one on the left looks like he is about to deal out a fierce ass backhand and has a big ol’ chunk of noggin’ missing so he should be good to go as a blitzer, but the one on the right was clearly holding a sword. Do I leave it be and say he was going for some kind of trek-fu style double fist strike or perhaps do I clip the fists apart and adjust the back arm to be a bit more similar to his counterpart. I think writing that sentence I made my decision. That is what this blog is for. Reflection and forward thinking. I was really bummed about that pose but it will be two snips, some TLC with a blade and a single dab of plastic glue and we are off to the races. These guys will be formidable (looking) as anything if you ask me. And they have a bit more armor than the rest of the skeletons which helps sell them as blitzers who have one more point of AV compared to the Linos and throwers. Maybe another bracer on the off arm to cover up the damage and further the armor factor. It shall be considered.
Got the cheering and triumphant ‘I can’t believe it I just picked up the ball!’ Throw-Ra on the left, and the ‘Oh Dayummmm I just heaved that bag a bones down the pitch!’ Throw-Ra on the right. They need something. A little something to push them over into full on ‘This model is a thrower’ territory and the paint job will handle that enough that it will be clear on the pitch, but I want something more. I am debating putting a ball model in the lower hand of the cheering thrower, but I am in the camp of coaches who prefer that blood bowl balls only belong on a model when they actually have possession of the ball in game.
Maybe I can do them up with a badass flowing headband or something to set them apart. That one bit of flowing cloth in the hand of the left one and their headpiece kind of inspires me. I think doing up some flowing ribbons and cloths, giving a bit more flowing cape-action to the one throwing the ball to illustrate and emphasize their motion might help sell the concept. A nice long ribbon following the arc of the throwing arm. Yeah! Keeps it on the base too. (I was originally thinking of having an actual ball on a flight stand launching away from them, but this goes back to the blood bowl balls on non-carriers issue) Give him a proper badass headband. Do them both up with other various cloths and wrappings do show that the team reveres them as those with the sure hands. Without them, it is a game of mummy punch out skeleton soccer with a blood bowl ball before the elf comes in and steals it.
SUDDENLY MUMMIES!
Got a try-hard on the left and a more easygoing on the right.
Also quickly tossed together a pair of mummies for the shambling undead version of the team, doing a simple heel & toe snip to let the one on the right stand a bit straighter on two feet instead of leaning hard and bowling forward headlong on a single foot (mostly). It will give them a little bit of subtle difference besides just the numbers. Prior to embalming, the one on the right clearly lived a more lavish lifestyle and it shows. Get it together buddy. But these guys aren’t going to be my tomb guardians for the Khemri version. I have four more of those ogryn models….
Aforementioned Ogres from the WIP flesh golems.
I am going to come clean. Prior to and during the writing of this article, and due to the tremendously huge pain in the ass that these shoulder pads are turning out to be for zombies and skeletons I was seriously considering just finishing the Necromantic portion of this team (To get into the painting phase and get them on the table by April/May-ish) and leave khemri and whatever shambling undead I didn’t feel like doing at the time in the (zandri) dust (Ayyy). But Nay! I have been inspired! The blog strikes again! This therapeutic exercise has actually increased my mana for the conjuration of creativity!
So seeing as those skeletons are making up most of the positionals, it really informs the flavor of the team for the most part and other than the basic line skeletons, they won’t really share much with the other two undead teams so I can lean hard on a slightly different flavor with them. (And not need to do those annoying shoulder pads. Curses.) Seeing as the tomb guardians will be pretty much completely wrapped in binding cloth, any brutal cuts and such won’t really show that much and lumps and mess beneath the cloth will probably look half decent and just add flavor and style. (is what I choose to believe at the current juncture) So I think I am going to go a bit wild with them, extend arms and legs with the cheap ass dollar store putty and try and get them into slightly more interesting poses as well since the ogryns are all, closed up and turtled in. I did it slightly with the flesh golems since I want flesh exposed there, but this time I can go ham.
After they are binded in cloth, I will try to leave the more intact and cool looking bits of the model, if any, exposed to add effect. The mummies will also be filled with glowing energy as well so a few strategic wrappings being open a bit will also prove helpful for the painting process as well. My original game plan was to just roll out tons and tons of super tiny strands of epoxy putty and have that be the ‘wrapping’ of the mummy, but it is going to be a tremendously gigantic pain in the ass. I think I will wrap actual thin strips of cloth and then douse the whole mufk in white glue/water mix. This gives me a chance to create some really interesting texture, but the size needs to be decent and it needs to be easy enough to work with or I will grow tired of it. Honestly the first thing that comes to mind is straight up bandaids, or proper gauze tape. But that will be annoying to cut to the like 1~3 mm size I need it to be.
I will have a walk around the dollar store craft area since they have a nice selection of ribbons and such that may fulfill my needs adequately and come in a convenient roll so I can just wind em up nice and easy with a dab of glue here and there to secure it. Anyway, that will be a bit further along apparently. They are pretty much the final boss of the project since I haven’t even started them yet.
Khem ri do it? Yes we Khem! (Theme of the team)
I don’t know. That just came to me and I went with it. No taking it back now. So looking at those skeletons and starting to get a feel for what they might look like when painted, or flavors and stuff I don’t think it’s going to be too ultra egyptian. I like the look of a ‘proper’ khemri team done up in golds with accents of blues and all anubian dog heads, birds of Ra, etc. But I do also think that it is overdone. It’s a great look, but I don’t think every single Khemri team needs to be straight out of the pyramids. And the skeleton warriors that will be my positionals basically, all have a more neutral ‘Winter warrior’ kind of theme with vaguely Europian or Nordicy Viking vibes (The chain skirts, fur cloaks, helmet style, etc) and I think I want to go with that a bit to flavor the team. Still skeletons, still mummy-esque tomb guardians, but just not full blown Cleopatra’s Choice Pharoh Fun Time.
My Khemri Models are going to be bit more european I think. I don’t know, I was inspired by the skeletons and how they look, even without the swords and shields. Anyway. What to do about these mummies to give them a bit of proper flavor?
Heads:
I like the look of these helms which have chain mail coming down completely. I think a mummy would be wearing a partial mask or keep their visage hidden since it is so horrible. In addition to being badass and ultimately easier to model/sculpt (I hope) than doing a proper face or eyes beneath bandages.
Here is another help which looks pretty good, but I don’t know if I will have horns on the helmets or not. I recently heard it was not historically accurate for vikings and honestly it is a little to dwarfy as well so we shall see. On a brutally huge tomb guardian, perhaps I can make something happen there but we will see. I do like the armor style here though with the leather/plate on top of the fur look. it goes along with the rest of the team and I could replicate it fairly easily I think. I will add some flavor and detail to otherwise ‘plain’ mummies. I think one or two with a more ‘bare chested’ look (Although it will be bandages) and just straight armor and full helm will be cool.
You can see they have the fur element, and the coach has a cape so potentially some rotted cape/ shredded flowing cloth off their backs could be in order for some of them. That pretty much covers the heads and shoulders and upper parts of the chest and back. How about the arms? The waist? The legs?
So the general vibe are these billowy pants with a belt and wrapped up leggings. I will probably just do mummy legs and maybe a belt since they are easy enough. Get some chains no there dragging down since that is kind of mummy-ish like they tried to keep him chained down but it didn’t keep. Do one or two with these pants perhaps if I figure out a good way to do the and like how it turns out. Or if I have some legs that are really wonky looking and the billowy goodness could cover up errors ha.
I think for the feet, I will keep the shoes as they are on the models already. The Bull Ogors have kind of simple plain shoes that are fairly easy to reposition and just generic. Do them up in a metal or a black and they will be fine. Maybe one or two courtesy wrappings around it to keep the theme solid if needed.
So the real question is the arms then. Obviously the easy road is to just wrap them up and put them in menacing poses and call it a day and that will be the default setting I plan for, but there needs to be something that makes them really stick out.
Celtic design town, but I am not too concerned about that. I think it will maybe be arm bracers or perhaps only wrist bracers and either have that fur lining on the bottom or maybe the twine-esque ringed lining. If the mood strikes potentially I can add in some more pattern, but maybe I could paint it on or something. Maybe just go for dots or stripes or something, stick on bits and call it a day.
That should be fine then. The helmets and shoulder armor and wrist/arm bracers should be more than enough to sell their connection to the positionals. They are pretty much the heart of the team and the reason Khemri are feared so they need to be super badass. It will be a lot of sculpting, but I think it will be fun and if I can fone proper (easy to use and glue down) wrapping cloth then it should be fairly painless with a little rummage through the old bits box.
What else are we missing?
Ah god I didn’t even talk about the shoulder pads business yet. Oh boy. yeah I am leaving the computer for a little while and will come back to this later. I made ultra progress on the skeletons last weekend actually and they look badass. Having trouble with some throw-ra flowing robes, but it shall be dealt with. But these shoulder pads are seriously my white whale at the moment and its killing me. I will write about them later and hopefully feel strong inspiration to get them done then. (Insert time skip here) Alright I’m back and feeling better. Let’s look at a crazy picture.
Yeah this is.. This is under control, nah, yeah, not really
So the shoulder pad situation. I can’t seem to make a decent copy of these shoulder pads and its just turning into something that is annoying me and I am starting to get to the point that I don’t even want to bother. I don’t anticipate it looking any good, and am currently hoping for ‘decent enough’.
Oyumaru casts of the shambling shoulder pads. (Second try)
So it took two tries to make usable casts and I was being cheap for literally no reason and made tons of small casts thinking I’d leave them overnight to dry and they are just so small. I mismatched them halfway through the process and its overall a nightmare of randomly splatted out casts. Actually after writing that bit about the skeletons I dove into them headlong and pretty much have them finished. I may even post them at the end of this article since its really a slog and a work in progress. I need a proper evening to get some epoxy out since I have a few small bits I need to do with that and it should finish a majority of the project leaving the tomb guardians only.
Here is a close up of some of the shoulderpads. If you can discern any detail at all good for you.
After clipping them up a bit, and sorting through what I had actually done, I managed to create 4 sets of ‘proper’ shoulder pads for my 4 ghouls. I also pressed enough 1-sided shoulder impressions to cover the remaining skeletons and zombies who got the saiyan armor I put on them before. I will use a bit of epoxy to connect them and do some (hopefully) light sculpting to bring them up to paintable status. What I managed to make is usable I think and just needs some trimming and fitting and should be good to go.
Ghoul awaiting the royal armor fitting ceremony
Managed a miracle sneaky hobby time last night and after closer inspection and proper prep and trimming of the shoulder pads I had casted, they were actually usable. Not too pretty, and a little epoxy will be needed to clean everything up and make it look nicer, but it should be doable. For the time being I just assume that they don’t know how the armor works and just slapped it on all randomly. Yeah, that’s it.
So there they are. Looking half decent as is, with only a few parts that were really funky. With some bladework and epoxy putty they will be cleaned up. This may sound strange, but for some reason while doing them up the urge to put mohawks on some of them was very strong. We shall see what comes of that, but regardless these guys are ready for the final stretch alongside the skeletons who are also waiting a little putty love.
The final line that must be crossed
Zombies and adhoc skeletons. I have 4 zombies that I made from some other company’s ghouls and the two D&D skeletons that need some shoulderpads yet. After doing up the ghouls above with their shoulder pads I have what’s left of my hasty casting operation and just need to trim and then glue those bits on before I can get to epoxy stage.
So I checked over the pads I glued on them before and I used the yellow glue from above that failed on the metal wolves and saw that it was too cold or epoxy and plastic weren’t playing nice and they just flaked off. I used the super glue I had for the wolves and sorted it back out no problem. Starting to think that ultra superglue may just be the be all end all going forward for multiple-medium projects like these.
I carved and trimmed up the little pad segments that remained and then poked around seeing which ones would fit well enough here and there. When I found one that looked decent, I glued it on. Nothing too intensely perfect at the moment since I plan on doing some putty on top of them to get some nice sharper edges and also make them look less like horrendously casted epoxy copies of shoulderpads. The zombies in particular have really gaunt poses which make armor placement tricky, but here’s to hoping it works out.
Overall, it worked out as well as I could hope and I used the mantra “let’s just get this over with and hope we can fix it with putty” and got it done.
The skeletons in particular were nice and flat so it was easy to knock them out for the most part and I used some of the nicer casts I had and managed to even replicate the neck chains between the armor which I’ll have to do with putty on the zombies. But they turned out half decent and half of them will be fairly easy to epoxy while half are going to be a truly creative effort to make look less than trash. I say that lovingly of course. Hah. Well. Just glad it’s flipping over with
“Cause this is thrillaaa”
And with that final armor placement I will take care of the putty goodness, but I don’t know when or how long that will take and we need to get this information out to the people! Look forward to the thrilling conclusion of the construction phase of the project when I dive deep into viking-esque tomb guardians from bull ogors and the no doubt great effort that will take.
I am looking forward to it, but will need to clear some epoxy missions on the rest of the linos and positionals before I even feel the need to start on that.
I sincerely hope that you are enjoying the read and are getting inspired yourself to undertake more hobby in your realms.
The first page of the fluff, a parody looking moderately similar to the original!
The Deed is Done? Yet it is far from done.出来上がりました?が、まだまだだぞ!
Well, it is complete! Or… nearly complete. The words are done, and about 1/3 ~ 1/2 of it looks like an actual rulebook and not just some bland sea of black letters on a white background. 完了しました!ま。。。もう少しで完了しました。言葉が完成し、1/3,半分ぐらいがちゃんとルールブックっぽく見えます。白い海の中にただの黒文字が浮かんでいるやつじゃなくて。
It has actually been done for quite a few months in all honesty. Real life and such has prevented me from sharing more about it, and also the big issue of how is the best way to get this information out there to the coaches and commissioners of Japanese-speaking realms? 正直数か月前から完成しましたよ。現実、生活も、どうやって広げようかの悩みなどのせいで、今までシェアすることができませんでした。どうやって必要な人たちの手までに送れるでしょうか?
The Final Stretch・ラストスパート
Honestly the goal was to have it looking like the original rules, pages matching one to one (For easy comparison) and that is currently happening. But it’s a slow, harrowingly repetitive process and I am but a single Magician! Granted I am aided by great verdant forces, but this is a task for the Red Magician. Here is the last page I finished typesetting: 正直といえば、ゴールが全ペイジ、ワンツーワン(比べやすいため)で、現在それをやっています。 すごい遅くて、(ある意味で)苦しいつまらないしごとだし、ただ魔法使い一人のじゃ!もちろん偉大な緑豊かな力を借りているけど、これが赤い魔法使いのすべきことです。今までの進歩の最後のペイジをどうぞ:
Page 70, SPP explanations. 70ペイジのSPP説明
And here is the one I am working on currently: そして現在の最中のペイジ:
Page 71, ‘Halfway There, living on a prayer (To Nuffle)’ 71ペイジ「途中がナッフルの渡し絵の贈り物」
I am mostly using tables to make the columns all match up properly and keep the text in a relatively close position to how it looks in the original. It is working pretty well, but basically I am getting into the deep waters of the rules where the charts come a flooding in and my OCD has me wanting it all to look really good, which means endless tweaking and I basically hit a bit of a wall. A magician needs time to rest and study their spellbook afterall! (New Season of the Witcher is fire. My BB League is rocking. Recently get involved in a Cyberpunk TRPG campaign with the honorable Sorcerer!) 基本的にテーブルを使って、コラムを整い、オリジナルルールブックを何となく再現しています。なかなかわ来るないともいますが、淵(ふち)に入り始まり、強迫性障害的に、全てのテーブルがきれいに並べないと気が落ち着かないので、休憩です。魔法使いも休みを取りスペルブックの勉強の時間が必要のじゃろう。(ウイッチャーの新しいシーズンが最高。ブラボのリーグが熱い。大好きな青いソセラー最近新しいTRPGに参加し始まった。。)
So things have been slow going. とにかくペースがゆっくりのほうになってきました
Are you teased?・いじめられているかい?
Just a humble update. It is done and can gladly be passed to you, you need only ask. I would be happy to hear any ideas on how best to get this information to the people who need it. ただの謙虚なアップデートです。とにかくある程度完成したし、聞けば喜んで渡してあげられる。必要な人の手までにいい届き方に対して考え、提案があればぜひ聞かせてください。今まで影に包まれている路地で秘密的に渡している感じです。
Checking my site stats, I get a fair amount of hits on the original translation article so people are poking their heads in and taking a glance! If that is you, please don’t hesitate to get in touch and let me know what you think. サイトの情報を見ながら、もともとの記事がかなりみられているみたいですので、人が顔を出してみてみることをしている様子があります。もし、それがあなたであれば、連絡を送ることをためらわずに考えていることを教えてください。
Greetings traveler! Welcome to part two of the great raising of the dead that is & will be my triple blood bowl team. Last we left off I was putting together the pieces and planning out ideas. I have gotten a fair amount of work done, and gotten more than a couple goodies in the mail, but have hit a minor standstill, thus I turn to the hobby blog. Hoblog? Feels forced. Anyway, I go over what I have done, and gain inspiration from my progress to give me ideas and fire to push forward. It has worked before and shall work again I hope.
(So much for the pitch creation blog I have had sitting in my drafts for half a year now. Whoops. I’ll deal with that later. Probably. It warped a little which is breaking my heart, but I know how to fix it. It will probably work. Aghhhh. Back to the dead.)
This will be released someday! I just have too many other projects on right now that I am focused on.
Flesh Golems
So the flesh golems were my first main goal here as I wanted to get those bull ogors looking more undead asap. I made some fair progress pretty quickly. Filled in the massive tummy gaps with blue tack.
Got to work converting!
I repositioned the arms, stuck them with blue tack and then glued them in place leaving the blue tack since I planned on puttying around it anyway. I picked up a bit more quick dry epoxy putty which is my go to for more detailed modeling stuff and got to work. The main deal with the flesh golems is their frankenstein-esque appearance with the huge obscene stitches. I did them up with big bellies to match their large frames and did stitches with a variety of modeling tools. It doesn’t look like much now, but I am hoping with a proper paint job and different flesh tones it will sell much more. Such a fear and a thrill when doing this kind of conversion work as it looks like slop (And probably will regardless) but with some paint it will be much better I hope. So far I am happy with the arm placement and have some much better dynamism in their poses ready to throw blocks and toss foolish weaklings out of their path.
Stitches on the back as well to try and sell the piecemeal look.
In addition to making stitches along the body, I also filled in the gaps and attempted to replicate some of the musculature of these brutes as well to questionable effect. We shall see.
Adding on other bits. A helmet, neck bolts, and the pants.
After feeling confident that the main body was in good enough shape, I went to add in some details. I did the helmets out of space marine shoulder pads and some epoxy on the back (Not pictured yet.) and used some plastic rod of varying circumference to create something akin to the neck/forehead bolts. These guys don’t have much neck space so I went with forehead bolts instead. Call me a ruiner of tradition if you wish, but idgaf. It’s blood bowl and my necromancer uses magic to bring these guys back from the dead, not science. Regardless, electricity gets to the brain zone in any case so its all good. The flaps around the waist making the pants seem more natural against the gut was a tremendous pain in the ass and I am glad it is over with. The helmet chin strap on the right one came out so great I think. Reminds me of a proper hockey or football helmet chin strap.
There is a bit more to go on these guys and I will update as soon as I can if I remember to take pictures of these guys before I release this.
No Bones About it. (Bones about everything.)
Bones! Skeletons. Skeletons were a source of ire and concern for me in the previous post, but I have since remedied that issue pretty well! TT managed to show up with another set of of those skeletons I was after and they got snagged right away! But in the meantime, I managed to find a pair of D&D skeletons which I thought would be alright. Here is one next to a normal BB skeleton.
Size wise (And pose wise, hah.) they are fairly close! You can also see the heinous armor that I plasted on the back of the skeleton, but I shall talk about that shortly. First… BOOTS!
Oh baby. Look at dem boots.
So, not shown here, but I snipped off a sword and shield from the D&D skeleton and they were pretty much just a straight up skeleton. While normally I would say just roll with it, no big deal, let’s play some blood bowl! I want to do these guys up and have them look a bit more cohesive so I saw the other skellies all had boots and went about doing some up with some leftover putty I had from doing the flesh golems. At first this was a tremendous pain in the ass, but I got it down to a pretty decent science. Took a kind of thick cylinder of putty and pressed it against the back calf and under the heel of the skeleton and then slowly using a modeling tool pulled it forward/upward around the leg/foot until I basically had it wrapped up like a blanket. Then I pressed in what I would describe as shoelace eyelets with a sharp flat edge of my tool and it had a really nice effect. I used the spoon-like scoopy bit of the tool to form and smooth the cap over the toe. Lastly, using the the flat edge of my modeling tool, I went around the bottom border of the shoe to create the sole and then again did a ton of straight lines on the bottoms of the soles to give the boots some tread.
They honestly look like gigantic high tops, like mario live-action movie jump boots levels. Regardless I was still fairly impressed with my work and found the process of figuring out how to ‘make’ sneakers/boots from nothing quite interesting. I ended up making a pair of boots for my two D&D skeletons.
Ghoulish Pants!
Ghouls! These guys are really important players on the team so I want to make sure to give them some TLC I’ve used ghouls before for players on a blood bowl team when I had a small boatload of them from a previous trade deal. They are the thralls on my vampire blood bowl team. Check more pics of them out here. (As well as a picture of the first pitch I made using the styro/foamcore technique. What a random coincidence, that.)
The standard Ghoul and my Vampire Thrall on the right.
So I realized that the official BB ghouls are all wearing shorts and maintaining a bit more decency on the blood bowl pitch which is respectful, appealing, and allows a chance to add a bit more team color to what would otherwise essentially be a naked dude with bone & stake piercings. With the thralls I went for knees and elbows with like blocks of stone tied on to them with cloth since the vamps don’t really care for their thralls very much. In addition, the shoulder pads match my vamps and the helmets are cool too.
I decided to go for a more sporty-style look for these undead ghouls and am starting that with some shorts. They came out pretty well. There were a few spots where with fur/hackles near the nuttal zone got in the way, but I just said whatever.
Nuttal Zone is an official term to represent the ballanic curvatures.
So nut jokes aside, My favorite part about this, and one thing my (typically passive) partner noticed and complimented right away when I ran up and showed them was the gap in the pantlegs making them look like actual clothing being worn as opposed to epoxy flattened around the leg. I really made sure that this kind of stood out where I could. I also snipped some spinal junk off of these guys since I think it’s a bit much and some was going to get in the way of my armor plans undoubtedly.
Tried to show off them dump trucks from every angle.
Using magic of the Hot Water Circle
Indeed. The hot water circle technique is one where boiling water and the ancient ritual components are mixed and plied and the desired material is impressed upon them! With more repeated pressings and offering of the sanctified materials one can have an endless supply of almost anything! Yeah, so Hot water Circle is just a playful translation of [Oyumaru], a Japanese craft/toy/repair item which is absolutely phenomenal. It is sold also as ‘blue stuff’ which I originally bought, but the prices are grossly obscene compared to buying oyumaru directly. Also, I can get it at the damned daiso for nothing basically. Truly beautiful days when you can essentially get a full blown casting operation going from crap at the dollar store. That is junk magic right there baby. Red Magician’s specialty!
Anyway, that long intro to the game plan aside, feel free to scoot around youtube for how oyumaru/bluestuff casting and molding works because I am not going to go into it here. What I will go into is what I am making. Well attempting to make. SO I have those funky ghoul/zombie dudes and these D&D skeleton dudes and they need some proper armor to match their players in arms. So I decided to make a cast and crank out a few more sets. Currently all I have is the back part.
A few back parts laying out waiting to be cleaned up and some on the models.
This is perhaps why my project stalled out since this is a setback. As you can see it’s not pretty and I am planning on doing sculpting on some putty to finish them off, but I don’t know… They don’t really seem to hit the mark so far and it worries me.
My first oyumaru molds were alright, but I wanted a proper two part, but it didn’t go down like that. I will need to spend some time making a few more molds from different angles that are easier to work with I think. That is the plan. Maybe I will rip off all those bits and start fresh. We shall see. That light blue putty is what I use to make casts of other models which I give away as gifts to my friends and when I have some left over I forged a few shoulder pads with it. So far it isn’t horrendous, but I am hesitating to progress since it doesn’t seem adequate enough. I shall report back in part 3.
Going forward.er.
As mentioned before, I need me some werewolves and they are actually on the docket. A good friend of mine and I will be throwing lots in together and snag some goodies off greebo and I shall be getting them soon enough. They are basically all sorted out as is and will need little work done to them anyway.
Remember that? All those years ago?
Also, as mentioned previously I got a set of those badass skeletons!
Aforementioned skeleton guys.
Snagged some of them and got to clipping weapons and shields on them and they are actually looking pretty good. I will need to do a little blade and dremel work to get the clipped bits looking like bones again enough to cover the rest with clever painting, but they are doing OK. I will add more pictures of them next article.
Finally, I need to finish my flesh golems, and solve the shoulderpad dilemma that I am currently facing. When I can get through the shoulder pad dilemma I have a feeling the rest of the project will start to fall into place quickly. That was it! That was what I needed to figure out through writing this and know I know. With a few more oyumaru casts of the shoulder pads are different angles I should be able to cast more than a few usable bits which will look great and be easier to sculpt into a cohesive thing than what I have going on right now. I feel foolish honestly, but don’t we all before we find clues to our troubles?
Dilemma solved, I shall move forward and hopefully take better pictures and return soon enough with another chunk of tasty hobby update for you to enjoy.
The loveable undead teams: The Mighty (Slow!) Khemri Tomb Guardians, Fierce and Resilient Shambling Undead, and the Eccentric and Exciting Necromantic Horror. I saw a post on reddit where a person showed off a 3D printed collection of undead dudes which was viable to use as all three of those teams. I liked the idea a lot and am currently in the stage of my blood bowl coaching career where I have a feeling I will eventually (and inevitably) collect a version of all the teams available and some that aren’t! There are a few teams which have a fair amount of overlap or could easily be used for either or without sacrificing too much ‘realism’. FOr example, Black orcs/Orcs/Goblins as well have plenty of overlap between big guys, tough ST4 Orcs and Goblins. Would you buy separate trolls for each of those teams? Owning 5 trolls in various team colors when really you will only ever need two at most in any scenario besides lending a team out and playing against them with one of the overlap teams in the same instance.
I digress! And to get back on track, a story about FUMBBL. My league hadn’t been meeting often and I was lacking in blood bowl in my life due to being too busy with IRL stuff (Also a factor why I haven’t been updating this blog either! Lots of good stuff coming in the future no doubt, though.) so when I heard word that FUMBBL got updated to the new 2020 rules (Good on them for getting it done so quickly!) I jumped in again. When I first encountered fumbbl I was but a fledgeling coach who took great personal offense to things like fouling and stalling, but that is (mostly) behind me these days. Needless to say after being obliterated, fouled into the dirt, and stalled on while they just kept beating me to death, I lost the taste for it and stuck to the tabletop. I was pleased that when I returned to Fumbbl, not that it was still the cesspool of tryhard goodness and no-nonsense play where coach coallump is compressed into the Diamond Playcaller, but that I had grown as a coach(on Tabletop with friends) enough to be able to not only sustain the stalling and fouling, but welcome and encourage it. I have thoughts on FUmbbl, but maybe don’t need to go into them here in depth. Basically, 1. Online blood bowl (Cyanide included) and tabletop bloodbowl are very different activities., and 2. The dice rolling on Fumbble (And to an extent Cyanide) feels funky in a way I can’t explain (But suppose that it is just TOO perfectly randomized and also not being rolled by my hand which combined makes me give the whole thing the side eye sometimes.)
Delicious Windows 95(?) Goodness! Love those sounds. Oit! Urragh! Nggyagh!
Anyway, long story, cut to semi-medium length, I played a roster of Necromantic undead for a handful of games, fell in love with Wraiths and of course Werewolves(Fuck year!) and wonder if I finally found ‘my team’. Currently Dark Elves are and have been my love since I can play proper blood bowl with agility and passing(not much these days, but it is still in the cards baby! Love the dump-off skill.) while also enjoying some proper bash as well, although that varies depending how brutal and strong my opponents are. I will always love the dark elves of course, but the Necromantic have such a variety of fun positionals with lots of potential and neat skills and just enough of a price situation that you have to make (important) tough decisions from the get go. I will speak about the dark elves in detail in the future, but I need to get on with this article! We are talking Undead here! And this is the first of potentially an endless amount of articles on this subject!
Not Pictured: The Flesh Golem. Come on!
How Necromantic? Oh the Horror! THE HORROR!
The horror indeed. So the new GW NH team is pretty cool and I am one of the people who actually likes the halloween theme. For the most part, they literally are a collection of old horror film/”halloween” monsters so its quite cool. The new wraith positional is also really interesting and the model is pretty cute with the idea that its a spirit blowing through a sheet hanging on a drying line with socks still dangling on it. Overall, it’s not a bad look, but it’s a bit much for me personally.
I do appreciate that it isn’t an over the top serious/gross design like the nurgle team or even the new khorne team. Bloodbowl is supposed to be slapstick to an extent and when people look a bit too gross or evil or violent it kind of pushes the slider one or two notches too far in the direction of warhammer proper for my tastes. Models aside, I am looking for a somewhat cohesive look if I can manage it and the strong halloween theme of the vanilla NH team means I would have to do a fair bit of conversion and all to achieve a kind of cheesy look. CHeesy and modeled very well? That is where GW succeeds. Cheesy and modeled by an ameteur like myself? Probably end up looking like a jack-o-lantern in the 3rd week of November. (Maybe the second, if I have gotten any better.)
A situation I would like to avoid personally.
The Plan:
So I am endeavoring to make an all-undead super team capable of playing Khemri/Shambling Undead/Necro Horror for blood bowl. First thing’s first, numbering and models needed where does the overlapping occur. I commented on the reddit post that the person shared asking for a list of all their models and how they planned on using them and found that they had actually printed quite a few specialized units and opted not to overlap units in places where it was possible. I used it as a base and came up with this:
Player numbers on the left, teams on the top, with positionals throughout, overlaps circled between teams. Also some early general painting notes on the right as well.
Essentially, Skeletons, Ghouls, Zombies, and Mummies(Tomb Guardians) overlap with these three teams on the surface and depending on how you swing it, flesh golems as well if you don’t mind a mummy flesh golem. The above image is actually the second version of this list with a few position shifts because of how I prefer to number my players (Important Positionals/Potential Stars in my early single digits and Big guys starting at 16 and going down from there). You may note I circled the wights and Anointed blitzers as well because I think the models i have will be a good fit for that as I shall show you shortly.
The Search for Plastic
I honestly could have kitbashed a lot more of this with the random junk I have in my bitz box(es), but any kitbasher/converter needs some raw materials. You must have a lump of clay before you can begin to mold it! So I got kind of lucky in a few ways and spent some cash to get the others. 1st, my good friend needed the ghouls for his shambling undead team and bought a second box for two ghouls alone (Curse you GW, but thank you good friend!) so I snagged that off of them in a modest exchange. This will end up informing much of the team’s general look since the Champions of death have a pretty general ‘Transylvanian’ look with spikes, bat-like shapes in their armor, and overall undeath which is ideal.
GW’s Champions of undeath have a fairly general ‘undead’ look which can be replicated somewhat easily and fit the bill perfectly for my aims.
So I already have 2 mummies, 4 zombies, 4 skeletons, and 2 (skeleton)wights. Pristine start. Pretty much all my zombies and skeletons are sorted, and mummies could be used as flesh golems for Necro and 2 TGs as well. As I sat up at night staring at plastic and flicking my bitz box searching for skulls in the dim light of the time chamber I slowly let the plastic speak to me and it finally came clear and it was the Wight Blitzer’s that helped me have a mental breakthrough.
The Tomb King Dilemma
SU & NH can be swapped back with fairly little trouble or ‘fluff concern’ since undead are what they are, undead. But Khemri Tomb Kings (GW won’t call them Khemri directly anymore I suppose, but I know in my heart their origin.) have a pretty heavy Egyptian theme and an overall Royal look to them with Pharoh-esque headdresses and Delicious Anubian symbology, etc. that make them look like Hieroglyphics came to life and decided to fail at picking up a blood bowl ball for half a game. Swapping players back and forth with Khemri will ultimately mean that the Khemri lose a lot of the ‘Egyptian’ flair and ultimately it is a design sacrifice that I have to make I think. But for TK they need basically a buttload of skeletons and then some mummies. I planned to purchase a secondhand warband of Deathrattle Sepulchral Guard to fill out much of my TK side of the roster and for auxiliary skeletons/coaches/staff/ etc since they look so awesome.
Yep, That’s the Coach Necromancer for all three Teams up front there, Assistant Coach right next to them, pair of annoineted throwers off to the side in the middle, some blitzers in the back left….
Trolltrader had such a sweet deal for an undercoated set of these and they slipped between my fingers. I can still snag a box new for like 3500 Yen, but not getting them meant I just needed to get creative. So where was I? Yes. The wight blitzers. I like the Wight Blitzer model a ton (Can’t get enough of that winged helmet) and it is really iconic. Combined with the paint scheme I have in mind it will stand out very clearly. So I started thinking about… What if they were also my Annointed Blitzers? Then the next thought is the Annointed thrower… I figured, Hey… These shambling undead skeletons are actually pretty decked out in armor. A little arm shift here and there and make them look like they are throwing the ball/just glue a ball on their hands and they could be a thrower fairly easily… Hmm…. So Basically with the 2 wights and 4 skeletons I now have my 2 Khemri blitzers, 2 throwers, and 2 line skeletons. Plus 4 tomb guardians and I already have 10 players right there. Not bad, but I need more skeletons undoubtedly. Some general skeleton models will be acquired on the cheap. I will use a handful for line skeletons and the rest as fans/the crowd for a future protect, perhaps one of the largest I plan on undertaking of all time. Every Bloodbowl fiend’s ultimate dream…
Anyway back on track! Look at all my crappy plastic.
The current State of the Project. (Unbuilt stuff not pictured.)
Shambling Undead unbuilt guys aside, here is my current haul. I have the 4 zombies built and built 2 more I obtained (Mantic games undead ghouls I think) in some random trade. They look kind of like a mix between ghouls and zombies, but when painted they will fit right in giving me a total of 6 zombies which should be enough for an ultimate list with Necro or Undead (Necro and Undead have 8 full Positionals not counting zombie lineman or the fact that undead can take skeletons as well.) I would have to be killing players every few games to run out of zombie models if I even wanted them. Obviously I just hire on the player I killed to spite my opponent and fire whoever I named on my team in those cases.
So I have 6 zombies in purple, I could potentially make 2 more which I think I may. I have two Myrmorn Banshees for my wraiths (I absolutely love these models) that I snagged off troll trader for cheap. Also got a bag of like 10 Crypt Ghouls and two lots of 3 Ogor Gluttons/Bulls for cheap as well off troll trader which didn’t cost me too much money. Obviously I am spending more than I would just buying the teams outright, but this is what I do alright? I spend money on trash and junk, give it TLC and epoxy and paint, and get something cool and unique from it. This is just what I like to and it pleases me to see it all come to fruition. So those 2 ogors will be my NH flesh golems and the other remaining 4 potentially specialized tomb guardians if I decide to go that route which will be more annoying, but ultimately be more thematic. They shouldn’t be too tricky though since it is mostly wrapping, and decoration, but I will cross that bridge when I come to it.
So I have my zombies, some skeletons(Need a few more cheapies for line skeletons), pretty much all my positionals sorted in general except for my wolves… And Werewolves are my favorite positional of all time I think. Claws, Frenzy, Movement 8… Decent agility and not unreasonable AV…What’s not to love? So these guys are the best and I don’t have a lot of dog/wolf style models or heads so it would difficult for me to kitbash and I want these guys to look awesome so I am springing for some nice ones and decided on these bad boys from Greebo:
Yeah This dude just made a badass dodge and is going for the ball. Good boy.
Yeah someone just went full Gauru and needs a taste of elf flesh. Good Boy.
Not bad. Basically 7 Euro a pop which is barely 1000 yen and I am ordering with some friends so shipping will be negligible as well. And I love the dynamic poses and just super badass look. They are also fairly generically armored and will mostly fit the theme I am going for. Simple armored plates/helmet, leathery straps and belts, and chains here and there. I think I may actually see if I can’t take the chain theme a bit further throughout the team since the paint scheme is going to be pretty striking and a nice challenge. But that will be explained in depth in another article.
What’s next?
I need to order the two wolves… Get my hands on some skeletons and I have all the bodies I need to complete the team. Hmm… I think I have some D&D skeletons somewhere… Maybe I can work something out there… hmm… Slap some basic armor on those bad boys…a helmet…a weapon snip… Hm…. It is also halloween season here in Japan so maybe if I get lucky I will find some cheap little models kicking around that I can snap up. Thankfully skeletons are super ubiquitous and I don’t really feel a need to purchase needlessly expensive ones for extra linemen on a team I will probably only play for one or two seasons at best (? Who knows, Perhaps Khemri is my future!?) . Besides I could just use a zombie or something if I needed to and only the coloring would be off/odd.
After the models are all obtained then comes the great modeling and epoxy/green stuff party to get em all fancy. Then basing and painting! Look forward to it!
Who and/or what is Nuffle? Thankfully to date this is one piece of GW game lore that remains a mystery to a large extent. Here is a wiki page for Nuffle. That wiki shows the following image depicting Nuffle:
Is Nuffle a Zeus-like old white dude holding the Living Rule Book 6? Who can know?
So Nuffle is a mystery especially when it comes to what he or she or they even look like and this is excellent for it really gets the creative juices going for a lot of players who fall into the truth that is Nuffle and begin to seek out description of their deity who gives and gives. Below are a small selection (almost exhaustive?) of all the depictions of Nuffle I have found. I am mostly surprised that there are so few given that the game is over 30 years old.
Of the images of Nuffle I have found there is a mischievous cat, a robed figure with a blocking die for a head, a robed merlin-like classical wizard look with dice, a baby nurgling, Jesus with a D6 staff, a large shoed goblin, a zeus-like deity, and meat loaf from the Bat Out of Hell tour. I mostly trolled google for these images and the pickings are desperately sparse after the first few.
I also found a few of these: (The Jesus, the large shoed green being, and the nurgling-esque baby) from the both down podcast page that had a contest about this very subject in 2012! It is a great podcast and they really go deep into the lore which is a breath of fresh air honestly, despite theirs being one of the longest running podcasts on the internet. I have listened just about every cast they put out.
In particular I like the idea that Nuffle is a cat smoking a cig messing with people. THat is courtesy of the excellent Blood bowl site and it’s writers/artists at the blood bowl strategies site. A really excellent page that has such a distinct style both artistically and how they view the game. I myself strive to become a better coach and appreciate how they kind of describe the process from fledgeling coach all the way to veteran and beyond.
But Meatloaf… Where does that come from? Actually, there is a quite well known player of blood bowl called Doombeard Dave who occasionally guest-hosts on the skulls and ones podcast who is very vehemet about a few things: 1. The Slow Jams (Sade, etc.) 2. Nuffle looks undoubtedly like Meat Loaf from the Bat Out of Hell Tour 3. Bash over Agility as a general rule. I respect this person and their opinion. I love agility teams myself, but play them as bashy as I can. I also like the jams going during blood bowl, but understanding the slow jams is something that I am working on improving both as a coach and a person. But one thing that just took off like wildfire among my local league was the fact that meat loaf is closest depiction of Nuffle there can be.
This podcast episode in general is a pretty good one and I respect a beverage imbibing during a podcast as I actually co-host a similar one of my own! But this first episode (Of three) is the best one before things start to spiral a bit, but more power to them, it was a damn pandemic. So before I go on to play the Djimm Thorpe to Dave’s Roze-El with regards to purporting the idea that Nuffle is BooH Meatloaf, please listen to his words directly for everything from here on out is official Red Magician conjecture and personal belief/expansion of the concept/personal discoveries made manifest and shared freely. Stare at these .gifs while you listen for maximum power.
And thus it begins. The great declaration of Nuffle by The Red Magician.
And of course, first off, this declaration is based off observations first pointed out (To my knowledge) by Doombeard Dave. On we go. With the three gifs above alone you should be able to get a clear indication of a few things. He is pumped up and charged full of energy and excitement. This excitement and energy sometimes courses so strongly it can barely be contained. Following that, the emotions that go along with this energy is deep and powerful evoking memories and truths from great depths. Finally there is the edge, the stare and gaze which stops any in their tracks and one tinged not with anger or fury, but subtle doubt and powerful questioning ability that makes any coach or player reflect on their lives up until that point and really dig deep for the hidden truths within the soul. Alright I just fancifully described a handful of .gifs and a single still image of meatloaf, but there is meaning behind this.
The usage of Marvin Lee Aday’s likeness (Meatloaf) to represent the one we all call Nuffle is an understood truth. I don’t care for the zeus or jesus-esque renditions of Nuffle because its overdone in general and blood bowl doesn’t really evoke that kind of ‘ultra-holy’ imagery and also because both greek pantheon and any form of Jesus worship doesn’t need to stick its nose in yet another quality pastime. If your Nuffle is a Zeus or Jesus-esque figure, then that is the truth. I think Nuffle’s demeanor is similar to that of a cat, and can’t question the artwork at all, but cats as well are just in too much media and I don’t want any cat deities in my life right now. If your Nuffle is a cat, then that is the truth.
Blocking die head, various wizards, crying baby nurgling, etc. are all wonderful ideas and iterations of Nuffle, but to me Nuffle is supposed to me something, somone, to look up to and aspire to. To want to appease while simultaneously be rewarded and alternatively, be chastised and taught by. This is also a being that despite being so mythical and deific, is something that is by my side every step of the way on and off the pitch. I don’t see that being as a cat by any means, and don’t see zeus or any others as being anywhere nearby me in any willing way. I certainly don’t want my deity to be a crying baby or some blathering monster either.
Meatloaf. A Rockstar. Not just a rockstar, but one that respects the operatic sphere as well – that is classy. Not just a rocker that delivers face melters and belts out the words, but also one that is sensual and caring and more understanding than your more traditional axe wielder. Also by focusing on the bat out of hell tour we capture a legend in the midst of a beautiful climax in various meanings of the word and rebirth. Read up on the whole tour and you will see what I mean. Also, this was during the late 70’s and early 80’s which is roughly when the game came out and undoubtedly right on brand in a variety of ways and blood bowl is one of the few brands left put out by GW that still has a little bit of rock and roll/metal fantasy vibe to it left. That and maybe Necromunda.
Blood bowl and almost every franchise started by GW had a few spots here and there which had a pretty badass flavor of what could be described as ‘Neon Mohawk’ to some extent. It is a big reason why I think a lot of people liked GW so much ‘back in the day’ and has such a unique look and feel and when ‘modern models’ still have little flares of that it is the best. Thankfully blood bowl has retained a great amount of that at least flavorwise and even some of the more models still have the goodness.
Some OG mohawks
2018 model, still repping.
It’s not just the Elves! (2016 model)
Anyway. Meatloaf is the truth. The energy, the passion… I see my Nuffle as someone closer to being a coach than some kind of old man or an animal/beast. An everyman and someone with flaws who takes chances, goes too far, might do a little bit more than zero nose candy, lashes out, but also has boundaries and self respect as well. Moderation and Moderation in moderation for this being who ultimately is an agent of chaos if only in the form of polyhedrals and timing with regards to this board game if not every random event that takes place in the universe, but let’s try to keep things closer to the board game than the cosmos. (Try being the key word there.)
Doing anything for love (Of Bloodbowl) but won’t do that. (Allowing you to succeed a reroll of 1 on a GFI before scoring a TD on turn 16.) Boundaries.
Tenants of Nuffle
I am currently in the process of thinking about this in more depth and will no doubt touch upon it in another article. By all means look forward to that. I didn’t think I would finish the build so early (Since my articles typically take a series of weeks and months to complete usually.) so I figured I would have more time to consider this in depth. I am also reaching out to Doombeard to see if he will grant me an interview/discussion of Nuffle Truths as he feels them.
The Nuffle Shrine Build
Needless to say, despite my devotion and trust and belief in Nuffle to a level which may concern more than a few people, I was not nearly as satisfied with my piety and my dice rolls still need a bit of love so I set out to create a great work. I set out to create a shrine to the great Nuffle.
Inspirado
Google is typically my first stop when I begin a new scratch build looking for inspiration. I knew of a few altars I have seen and collected the .stl file for 3d printing on thingiverse(can’t find it now and it isn’t saved on my profile either! Oh well), but my printer is all but trash at this stage unless I really put some effort into it. There was the altar upgrade in the BB2 game, a recent altar .stl/print from Kraken Studios and a few other 3D prints which used to be online. Also finally a reroll marker that has shrine/altar-like qualities which a Red Magician can respect. Main elements of all these altars are the stone dias/plinth and the honorable rule book (Was the LRBVI in most iterations, one of the darkest, yet brightest times of the hobby), skulls or dice bearing skulls/blocking dice, regular D6’s, and various dungeon regalia like torches, braziers, skulls, treasure, sculpture, etc.
I really like them all and have nothing to complain about and loved all these ideas and planned on doing something similar, but wanted to bring some real ritual into the act. I would not be able to call myself a Magician if I didn’t find some way to inject a little ritual into such fun, especially when it involves the rolling of dice and supplication to the chaos.
Shrine Foundation
The foundation of the shrine will have three main areas: Central Altar/supplication zone where models/coaches/players will be placed when they must go to attone, and two side altars before (dice) pools where the dice in question will be placed to offer up to Nuffle.
This is what I am thinking when I speak about ‘dice pools’ with my shrine to Nuffle.
The foundation was a piece of flat foam (The same one that I used for my Necromunda Tile build) and a kind of foam brick/sticker/wall decal that you use to make a wall look like it has bricks. My friend picked them up and handed them off to me a while back and I liked their natural look and sliced them in such a way that suited my needs. I cut holes in the pond areas and then peeled off the sticker and stuck them to the foam base pate.
I used more of the base plate style foam to carve out some stairs which I thought would add a nice effect like the shrine was super old and the earth around the shrine was winning out against these ancient stairs. I also used the foam to begin the front and back of the bottom of each of the altars.
My Chaos Minotaur (On a 40mm base) practicing to pray to Nuffle in repent of its horrendous performance against goblins. Even worshippers of Slaanesh must bend the knee before Nuffle.
Main Details
So the base would be foam and such, but we all know it’s the details that really make terrain pop and I wanted to spare nothing to show my praise and appreciation for Nuffle so I raided my bits box and came across quite a few gems which really are going to add a lot to the flavor of the shrine. I finished the altars themselves with more foam, beveled unevenly to show wear and tear of ages and to make it appear more stone-like since I am going with a humble greyish stone which will be painted to have some moss ideally. The side altars are straight flat stones and the main one is more of (in scale) huge book stand/plinth.
Tons of delicious bits, books, tomes, regalia, curtains, skulls, skulking creatures, etc.
The main feature of the side plinths, seeing as they would be the offering space for the dice, would be the dice themselves. I recalled from AGES ago when I just got back into 40k again (8th edition, during index times) and someone gifted me some of these ultra tiny dice and I knew they would be perfect for the task at hand. I also found a small little decoration with skulls on it (I think it was a grey knight thing) and sliced the skulls out and popped em on top of the 1 pip location on the dice. I also added a small lantern (since I kind of want to try some more OSL) and a bag of pentacles, I mean gold (11 coins actually…) since money goes a long way in most religious activities. The coins were cut from a thin length of plastic rod, but a toothpick could have just as easily done the job. I adore how they are spilling out of the bag and think it gives the altar a lot of flavor. Once painted it’s going to be something special I feel.
Skulls up baby! Glittering coins in the light of a small lantern on the blocking dice altar.
For the Central plinth I went with a book, and a (poorly made from two skaven bells and some random spikes, should have just used a damn ball) blood bowl ball tipped wand/mace. I glued down the wand, but am not sure about the book yet since it feels kind of small and needs prepwork anyway. Thinking about having multiple books to swap out or potentially just glue one in randomly. That will depend on the universe. Being able to change books will allow for some more fun and letting coaches have their own books and such if they are blessing playbooks, or brining their interpretations of Nuffle’s word, etc. Those are all little details that only matter to me though.
As for the 2D6 altar, I made sure the small D6’s both were correct (Had 1~6 and in the correct locations, these are mostly free cheapy miscasts/prints) and glued them down, Ones facing upward. To accentuate this altar was the ritual sword/dagger and the cup/chalice. Perhaps used separately or in conjunction as a petitioner offers their bodily fluids or perhaps just gets drunk af while praying or one after the other or, well, use your imagination here.
Vampire Coach, Lady VonZasswhippen overseeing the blessing of the items while sneaking in a few special prayers to ensure her vampires recover and succeed moving forward.
For those playing at home….
Just a quick side note and comment on the main implements of the altars. As a fellow Magician to THE Magician, I, the Red Magician wanted to add some delicious flare into my Nuffle shrine by making sure the four main tools of the magician were represented on the model- The Pentacle (Coin or Disk), The Cup, The Sword (Or Dagger), and the Wand (Or staff). Just something I wanted to add in to give it a more personal feel and to power it up. I feel with those implements on the altars, anyone who approaches will be ready to offer Nuffle their most sincere supplications.
Why are the Skulls and Ones facing upward? Will you not doom yourself?
Perhaps. It is a real fear in the pits of my stomach, but these are the facings on the dice which cause many to curse the name of Nuffle and which people wish to see the least come up in their games of blood bowl. I myself have been working very hard on not externalizing the, “strong emotions” we shall call them, when such things happen. (Goal line 1 reroll 1’s are real and I just had one like a week ago and it cost me the win I feel.) But also Nuffle’s Chaos Number is 11. Obviously for the number of players on the pitch at a time, but more colloquially as the eyes of the snake. The often fatal 1 reroll into 1 that this game, and Nuffle’s often fickle will, are famed for. Likewise for skulls which are very popular in decorating various Nuffle Shrines, although I have seen many POW facings upward in those shrines, I do not believe that is the way.
So the concept is that players will place their dice in the dice pools, ones and skulls up, as an offering to Nuffle that he may receive the ones and skulls, the holy number being beared and skulls proffered so that they will be taken away from the coach and the dice. Granted they will remain in Nuffle’s grasp to be returned at a later time, but perhaps they will be returned to an opponent instead of to yourself. And for coaches who think this is a microwave and we are weighting our dice to land on 6’s and POWs, they are offering their best dice to Nuffle which may take them away from them and be given to others. It could be thought of several ways, but I am going with skulls and ones up as my method of benefaction towards Nuffle. People all pray differently and have their own ways of conceptualizing things, but that is my logic.
Moving Right Along….
With the altar prep begun, the fires in my heart were lit and I felt that progress on the shrine was going well and already its giving energies were granting me gifts in ways I didn’t even comprehend fully yet. Also, I tried to dry fit a few more bits on here and there, but realized that until the ground was fully based and good to go it wasn’t even worth placing more bits around so I jumped to it.
So sloppay, but so smooth and tasty. That looks much better than before, especially in those pools.
I laid down some glue in the main gaps and around the locations which I felt were a bit too sheer/unnatural and then placed some ballast in there, and then went over the whole thing (All still wet) with a spackle/glue/water mix. Since everything was reasonably wet and malleable still, I was able to get some more natural curves and hills which I was hoping would look nicer when it was dried. Ultimately there will be more finer sands/flock, etc. that will go on later, but this helps to unify the shrine and act as a first layer to protect the foam for when I basecoat it.
The initial painting.
Black and two shades of grey! That’s it!
Truly! Just to get some paint down and to identify gaps, etc early on I like to lay down a layer of paint. Just some cheap watery black paint (Pictured) and two shades of grey. This is all my old terrain paint from making blown out buildings for 40k, perfect for a stone altar.
Back of the altars.
I also like to slop on my initial layers fairly thick when it comes to terrain since the paint also acts as another layer of bonding to give a nice solid layer. In particular the stones and altars themselves I tried to go thick with it, whereas the objects and regalia on/around them I try to keep more reasonable.
Front of the main altar.The Blocking dice altar all undercoated.The 2D6 altar.
With the altars undercoated, it was time to give them some love. These aren’t some kind of fresh out the church of Nuffle made to order altars, nay. These are some ancient, hidden for centuries and discovered in the woods where a new pitch will be sanctified altars and pools of magical power. Thus, we gotta mess em up!
Altar Weathering
Oh yessss. 2 SHades of Grey and one or two of green pretty much gets the job done.
I use two shades of grey for my stone, then some watered down black paint as a makeshift wash, and pretty much soak the whole thing liberally. It looks like it is overkill and that is because it is! I then get some dark greens mixed right in the black I had mixed up previously and do the lower bases of the models and some of the edges and other spots I want to see some mossy action. I do one more mossy layer with a slightly brighter green as a ‘highlight’.
Looking nasty and musty already. That is a shrine that has seen a few winters, summers, rainy seasons, and a little bit of mud and dirt too!
After the shrines were looking ultra messy, it was time to finish up the base coats and bring it a bit closer to the light. I did a layer of cheap brown on top of all the black on the ground, and then did a slightly brighter layer of grey as a drybrush over all the stone and cement to make it look slightly less slick and damp. Finally, I did a layer or two of a drab green color over all the brown to simulate some kind of simple undergrowth/sparse moss/lichen. I intended on flocking it, but still adding these small shifts in color make it more interested in the little spaces between the flock and for when it eventually falls off it looks like there is dirt and soil beneath.
Finalizing the Foundational Colors
That drab green color looks so awesome I love it.Beneath the main altar, some old books, a pair of skulls besides a spiked railing and a teensy tiny inset shrine space where fragments of single broken bone have been carefully placed. Whose bone was it? Certainly one who served nuffle eternally.
Also at this stage since I was itching to see more progress, I laid down some base colors on all the metallic items and a few of the bits on/around the altars. It starts to really make things pop and look like a location where some kind of activity takes place rather than a bunch of bits glued together.
2D6 Shrine: 2 D6’s, a ritual blade, and a chalice.
I did the colors up a bit a bit more adding details and weathering, shading, and touching up here and there with color and trying to make these items come alive on the altars. The altars themselves ended up looking pretty good and more than some cement-like grey stone, I was happy to get this interesting mix of light and dark greys with interspersed spots of greens and blacks that some off like these stones have been soaked for ages. I am a big fan.
Also, the tons of layers of paint also take away from the look that it is a piece of foam and looks more like stone I believe.
Coins, lantern, and 3 Skull dice on the block dice altar.
Pools of death!
Or pools of health depending on how well you pray to Nuffle!
One element of this altar is that I intend it to be an actual place where coaches can pray to Nuffle and place their blocking dice into the respective pools while a significant model on one team or another recites the incantations/makes the sacrifices/dark pledges to get those dice that they need. To do this I wanted each pond to have a glowing effect (Go back up to the zelda pond image) and really come off like you are placing your dice into a magical pool and hoping for the best.
Looking half decent!
I have been trying to practice OSL since I worked on my slaanesh team and it’s been a slog. The green turned out much better than the red I think. Regardless I am happy with how they look.
Side note on color usage
The Three Goddesses of the Triforce, Din (Red/Power), Nayru (Blue/Wisdom), and Farore (Green/Courage)
Some of the most iconic colors and also often linked with elements like fire, water, and earth/wood. I love these colors and of course respect their connection/representation within and to the triforce itself. Red being Power, Blue being Wisdom, and Green Courage.
I like to add these little nuggets of flavor and personal lore into my work when I can and this was no exception. Green in my mind was the courage to throw the block and such a pool of courage would bless your blocking dice. The Red pool, of power, would be needed to break armor, injure, and also throw and dodge successfully, which are all mostly physical aspects of power to me. I am currently at a loss as to what to do with blue without really messing up the vibe of the piece.
My original plan was to get hot glue and have it like all over the dice and pouring into the pools like tendrils of raw power. I thought it would look good, but I just skipped over that and went with a slightly more mundane approach ultimately. And then each pool would have more tendrils of red and green reaching out forming a kind of blueish ring in the middle but color-wise that doesn’t make sense and as I was working on the piece felt all the tendrils of power and such would just make it look like a mess.
So going forward I am thinking that I will do a small glowing set of runes on the space in a circle glowing in blue where someone would place their model. THat will represent the blue of the wisdom to come and pray to Nuffle in the first place and it will also break up the kind of dookie brown that the base ended up becoming which I do like, but, well, you will see what I mean.
Grass and Water (Flock and Water Effects)
Ain’t that pretty! You can see where the water effects have mostly dried and where its still wet beneath the surface after like 4 hours of drying. under a fan, not bad.
Oh hells yess. I was on the fence with how much flock I should put on, but got some nice advice and was ultra chuffed with how it turned out. The grass itself is one of my more preferred blends and comes out real nice and also the ‘soil’ browns and stone look real nice against the green of the grass too. Usually I like to spritz some glue water over flock like this, but I think I need to keep it looking fluffy, small bits of flock falling off everytime be damned.
So the base got flocked, and I also poured in a little bit of this ancient citadel water effects stuff I got a hold of a while back. I would compare it to modern day ‘ard coat I think it’s called, but basically makes whatever you paint it with shiny and nice. Good for gems and coins and pools of water of course. I want a beautiful deep resin pour, but I also can’t be asked so I just use this stuff and go for a general effect.
Also, I did make a super deep pour of this years ago and regretted it since it stays kind of soft and malleable and fingerprints get stuck in there as well so I am going to do a layer of glue water over the top of this water effects to give it a slightly tougher shell so that it doesn’t nasty up anyone’s dice and can handle having dice tossed around in it since its essentially a dice pool!
Glue Water on the pools.
Domina Netherslayer, Dark Elf Coach, praying that her blitzers stop missing games!
The pools dried well enough and then with a little glue/water they were looking primo and handling dice and pokes with little trouble.
Final TLC on painting / Books Etc.
A little mithril here, some gold there, touch ups here….
Last part of the process was doing some final touch ups and doing little details that I wanted to complete.
These blocking dice are reminiscent of a set of dice I made for my first league.
Painting the small details really adds even more pop. Although I want to go over the images on the dice with a super fine black line, I am falling into a situation where I am fussing over details back and forth and will just sit there and look at it endlessly doing little so I decided to call it here.
Glowing Blue runes on the base.
Notice there is no image for this heading. Because I decided to leave it be for the time being. If I am going to do some kind of arcane glyphs on the base of this shrine I will need to do some research or reach out to the sorcerer for some input and suggestion on how best to reach nuffle so I can do this right. For anyone else if you like the idea, cool looking squiggle may suffice, but this I feel, may be a slightly bigger project than I am realizing so I have decided to leave that part be for the time being.
Conclusion.
Almost all final details in place, painted, and looking good I called it.
Domina and my green dice in full array on the shrine.
I realized all too late that I still needed space for the D8 and D16! Which way should go up? I opted for 11’s being visible and placed it just around the coach just so. I think it is alright. Really I will leave that decision up to the coaches who worship at the altar. This is how I thought about it as I wanted to take a pic of it in ‘full prayer mode’ so to speak.
Opposite Angle so you can see Domina’s intense expression as she reaches forth toward Nuffle.
Well there you have it. A light primer on Nuffle as well as a shrine build and more than a little bit of interesting banter around the both of them! I will say that after a few test rolls, the dice did feel good but were also not happy to have their energy wasted on practice rolls and after a few super hot streaks provided skulls in plentiful amounts. I learned my lesson and look forward to sending them to the pitch to do battle properly and let the will of nuffle flow through them.
So I made a dice tower a while back when I got into blood bowl. I actually made two dice towers. One hastily fashioned from cardboard and hot glue and decorated with paint markers. This was my ‘test’ to see if it could be done and to get a feel for the new project. And another made a bit more lovingly and carefully from foamcore with a few more bells and whistles.
So I made these two dice towers and at the time I was using dice for blood bowl that I had made myself because I didn’t have any “official” ones. The made ones were a little chunky and more edged than the rounder ones put out by GW. Also, I used the same paint pens to decorate those which gave them a kind of friction element which ultimately made them get caught up in my foamcore dice tower in addition to rubbing paint all over it which I didn’t care for either. But they seemed to flow more smoothly enough through the coincidentally smaller cardboard one fine and the cheapness of the cardboard one meant I could slam the dice with more authority into them when I was getting emotional about pretend board game football. Thus, my poor (Although more lovingly crafted) foamcore tower found itself on the sidelines while the cheaper crappier cardboard one saw me through almost an entire season of blood bowl on its own. Please check out my league’s page here. Another loving creation of mine that I have spent my time on recently.
The Tochigi Legends League logo.
So anyway my dice tower.
I won’t bore you with the details of the tower build itself which is to say I didn’t document it and made it before I had this blog and sadly didn’t take many pictures then either. I will take a dive through my historical photo gallery and see if I have a few laying around in the future. Maybe. If you are very curious, I used this tutorial for my cardboard tower looking for something simple and cheap (googled ‘how to make cardboard dice tower’). I applied the same concept with some flare to my foamcore one. So! Here is where we pick up on the story:
Alright well I actually did some work on it by the time I decided I wanted to blog about this.
So you can see the main box of the tower itself which houses the baffles. And the curved rolling tray I made as well. If anyone ever cares enough to comment or get in touch about it I can talk in depth about the tower and its inner workings and smaller bits that don’t get touched on in this log.
I cut some card into thin strips and glued it on the exterior with white glue to give it the impression of being made of wood and having cross beams, etc. I also did some penciling in where I planned on putting some more embellishments as well. Below are images that I used for inspirado (Googled ‘blood bowl dice tower’):
In particular I liked the look of the rolling tray and the interchangeable sign board for the score. And its simplicity. I like the symbol usage for the weather but don’t really care for where the weather sign is from a pragmatic pov. Same with the permanence of the platform.Again I liked a lot about this as well. Ultimately the same as the one above it with a few small changes/adjustments.And another. They all have a similar theme don’t they? I really like how the score hangs down from the platform and the overall design and feel of this one above the others. But again it is bulky and not really for being moved around!Made by an absolute legend of a creator on thingiverse. (https://www.thingiverse.com/thing:4246507) It really gave me pause and start to think if there was some way for me to incorporate more game/dugout statistics into the tower. Worth considering for sure.
The direction I am taking it.
So from the comments on the inspirado, you can see that I am not such a fan of permanence of the platforms, things hanging off, and sticking out, or the large footprint of the tower. Why? Aesthetically I love it all. Pragmatically, I live in Japan and tablespace is at a premium and gaming at home isn’t always an option which means the Red Magician needs to travel. Besides models and dice, almost everything in blood bowl breaks down to be pretty flat so a dice tower ends up being quite a haul on its own. With all those bits hanging off it would be a recipe for destruction and with such a large footprint I’d be hard pressed to have any space for my witches brew after considering the pitch, dugouts, laptop, rosters, etc.
So what that means is I want portability, and to limit pokey-outy bits where possible. I also want a beautiful dice tower that is useful and ultimately aesthetically pleasing. I think I can make it happen.
The Tower
There will be three main areas to address when enhancing the tower.
So the three main elements I want on the front of the Tower are 1. The Weather, 2. The current Score, and 3. A platform to place models, extra score cards, etc. The Yellow dots show where I intend on gluing magnets.
Yes! Magnets. Most if not all of my inspirado use little dowels or nails or paperclip snips to create a space where cards can be hung from. It’s easy and effective and looks good in setting as well so immersion wise it is clutch, but in my mind all I see are books, papers, models, my backpack, etc. getting caught on it and scractching and tearing or otherwise ripping indiscriminately into things. I know I know, “How the hell are you transporting that thing to the point where it can cause so much damage?” To that I say, Praise Nuffle.
It was once remarked by a notable NAF affiliated blood bowl player renown for their slow jams and thirst for blood that Nuffle’s much contested appearance mirrored none other than that of Meatloaf and wouldn’t accept it otherwise. I heard this sermon via a podcast and honestly, couldn’t contest otherwise. Although the ancient Zeus theorey did appeal to me for a time but now all I can say is, “I won’t do that.” Also, always snowy weather for that guy, damn look at those eyes.
Just get on with it.
Right. So magnets. #1, I need a place for the weather and I want it out of the way. It is important information during the game, but ultimately once it is set, you don’t really need to keep it in mind unless you roll a 2, 3, 11, or 12. So I added a little nub of foam, slapped a magnet on it, and intend on having a set of wide sign boards to represent the weather up top above the score descending from the beveled tower top.
[Side note!: I made the towers with a beveled top in order to allow for some light short distance throwing/ overhead slamming into the tower to get that extra oomph needed when charging dice rolls with emotional energies. That it allowed for a hanging sign was a happy accident/opportunity. From experience with the towers in play it is satisfying and a good design choice in my humble opinion.]
#2. The Score cards. So again I will use magnets, but how to magnet up score planks and to what degree were something I had to consider. But it should be fairly painless and I thought I could just shove some paperclip snips into the foamcore and things should stick well enough from both sides I hoped.
#3. The platform. I am no stranger to making scratch built terrain and had just the piece of leftover foamcore for everything I needed so just used it and would just mag it up.
Preparing the fiddlies.
Cheapness which knows no bounds?
So for the sign boards and score number cards I decided that the full thickness of foam was a little bulky for my designs and also meant I would have to double or dare I say it triple the amount of paperclip I would have to shove in there to get the attraction I wanted and still have them be double sided. Thus, I cut out the score card squares (And weather signs), and then sliced them ‘carefully’ through the middle of the foam making two “identical” pieces of very thin foam core. Needing card on both sides I used PVC glue and glued them as you see above to a piece of card.
If they dry they dry.
So I am a fan of slathering glue all over stuff. I cut out my now thin foamcoare cards, trimmed the edges to clean them up a bit, and slathered. What did I slather? Glue. Where? Around and inside the edges. So my ‘precise’ foamcore splitting ended up leaving more than a few gaps between the foam and card so I needed to do some gap filling and also seal the foam for when it comes time to spray and pray. I think it also adds a nice little texture to the outside as well that gives it some personality when you drybrush it kind of taking away that ‘its painted foamcore’ aspect.
Tiny metal bits. Not actually a paperclip, but part of a BBQ grill top mesh which I thought could become a necromunda ladder until I snipped the parts securing it and it exploded into hundreds of these metallic wires. Oops. Note to self, thin cheap daiso BBQ grills are not secured in the middle making them ideal for necromunda ladders.
Wanting to preserve my magnet usage which will ultimately make using this annoying to a degree, but also save my magnets so I can be buried with them instead of having a easy time of things, I opted for snipping and stabbing snips of these into my foamcore cards near the top so they could hang down. After they were secured in there with white glue I glued over the little opening where they were shoved in to create a kind of coating so they didn’t pop out.
The Platform
The top(L) and bottom(R) of the platform.
So I cut all the squares and stuff for the score cards from a spare bit of foamcore and was left with a thin strip which I hastily cut into similar lengths and glued them together. Stabbed them through with toothpicks. Cut scraps into thinner foamcore and glued them on the sides as a small barrier. Did the same and extended the platform and then slathered glue where it may fall.
[Why the toothpicks? Well, I tend to use loom bands or other small trinkets and having a small place to hang them might be interesting if that is ever something that comes up. Also, I could hang pennants or team regalia of sorts from there to add some flavor as well. They also shore up the glue and fasten the platform together. Do they stick out? Yeah, but they won’t be glued to the tower proper.
The Tower Proper
Behold the Slather.
Working with magnets can be annoying. Infuriating at times really. Especially when you aren’t just using metal to stick on, but need to keep polarity in your sphere of concerns. And when they are ultra small it just escalates things.
So I glued them with little care onto the weather and score areas since those were intended to stick on with metal so polarity wasn’t an issue. I used a super glue to get them on there nice, and then slathered white glue on top to bury them in (Pictured above, still wet). I also covered the magnets with polarity cared for below for the platform since I will be adding magnets to the platform itself as well to insure a solid grip. Also because I second guess myself endlessly during polarity checking and couldn’t wait so with a little card cover I could test to make sure they were still the right direction without pulling them out again and again. Although I did pull one out from the glue once during testing.. (Or twice or more times I don’t care to recall….)
The platform on the other hand needed to be load bearing to a degree and my small magnets and snips of metal weren’t up to the task. In fact the magnets paired as well weren’t really up to the task either as you will see. They are small!
So incredibly small. So.. SO tiny.
Got those badboys off ebay. Like 50 for some small amount of money and haven’t used em all yet despite doing a few 40k vehicles and a fair few tau battle suits. Also pictured there are the buttresses which will support the tower when I attach them on. After getting a little time to dry, I gave them all a try to see how they went.
Initial Testing
Works well enough!
So the initial testing went well! Enough… Also, the glue slather dried real nice and didn’t interrupt the magnet’s attraction. The numbers are done for now and so are the signs until painting. The platform will need some more support in order to bear the weight of more than one or two super light plastic models. I will affix the buttresses (Just googled it and apparently I mean to use the term braces. I will not amend writing buttress until now. It’s basically an upside down buttress which is still funny. But I will use braces going forward.) So if the two small braces (Pictured above behind the picture showcasing my little magnets) are not enough, then I will add a third one which will go a bit lower and extend a bit further which should do the trick.
Preparing the landing tray.
Spoiler alert! I made it!
So the tray itself is fairly shallow, but it is more than enough for regular play. Also while I am really interested in putting a fence on/around it, I have a feeling it will end up being bulky travel-wise or blocking the view of the dice after they are rolled. It already looks like a mund of grassy earth which has been spread out so that is what I am going for. The urge to have a random direction D8 template in there is tempting, but I already have some of those available and don’t know where the tower will end up anyway.
So I am going to embellish the hill in one or two key locations where a little bit extra embankment can prevent the escape of dice. The goal when I designed the dice tray originally was for the dice to roll true and be easy to grab once rolled. I have found that with current dice trays it is a little tricky for my gross sausage fingers to shove into the confines of the small areas so I want to try the open layout.
Currently with how it came out after the ballast and flock went down, I covered it in glue water and painted it up. Going to do something to embellish the outside of the base, but realized that there was an issue. Dice often get hung up in the crook between the base and the dice tower itself. I will remedy that later.
Can’t just leave it there now can we?
In addition to the score and weather, and also being a dice tower, I also wish for it to serve another purpose, or multiple other purposes. Namely, I wish to have access to information needed when looking at/near the dice tower. For blood bowl this is largely the kickoff chart and potentially the prayers to nuffle at a glance as well. Previously on the cardboard tower I just wrote on the side of the tower as it was that simple. But I don’t really think that will suit my needs this time around and I want to add some flair.
Similar to the weather magnet on the front, I want to have sets of magnets on the sides which will allow me to hang/drape a ‘banner’ down on the sides which will be covered in information. Maybe even make it double sided as well allowing for further customization. I am also considering adding one to the back as well, but that may be going to far since typically one wouldn’t lean over far enough to look at the back of it. Perhaps I will just put my league logo on there or decorate it with posters, graffiti, and such.
Final pre-paint touches.
Before we spray this bad boy, I wanted to make a few final touches. Add a little tactical gravel and texture here and there, spackle/epoxy it all in place. Seal the open foam locations with glue/water mix like I did with the base above.
Painting
Going to paint the majority of it nice and simple. Spray black, potentially reseal open foam that melted away, spray brown. Then get some cheap paint and paint grey on the stony bits in the ground. Paint green on the grassy bits. Then drybrush the wood a lighter brown and do it tactically in lines that seem to go with the ‘grain’ of the wood. Do a wash and do that again building up texture. Paint the signs/score numbers. Paint the platform. Do the ground and grass around the landing tray up real nice with greens, washes, and drybrushing. Take care in painting the area on the front of the tower so that using it is intuitive and score being 0 to 0 is clear. Same with the magnet areas. Painting and preparing the banners.
Some weather markers and the numbers in progress. I like how dreary the rain marker came out and the lovely greyish white transition on the clouds in the snow marker.I really tried to take my time a bit on these weather markers and try to use color to evoke the heat or brightness from the letters with symbols as well.
Finishing touches
At this stage the project has been going on for far too long and I can barely remember what I wrote or planned for the tower and things just kind of got on on their own haha. But After a basic paint job, I wanted to slather the tower in adverts, league regalia, posters, etc. I loved this look and my expeditions into making Munda terrain cemented that fact. This is what my workspace looks like during that endeavor.
Blubbo adverts printed on regular printer paper and glue water-ed/modge podged onto the tower.
Print out and carefully cut the adverts and do some glue where you want them, stick em on, and slather glue all over them until they are flush with the surface or how you want them to be. They leave a minimal sheen after they dry.
You can see the sheen of the glue. Under bright lights in the utter darkness that are the pits of hell where I work, its very clear, but when playing blood bowl and cursing your luck and choices you don’t mind it so much. A full on OCD satisfying solution would be to ultimately do the whole outside with glue water I suppose. Also, by doing the ads over the gaps in the ugly top part of the tower it helps clean up the overall look I tell myself.These ads all rock and I found them via googling and there is also a facebook group about blood bowl adverts, etc. Its tremendous and I adore it. I even rigged up a few pages of the adverts I liked, compiled them, and uploaded them there! Check it out. If you don’t use facebook you still might be able to peep some of the images they have up there, but their repository is one of the best i’ve found online.
Other Baubles
I had just played a game and forgotten my apothecary AGAIN and was furious when finally the pieces slipped into place.
So THAT is what those toothpicks were for….
It came to me. I saw the three toothpicks which I had randomly stuck on there thinking to dangle something from them, and it hit me like a ton of bricks! Three picks, one per player, one shared in the middle…. I made a pair of apothecary tokens and taking a clue from things I have seen online and the BB2 PC game, a lightning bolt-shaped blitz token as well.
Here is a snap of the progress to date.
The tokens are a bit crude, but I made them on a whim a day or two before the coming game and just banged em out quickly. They are simply cut from foam and I bent a paperclip and stabbed/glued it in the top so it could loop around the toothpick and alternatively stick onto one of the myriad of magnets I have glued to this construction. I have since painted them a second time and when I finish the final final touches will take some proper pictures to show it off.
Since finishing the tower for the most part I need to finish the shoddily painted black base with some posters/artwork/something to spice it up, and also add a little ramp/smoother to make the dice flow nicer out of the tower and onto the landing grass. After I finish those two last bits I am calling it done. I have been writing this article for what feels like months now haha. Just gotta knock it out and update this hobby blog! I have been working on a pitch for blood bowl as well but that fell on the back burner and has been an article in the works for longer than this one. Just glad to see projects nearing completion. Hopefully this or next week! (5.12)
The landing smoother
You can just make out the line (That crease in the middle of the exit path) of the paper I glued and painted.
So after previous writing, and WIP usage of the tower I realized my grassy landing pad which I really like ended up causing some trouble for the dice ending up with more than a few cocked dice in the crook between the tower proper and the landing zone. So I decided to keep it simple and just get some brown paper bag paper, cut it to a good size, and then just glue it on there and paint it.
I just used regular white glue and kind of coated the whole top of the paper to get a good layer on it and toughen it up. I then painted it similar to the pattern that was already on the inside and blended it a bit with the actual landing area. It is obviously a piece of paper overlapping the ground, but I am not too concerned about it and the dice roll way better often making it all the way out to the end of the landing tray making them easy to grab even with the upper deck/dangling apothecary & blitz markers.
It was slapdash, but effective and I am happy the tower works more effectively.
The Landing’s Outer barrier
Here is the outer barrier. In some games when space is a bit tighter, I have just forgone using the lading completely which is a bummer since I put work into it, but such is the way when you have a practical issue. Also why I made the landing tray detachable! (Sure that’s it.) Either way I want the barrier to exist since the dice do fly out of the tower at a reasonable speed and without it they splash about.
So instead of leaving it as is, which is to say painted poorly since this particular part wasn’t taking the paint well and it was cheap crappy dollar store paint on top of it, I just glued on a few more adverts and other fun stuff around the base as if companies and others rushed in after the landslide/tower explosion that caused the rut in the ground and just staked in their sign posts/ads to get exposure quickly while the scenario was still hot.
The Final Product (For Now…?)
There she is in all her glory!
Still have room to add things like banners, etc, on the side hooks, but my need for those will arise with time. For now this is a fairly complete and quite nice tower that I am really proud of and happy to use in my blood bowl games and in general for ultra-superstitious dice rolling scenarios.
I hope you enjoyed checking out the Dice Tower build! Let me know what you think!