After finishing two cars, I am now at the stage where i need to start coming up with more interesting ideas and figuring out how to push the envelope a bit more to start getting some unique cars. My first two were satisfactorily ‘beat up’ rust buckets that have been on the wastelands and in the death races for quite a while.
Before building gaslands cars and even before stripping the cars for the process, I gathered up a bunch of bits from my various bits boxes and terrain stuff and tossed it together as stuff that I thought I could use for gaslands cars. Spare bolters, sponson pieces, interesting gun-looking bits, nice engine greeblies, etc. With each car I made my eyes started to see the bits in a different light and I began to understand the ‘code’ if only a little better.
Some of these parts were enough for me to get inspired and get going on putting a car together which I should would be fun.
Those in the know would see clearly that is is a bike for a space marine. Those even further in the know would understand that they don’t see the table as much as they used to. That changes today!
The Super Charger
I saw the bike, and promptly took it apart seeing that the wheels would offer something interesting, and then saw the pipes on the bag, the handlebars and little screen were perfect for munda, and this engine section called to me. I cut it out and glued it together. I liked the look, but it was filled with huge gaps and I didn’t feel like breaking out the epoxy because one: that requires effort. And two: I was cold and just wanted to get on with the project without using epoxy. I want my gaslands cars to be made of junk and scrap before I start to get overly artistic with them and going beyond just slapping crap on them. Part of the point of this is that it’s so easy and carefree and is slowly draining the bits box if only a drop at a time.
So yeah, the engine bit was holey and needed something on top of it and after googling ‘what is that part that sticks out of the hood of a car’ I realised that I was trying to make a super charger and that they have a thingy with three cylinder looking jawns on top of it. (I am aware that this is an air intake, but still speak in absolute ignorance out of respect.) ((For who? For what? What? RED MAGICIAN WHAT?))
Cylindrical sprue and butter packaging. Match made in heaven.
I’d been looking for an excuse to use the cylindrical sprue that came from some dark reapers I scored in a trade and figured this might be it. And it was. Cut some small tubes, wrapped them in light card (butter packaging) and was pleasantly surprised with the outcome.
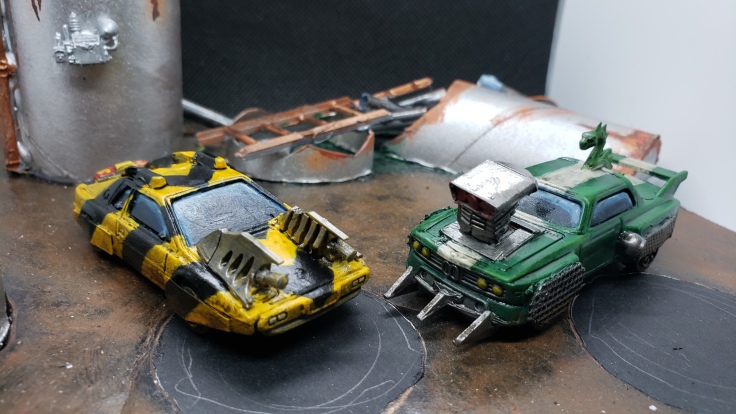
The ‘blue car’ (I think its a BMW of some kind) and the parts ready to roll.
It didn’t take TOO long to make it happen, and I enjoyed the fun of figuring out how to sort it out nicely and make it all sit well. Some shaving of plastic here and there and it glued on well enough.
Team Players & Personal Sensibilities on Conversions
The ‘black’ car. Looks like an old badass Lambo.
The other car was a really sleek looking vehicle and I wanted to paint it up relatively nice. I have been starting to think about teams a bit more and considering what team a car would be appropriate for. Obviously any car can play on any team and that is one of the great truths of the freedom of gaslands, but each sponsor also seems to have a ‘feel’ to it and matching it would reflect nicely on the table.
Sports cars and hot rods and sexy vehicles all scream Miyazaki (Stunty Drift masters) to me or potential Idris (Speed Freaks) or even Mishkin (Futuristic weapons and tech). Whereas the previous two vehicles I completed, Skidz and Hedgehog would be more suitable for something like Slime (Wild psycho driving) or Rutherford (Military) or perhaps Warden (Cheap rusted out junk boxes filled with prisoners).
So I wanted less mad-max and a bit more kind of post apocalyptic ‘chic’ or something like that. I don’t think I will ever use a car as is without doing a little something to it, otherwise I wouldn’t bother stripping it of paint. But I also want to add a enough to it without going overboard so represent the fact that these vehicles have outlasted the others and survived a lot of the struggles of the wastelands and death races.
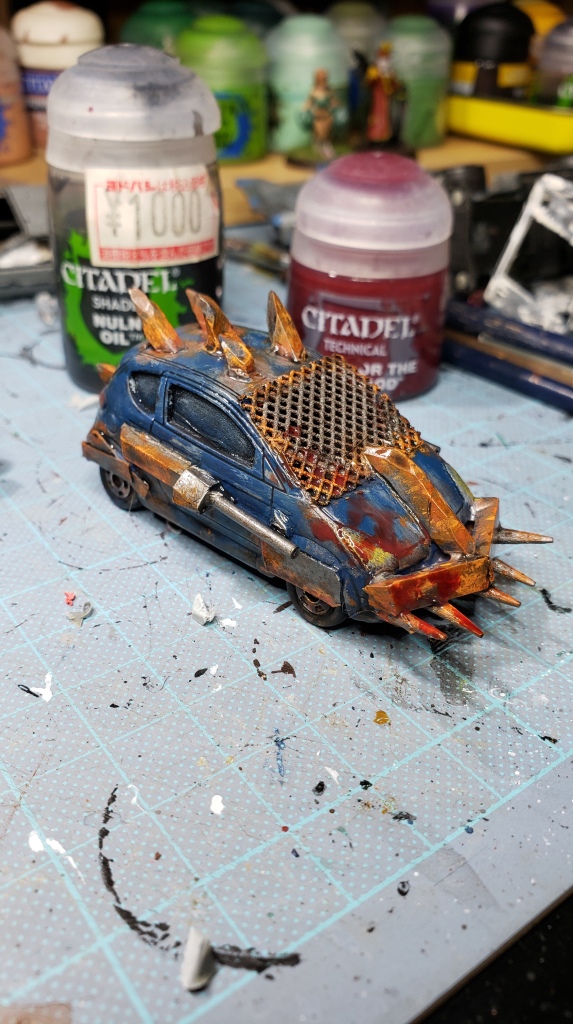
The hood of a Dark Eldar Jet Bike that has been lightly chopped up.
So I wanted something kind of sleek and neat and dark eldar are that to a T. For those who don’t realy know they are essentially evil space elves in the 40k universe who literally drink fear and pain from their enemies and themselves to stave off a chaos god they created from their excessive lifestyle from millenia ago. Yeah. So basically that means everything they have is spikey, sexy, and just really pleasant in my opinion. I planned on using these jet bike hoods for terrain age ago but it never panned out. I had a feeling looking at the little grate-looking bits and hood scoopy goodness that this would add some flavor to an otherwise already sexy sports car.
The front looks pretty decent.
These huge bits sticking out seem like some kind of dangerous weapon allowing for easy Miskin use as is. I glued on some tooth pick bits for gun barrels anyway. They also look like some kind of ram like weapon as well so this low profile vehicle can really get in deep with cars and trucks that have a higher profile. I like the look and am hoping paint will really solidify things.
The cinderella fit of that hood bit in the back window after minimal cutting made me teary eyed. That is what it is about.
I have a habit of removing the inner plastic seating area/dashboard/back seat/etc. from the vehicle and setting them aside. I feel like I want to save them so I can make buggies and such later on from scratch using them as a base. I actually plan on doing just that soon enough. Soon.
But to that effect, I also need to either black out the windows or put on some of that delicious mesh netting which I love so much. It’s quite popular and I don’t deny it. But I wanted something more and after playing with the puzzle pieces I thought it kind of looked like a nice rollbar kind of thing and after some trial and error found it fit in just right. A few other bits of sprue later and it looks like it belongs there. A little glued on mesh on the inside and above and its as if it were incorporated in real nice. I was proud of that one.
Look at that sexy beast.
You may have also noticed that I added a little bit of action on the caboose there as well. When I was making Miyazaki teams I found that I was adding a lot of dropped weapons on them since they were cheap and I think very effective as well so I popped a little canister looking thin on the back. I think it was some kind of thruster or perhaps a headlamp or something, no idea at the time of writing. I am going to assume it either drops off and reloads somehow or potentially shoots out of either side so its able to be used for multiple loadouts.
And the paint keeps runnin’ runnin’ and runnin’ runnin’
After the customary spray of cheap daiso brown paint, I did an undercoat.
So you can tell a few things right away. One is that the blue car is now green. Also, I added a dragon on the top of it! Also a ram on front, bits around the super charger, and some guards over the wheels as well as a pair of ‘vent’ shooters on the sides as well. Got busy apparently!
The black car is now yellow! And Sexy!
Yellow. Yeah I did it. I wanted fast cars with nice colors and wanted to sexy em up so I chose sexy colors. I also added a few guards along the wheels of this vehicle to spice it up a bit. When it is painted it will look better I hope.
I gave them a healthy drybrush with a slightly brighter color to build up the base layer.
Compared to the first color, this drybrush really brings them to life. If you don’t have a ton of paints, just mix a little bit more and more white with your base color to achieve this effect. I paint over places that won’t be yellow or green with fairly reckless abandon because the more paint layers I get on this thing at this early stage, the better and nicer paint will go on later down the line when I care what it looks like.
Getting silly with it.
Oh hell yeah. Stripes up in this.
SO I wanted stripes. Cars with stripes go faster, it is a matter of fact. I saw the yellow and wanted to do some hazard stripes since this vehicle was dangerous. I also liked the nice fat white stripe down the center of the green car as well. Blacked out the windows and gave the metallic parts a solid brush of gunmetal silver.
After paint the yellow car’s armor plating looks flipping sick as hell and I am really glad I did it. When I dirty up the tires and they are a little more apparent through the armor it will really look badass. I will touch up a few more colors and then douse these mamma jammas in some washes to really make them pop.
So I skipped a few steps to get to this point apparently…
Final Touches
So the final touches… I painted up the windows with some shades of blues gradually increasing lighter and lighter and then did a final teensy touch of white here and there. I did the tail lights red and the head lights either white or yellow… Did the red on the supercharger’s intake flappy bits. And of course doused them both in nuln oil. I also did some browns along the wheels and where I imagined mud would kick up on the paint job. They can’t get out of this looking too nice.
The yellow car ended up looking pretty sweet. I really love how it turned out.
I am not completely set on any names for it yet, but the yellow car is going to be something along the lines of Hazard or something. I am avoiding any and all bee related names for reasons. Might just end up calling it hazard stripe perhaps. But I really like how the tail lights worked out and how the weapon canister on the back looks as well. It is painted as napalm, but could be anything really. The windows on this one came off pretty good too. I like the look of cars online that do a similar effect which is where I got the idea.
The Jade serpent. Looking sexy.
So when I decided I wanted this car to be green I knew it was going to be jade something. And the snake kind of sealed it. So I shall call this one the Jade Serpent. I am really happy how the silver and black wash do a great job making the ridiculous supercharger I kitbashed up look half decent. I don’t have any desire to drill holes in the hood of these cars, so the cheap card did the trick in my opinion. Also really like the contrast of the brown dirt against the green paint on the sides and around the metal guard mesh over the front wheels.
Now there are four….
CLockwise from the left: The Jade Serpent, The Hedgehog, Skidz, and Hazard Pay(tbd)
Hello blood bowl fans! Red Magician here! I saw the FAQ came out and although I am still waist deep in translating all the main rules, I figured I could knock out the FAQ fairly quickly and was pleased I managed it in only about an hour or two including all the unwanted commentary by myself!
There were a few good questions and a a few mistakes in the rules and just about everything has been addressed by these questions and the piece of errata added. Take a look at the translations below for the Japanese version and my commentary and thoughts on the matter!
— Q: Can a team use more than one team re-roll in the same team turn? (p.24) 質問:チームはターンにはリロール二つ以上使えますか?(p。24) A: Yes. Though be careful, as if you use them all early on in a half you will be facing quite a few turns without any! Remember that you can never re-roll a re-roll. 答え:はい。でも気を付けって、ハーフの早いところに使い切るとリロールない状況でまだまだターンいっぱいですよ。そしてリロールをリロールできないことを忘れずにね。
Translator’s note 訳注:Wow. This is a change for the rules and quite interesting if not a little controversial! ワオ!前のルールからの新しいチェンジですね。面白いですが、人による物議的なことです! — — Q: If a player re-rolls a single dice from a dice pool with a Skill (e.g., Brawler), can they then use a team re-roll to allow them to re-roll the other dice from the same dice pool? (p.24) 質問:もしスキル(例:ブロラー)でダイスプールからサイコロ1個振りなおせば、チームのリロールで同じダイスプールの他のサイコロを振りなおすことを許されている? A: No. 答え:いいえ。
訳注:People will try for anything won’t they. マンチキン的な質問ですね。 — — Q: If a player with a PA of 1+ scores a 1 for a Passing Ability test, after modifiers have been applied, is this still an Accurate Pass? (p.29) 質問:PA1+のプレイヤーはモディファイアの後、1になったらアキュレートパス(大成功)ですか? A: Yes. 答え:はい。
訳注:This is clear in the rules imho. すでに明らかと思いました。 — — Q: After purchasing Inducements, do you add the value of the Inducements to your Current Team Value (CTV) when recalculating your CTV to determine which team is the ‘Underdog’? (p.38) 質問:インデュスメント(勧誘)を買ってから、アンダードッグさんを決めるためにCTVを計算しなおす時、その勧誘のバリューをCTVに足しますか? A: Yes. 答え:はい。
訳注:This is obvious to veteran players, but believe it or not the rules didn’t explicitly state that you add inducement value to CTV. A careless miss by GW. べトランにとって当たり前のことですが、指示るかどうか明白的に勧誘のバリューをCTVに足すことはどこにも書かなかったんだよ。GWのケアレスミスだ。あ~あさすが。。 —。 — Q: During the Determine Kicking Team step, does the team that wins the coin toss or roll-off automatically become the kicking team, or may they choose to be either the kicking or receiving team? (p.38) 質問:キッカーのチームを決めるステップで、コイントスで買ったチームは自動的にキッカーのチームになるかリシーバーのチームになることでも選べますか? A: They may choose. 答え:選べます。
訳注:Yup.そう。 — — Q: During a Blitz result on the Kick-off Event table, if a player from the receiving team is Knocked Down does this end the Blitz? (p.41) 質問:キックオフイベントテーブルの「ブリッツ」の結果の時、リシーバーのチームがノックダウンされたら、「ブリッツ」のイベントが終わりますか? A: No. 答え:いいえ。
訳注:The wording is a little vague in the kickoff chart and says “a player” instead of “a player on the kicking team.” 字句の曖昧のせいの質問。「プレイヤー」だけのところに「キッカーのチームのプレイヤー」を書けばより確実でしょう。 — — Q. During a Blitz result on the Kick-Off Event table, can I use a team re-roll? (p.41) 質問:「ブリッツ」のキックオフのイベントの結果の時、チームのリロールを使えますか? A. No. A Kick-Off Blitz isn’t a team turn. It represents the kicking team springing into action ahead of the receiving team. 答え:いいえ。キックオフのイベントの「ブリッツ」は「チームのターン」ではありません。キッカーのチームが突然リシーバーのチームより早く行動することを表すんですので。
訳注:Interesting. Often times people call the ‘blitz’ a ‘bonus turn’ which implies you can use rerolls and since you are activating players and such. I can see how training (rerolls) wouldn’t come into play as much during such a hasty time.面白いな~。よく人は「ブリッツ」を「ボーナスターン」見たいなことを呼ぶんだし、プレイヤーをアクティベートしているし、リロールが使えることは当然と思いそうですが。でもそういう突然、軽率的な時期だとチームの訓練(リロールとのこと)が使えないことは見られますで。面白い。 — — Q: The rules for team turns state that a team turn ends when all eligible players have been activated. However, the rules for player activations state that coaches are not obliged to activate every player. Does this mean that coaches can choose to end their team turn without activating all of their eligible players if they wish? (p.42) 質問:ルールにはすべてのアクティベートができるプレイヤーがアクティベートしてからチームのターンが終わります。だが、アクティベーションのルールにはコーチがすべてのプレイヤーをアクティベートしなければならないと書いていません。もしコーチの望みはすべてのプレイヤーをアクティベートせずにチームのターンを終わらすことでもいいですか?
A: Yes. Remember that a player can choose to move zero squares, so if you wish to do nothing with a player simply activate them, move zero squares, and then end their activation. 答え:はい。もし何もしたくない場合、アクティベートしてから0スクエアを移動する選択もできることを覚えましょう。
訳注:Internet is losing itself over this seeming ‘double’ answer. The answer is ‘yes’. You don’t have to activate your players or endanger them to losing tackle zones or take root by failing (what are perceived as mandatorily forced) activations each turn. You don’t have to activate them. BUT I think that they are reminding you that you can choose to activate and ‘do nothing’ in addition to giving their asnwer.インタネットの多くの人は大絶望な答えです。答えは「はい」です。アクティベートしなくていいとのこと。(無理やり全てのプレイヤーを毎回毎回)アクティベートして「テックルート」や「ボーンヘード」でタックルゾーンを失うなどの危機をしなくてもいいですよ。アクティベートしなくてもいいですよ。ただ、アクティベートしてなにもしなくていいこと「も」できることを念押しているだけだともいます。 — — Q: Can a player make a Pass action to an adjacent friendly player? (p.48) 質問:プレイヤーは隣のスクエアにパスできる? A: Yes. 答え:はい。
訳注:はい。Yes. — — Q: When making a Passing Ability test, if the roll is not a natural 1, but is reduced to less than 1 after modifiers have been applied, is this an inaccurate pass or a wildly inaccurate pass? (p.49) 質問:パスのアビリティテストの時、ロールはナチュラル1じゃないけど、1より少ない場合、結果は「インアキュレートパス」か「ワイルド敵にインアキュレートなパス」の結果ですか? A: This will be a wildly inaccurate pass. 答え:ワイルド敵にインアキュレートなパスになります。
訳注: I had this question as well when I was making my ‘throw team mate’ flow chart. This is what I thought would be the case.スローチームメートのチャートを作る時、同じ質問考えました。この漢字だなと思いました。 — — Q: If an inaccurate or wildly inaccurate pass goes out of bounds, do you roll for passing interference before or after the throw-in? If before, where do you count the ball as for the purpose of placing the range ruler to determine which players can attempt to interfere? (p. 50) 質問:もしインアキュレートパスかワイルド的にインアキュレートパスがピッチから出たとき、パスインターフェアランスのテストは観客がスローインする前か後ですか?そしてインターフェアランスができるプレイヤーお決める目的にレンジルーラーを置くためににボールはどこにあるようにしたほうがいいですか?
A: Before. When placing the range ruler to determine which players can attempt to interfere, treat the ball as occupying the last square it was over before going out of bounds. 答え:パスのインターフェアランスは前です。プレイヤーの誰かがパスインターフェアランスができるためのレンジルーラー置く場所はボールがピッチから出る前の最後のスクエアにすることです。
訳注:Sorry my translation was a bit rough for this one! It’s a little clunky language and I haven’t gotten to the passing section in my translation efforts yet!私の訳はちょっと荒くてごめんなさい。文がちょっとだめと思うんですが、まだルールブックの翻訳をパスのセクションまでは進んでいないんです。 — — Q: When a player makes a Blitz action, do they have to nominate the target of the Block action before the player is moved? (p.59) 質問:プレイヤーはブリッツアクションそする時、動く前にブロックのターゲットを指名しなくてはいけませんか? A: Yes. 答え:はい。
訳注:やばいね。このちょっとな違いだけでかなりコーチの計画の柔らかさに影響があると思います。 This is surprising to me and feels new. This will reduce the abililty for coaches to change plans mid-blitz. — — Q: What happens when a player with a PA of ‘-’ rolls an improvement to its PA? (p.71) 質問:PA’-‘のプレイヤーはキャラクタリスチックの改善ロールでPAの改善が出たらどうなりますか? A: Either choose another listed option, or improve its PA to 6+. 答え:ほかのオプションを選ぶかPAを「6+」に改善します。
訳注:やば!!これも新しい情報ですね!多くの人はPAなしのプレイヤーは永遠にパスできないことをちょっとがっかりしましたので、これは面白いですね。This is quite a revalation. Many people online were disappointed to see that PA ’-’ players would seemingly NEVER be able to pass in their lifetimes even on a 6. This is new information and interesting to me. — — Q: If a player attempts to dodge away from a player with the Diving Tackle skill fails the original dodge roll, but then uses a re-roll and succeeds, can the player with Diving Tackle use this Skill on the re-rolled attempt? (p.75) 質問:もしプレイヤーはダイビングタックルのスキルを持ているプレイヤーの隣からドッジして失敗してリロール使って成功すれば、ダイビングタックルを持つプレイヤーはリロール使ったドッジに(ダイビングタックルの)スキルを使えますか? A: Yes, provided they did not already use the Skill on the first attempt. 答え:一回目のドッジに使っていなかったら、使えます。
訳注:OK.そう。 — — Q: Can a player with the Sneaky Git skill that performs a Foul action still be Sent-off if it rolls a natural double on the Injury roll? (p.75) 質問:「スニーキギット」スキルを持つプレイヤーはファールすれば、インジャリーロール(負傷)がぞろ目なら退場させられるんですか? A: Yes. 答え:はい。
訳注:Sneaky gits don’t get snagged on armor rolls if they are doubles, but the ref can’t ignore a player being pulled off the pitch right?スニーキギットの奴らはアーマーロールならファール隠せるが、プレイヤーが完全にやれることはレファリーが気づくでしょう! — — Q: When a player with the Dump-off skill is nominated as the target of a Blitz action, when do they make their Quick Pass action? (p.79) 質問:「ダンプオフ」のスキルを持つプレイヤーはブリッツのターゲットとして指名されたとき、いつクイックパスをしますか? A: As soon as they are nominated as the target of the Blitz action. 答え:ターゲットとして指名されているとたんです。
訳注:ちょっとダンプオフをより利用できるような判断です。This is a call that seems to help dump off as a skill. — — Q: Brawler states that a player can use this skill when making a Block action on its own (but not as part of a Blitz action). Can a player with this skill use it when it has an assist from a friendly player? (p.80) 質問:「ブロラー」スキルを持つプレイヤーはブロックの時だけ(ブリッツ含まらない)使えます。このプレイヤーはアシストがあってもスキル使えますか? A: Yes. The ‘on its own’ part simply means it can only be used as a regular Block action, and not part of another action that includes a Block (such as a Blitz action). 答え:はい。「だけ」の部分は普通のブロックの時を示したんだ、「ブロックに含むアクション、たとえブリッツ」ではないことです。
訳注:これは英語の字句の問題で「ブロックの時だけ」と「一人だけ」のように読めたため、アシストはできないかな~と思った人のためです。Clearing up working that could be misinterpereted or perhaps even…manipulated. — — Q: Can a player with the Grab skill choose not to use it if they wish? (p.80) 質問:「グラッブ」スキルを持つプレイヤーは望めば使わなくていいですか? A: Yes. Remember that only Skills and Traits marked with an * are compulsory. 答え:はい。「*」マークついているスキルとトレートだけは強制的に使わなくてはいけません。
訳注:はい。Yes. — — Q: If a player with Animal Savagery knocks down a friendly model, are they forced to use Claws, Piledriver, Mighty Blow (X+) (or any other Skills that would affect Armour or Injury rolls), or can they choose not to? (p.81) 質問:「アニマルサヴァジャリー」のスキルを持つプレイヤーは自分のチームのモデルをノックダウンしたら、「クロー」、「パイルドライバー」、「マイティーブロー」などの(アーマーやインジャリーロールに影響があるスキル)のスキルを使わなくてはいけないか、使わないことが選べますか? A: The opposing coach may choose if the player must use these Skills or not. 答え:そういうプレイヤーはスキルを使えるかどうかが相手のコーチの選択です。
訳注:Vampires are in trouble baby!ヴァンパイアは困りますね! — — Q: If a model with the Animal Savagery trait wishes to use the Hypnotic Gaze trait, will the bonus +2 to their Animal Savagery roll as if they were performing a Block or a Blitz action? (p.81 & 85) 質問:「アニマルサヴァジャリー」を持つプレイヤーは「ヒプノティックゲーズ」のトレートを使いたかったら、ブロックやブリッツのようにアニマルサヴァジャリーのロールに+2をもらえますか? A: No. 答え:いいえ。
訳注:ゲーズはもう2+だよ!0+ほしいの?そして、またヴァンパイアがやられる。Gaze is already 2+! You want a 0+ gaze? Also, vamps getting the slap again. — — Q. If I roll a 1 when rolling to see if I can use a Chainsaw or Projectile Vomit, is a Turnover caused? (p.84 & 86) 質問:もし「チェーンソー」や「プロジェクタイルボミット」を使う時のロールは1が出たら、ターンオバーになりますか? A. No. The player is Placed Prone and an Injury roll made against them. They are not Knocked Down. It will only cause a Turnover if they are in possession of the ball. 答え:いいえ。プレイヤーはプローンに寝かして、インジャリーロールを振ります。ノックダウンされていません。ボールを持つプレイヤーならば、ターンオバーになります。
訳注:プローンに寝かせるとノックダウンされるの違いですすね。The difference between being placed prone and knocked down. — — Q: Can Griff Oberwald’s Consummate Professional special rule force an opposition player to re-roll a dice? (p.130) 質問:グリッフ・オバーワルドの「完全プロ」のスペシャルルールで相手のプレイヤーをリロールさせることができますか? A: No, it can only be used to re-roll a dice rolled by Griff Oberwald himself. 答え:いいえ、グリッフオバーワルド自身しか使えないリロールです。
訳注:さすがオバーワルドさんですね。Good ol’ Griff. —
ERRATA — 正誤表:
Page 61 – Characteristic Reduction – Change the second paragraph to read: In the case of Movement Allowance or Strength, the characteristic is simply reduced by 1. In the case of Agility or Passing Ability, the target number is raised by 1. For example, if a player with AG4+ suffers a Neck Injury, the characteristic would become AG5+. In the case of Armour Value, the target number is lowered by 1. For example, if a player with AV9+ suffers a Head Injury, the characteristic would become AV8+
So I left the last gaslands article off on a cliffhanger! Well I finally finished the hedgehog. I’ll take you through my process step by step.
Hedgehog all done up and built.
Parts breakdown in general
So I have a ton of 40k bits which puts my in a solid position in general, but I am finding myself very picky with which ones I will use. I also want to make stuff from scratch and not feel like I ‘have to’ use the bits which is what I accomplished with this vehicle.
Almost all of the decorations are carved sprue, light card (butter package) which I pressed the end of my tool into to give some texture, a couple toothpick ends, some excellent sturdy mesh sandpaper, and finally the handle from a miniature axe for the gun barrels.
Base Coats
Ya blue it.
In maybe a minute or two, I base coated the thing blue. I had to go fast. I love the freedom to be so sloppy with these cars compared to doing more detailed miniatures like BB teams or Munda gangs.
RATTATATATATATATATATTAT *Pokemon being ejected from guns*
I then did some gunmetal with a bit more care on the metallic parts and a few spots that I figured I wanted some damage or rust.
Rusty and Dusty
Durteh.
I start most of my rust by doing the bottom-most layer as a straight brown. It could be dirt, or old old rust, or whatever. Makes for a good layer as a base and adds more contrast in general as we build up our oranges.
Using a pretty standard technique when highlighting stuff, but doing it based on where everything was thickest in brown I add my oranges. Reddish orange I put almost everywhere I painted brown, then stippling regular orange in the center of the reddish orange before finishing with a very light stippling of the bright orange all over. I think there is a lot of rust on this vehicle, but only in the spots where the raw metal is. I am imagining that the armor and spikes have protected this vehicle for a while and its paint job has managed to remain intact to some degree, but due to that fact the metal and spikes are all rusted and corroding.
Final Touches
Subtle?
I use some very light blue to add weathering to the blue areas since the car isn’t in flawless condition. I also used that color to add the reflection of light in my blacked out windows. I did a little yellow on the front and red on the back lights as well. I want to try and pick out more details on the cars themselves so they look like real cars made of many different parts and materials and less like toys for gaslands that were just painted and drybrushed. Although I do like the look of the simple color and drybrush in all honesty, but can’t seem to let myself do it! And finally.
BLOOD FOR THE BLOOD GOD!
Best paint ever man. This stuff is too good and I just wanted to make sure those front spikes saw a little action. I play dark eldar in 40k so bloody and nastied up weapons and stuff are a part of my life and this was restraint. You can kind of see how the person running from the wreck of their car tried to dodge off to the right, but got caught on the spike, pulled over the hood and rolled off the front of the window mesh. They had a rough time of it.
Also at this stage I proceeded to do a healthy coating of black wash over the car in most spots to give it some nice shadows and kind of dirty and darken the paint job and rust. It cleans the model up quite a bit which is a tiny bit unrealistic, but I think it looks better.
Now there are two!
The first of what I can guess will be a great many.
So that was basically it. My painting style and pace for this vehicle was quite quick and not really overly precise. I went a little more mad maxy with this one, but surprisingly it still is in nicer condition than the other one! I think it has a bit more personality than skidz but also fits in with the general rusty beat up death machine party. I also found an excuse to imply vehicles hitting people as well which always adds a little zest to the equation.
That’s all for now!
Is this blog becoming a gaslands blog? It is certainly looking like that I bet.
But believe it or not I have a couple other ongoing articles that I need to complete, but the projects have been taking forever and stretching out a considerable length of time (Making an entire blood bowl pitch for example!).
Gaslands is such a short time from start to finish that it really gives you a quite immediate sense of satisfaction with minimal effort and it also means that I can snap a few pictures and when I get a chance to sit down at my desk, bang out an article like this in no time at all. In fact I have another one for the next two cars in the chamber already. Probably going to start writing it now and with luck finish painting them tonight perhaps. A magician can dream.
Indeed. For gasoline is the currency in this dark world which has been left behind as the rich and powerful have all gone to Mars in the far future (2018, lol.) and left the Earth to turn into post apocalyptic mayhem seemingly overnight. Damn. Too real with what”s going on in America, but at least there is good TV right? Still too real. And in a twisted metal calypso-like deal of the century, the winners get a free trip to Mars and out of the living hell that Earth has become.
The setting in book is not particularly deep, but it doesn’t need to be. It’s more than enough and I like it a lot. There is potential there for people to take it above and beyond and get all super serious with it, with long campaigns filled with intrigue, but it isn’t needed. Its also easy enough that you don’t need to bother with any fluff at all really and just get down to business, the business being playing with toy cars, rolling dice, and making noises like ‘VRRRRRRMMMMM’ and ‘SCREEEEEE’ and the like while driving them around and destroying each other.
For the record I am speaking of the Gaslands Refuelled edition, but my opinions go for any gaslands you can find most likley.
Rules that Rule
The rules for gaslands are pretty solid and fairly streamlined in my opinion. They also ‘feel’ good when playing and the gambles you take choosing templates and then seeing what happens when you lay it down and where the car ‘ends up’ is thrilling. It is akin to being a driver in the vehicle and yanking the wheel desperately hoping you can make it around that obstacle only to find out that you contact it just enough to trigger doom. Compared to games like blood bowl and munda, it is absolutely rules light in my opinion.
It can be taught fairly easily at the table and the most complicated parts are the ‘official’ final positioning mechanics, especially during collisions, but they all make perfect sense after a few plays. That and sussing out what dice do, which hazards you can and can’t cancel, etc. was also a little tricky. But everything is streamlined in a very easy to follow flow chart which labels the order of operations and is the bedrock on which the game is built and solid bedrock it is.
Templates
I printed a set of templates available for free on the website and laminated them. I made a regular sized set and also a ‘pocket’ sized set so I could practice at my desk without taking up a ton of space. Three straights, four turns, and two swerves as well as the extra templates for sliding and small and large weapons. Simple, elegant, and effective.
The downfall and annoyance of many systems is that you have to measure distance when moving. It affords a lot more freedom, but can also slow things down considerably. In gaslands you choose a template, place it, and then (optionally) roll dice as a risk/reward system to allow you to shift up (or down) into another gear or perform more complex movements. The key with this is that in the rules it says quite clearly that once you choose a template (the second you touch it or a house ruled when it is brought into the playing field, whatever) you cannot put it back and choose another. This is the thrill I mentioned previously. After a few activations of your cars you start to realize you are going off your feelings and eyeballing your current position, car size, terrain, etc. and balancing one or more choices to try and get ahead without wrecking your car. Would a gentle turn put me right behind my enemy or would a regular turn? Can I avoid that rock formation with a swerve or would a veer be necessary to get by?
Excellent questions which often yield hilarious and exciting results.
Skid Dice
WHAT ARE THEY TELLING ME?
Skid dice. Easily replicated on a D6 by assigning hazard to 1, Spin to 2, Slide to 3, and Shift to 4~6. You can choose to roll none or as many as you are able whenever you move your vehicle based on the ‘handling’ characteristic of your vehicle.
This game has a big element of risk management and pushing your luck since many actions you take in the game afford you something called hazard tokens. Gain 6 of them and you ‘wipe out’ which can be disastrous or just aggravating, but in any case typically detrimental to your chances of winning in most game modes. Rolling these dice is both a source of hazard tokens, but also one of the only ways you can remove them from your vehicles so they are important.
This is a game of vehicles so movement is the most critical part of the game and the shift dice are fairly simple, but the spin and slide results really open up the game allowing players who can think outside of the box to really dance with their vehicles or put them into perfect position to blast past difficult obstacles or to thread the proverbial needle and line up weapons at their opponents.
An article written by the game’s creator about the collision mechanics in the game.
Colliding in the game is something that I find particularly interesting and the part of the rules where the writer speaks very honestly to the player about why they made this choice and that was even before I read the blog article above after being questioned why they made the choice they did in the gaslands forum.
Basically if your template or final position overlaps or intersects with any obstacles or terrain or vehicles then a collision happens. YOu move the car as far as it can go on the template until it hits something then stop it there, you roll dice, check some charts, gain some hazards, and sort it all out and maybe someone blows up. The beauty is what happens in the next activation for any vehicle which starts in contact with an obstacle/vehicle, etc.
You ignore it. Drive right through that B like you don’t even CURR. The creator mentions explicitly that while it takes away from the ‘realism’ (Of the toy car death race dice game- I mean this with nothing but respect), it makes things easier for everyone in the long run. He speaks for himself very well in the above blog and i recommend you give it a look if you are interested in design choices of game writers.
Anyway, you just drive through the obstacles which is very clever and loads of fun to imagine how it actually would work out. Like, I hit a brick wall straight on, and instead of taking two or three turns to reverse back, go around, and then make my way towards the goal area (Three turns-worth of moving behind everyone else), I just drive through it and keep going still a relevant participant in this game. I can imagine hitting a wall so hard you blast right through it despite taking perilous amounts of damage. Crashing into cars and them going one over the other, etc. I find that in any game where the mechanics ‘get in the way’ of or don’t EXPLICITLY paint the picture of the narrative and the immersion that it is a lot of fun to try and imagine the crazy scenario which would ‘justify’ such a result.
Needless to say I do this often and my friends and I pretend to be in the cars pulling e-brakes or spinning out and going through ramps and other vehicles with great excitement. I feel bad for folks who get hung up on that stuff to the point where they aren’t having fun anymore. Give me a break.
Gaslands is awesome.
So sugoi.
The weapons are badass, the sponsors are interesting, and the tactics feel like they have great great depth.
I played the tutorial mission (against myself) using the pocket version I made and the first two games only took like 30~40 minutes a piece. The proper death race scenario (the first suggested ‘mission’) took me about an hour and 15 minutes or so and it was only my third game. While blood bowl and necromunda are certainly quicker games than 40k which I previously compared them to, gaslands is quick as lightning and if I were to play more than 5 or 6 games I bet I would be able to do it even quicker as I got used to the decision making process with skid dice.
This isn’t really a review, but just my musings on the subject, but I love this game and have only played a few games of it. I have experienced some come from behind stuff, lots of excitement, and after building a few teams of cars each with a different sponsor in mind it makes me look forward to playing with sponsored teams and exploring more of the missions. Most of all.
The Conversions and hobby aspect is a breath of fresh air.
Pryed all these fools apart using basically only that hand screwdriver. Turns out my dremel is too weak!
As far as hobby goes, gaslands opens the door for you to do anything. You start to feel kind of pushed into a corner by big games with ‘official’ weapons and rules along the lines of WYSIWYG which imply very very heavily your models gotta look the part to play the game. Gaslands creator was wise and in addition to wanting easy smooth rules, he wanted the materials needed for the game to be available easily and put as few barriers (Basically none) as possible in the way of a hobbyist’s creativity.
There are recommended sizes for cars, but if you want to play with smaller or larger, just adjust the template size accordingly. In general any car or vehicle will be fine enough as long as the people you play with are understanding. As far as weapons, they are a conversionist’s dream and honestly, the bar really isn’t ultra high either and there doesn’t seem to be a lot of pressure to build or paint the best thing in the universe. As a long time participant in the hobby in the games workshop realms, it’s nice. There are a lot of people in the miniature wargaming hobby community who gatekeep pretty hard and the gaslands community (Mainly the facebook group and gaslands forum) seem to be really chill.
Decided to start with all the cars which only had one metal pin to spare my wrists and hands.
Current projects
So I previously shared a post about my first gaslands car and since then I have begun to improve upon my system and get ready to jump into converting these cars with a bit more gusto.
This is that good stuff. in 5~30 minutes, paint will peel right off!
I got a stronger paint remover after doing some googling in Japanese and found a hobby blog which suggested this product (about 8 bucks at the local home center) would be effective at removing paint from diecast cars. We shall see.
I read a considerable bit about this process in English as well of course and all signs pointed to the fact that the fumes are no joke, it getting on your skin is no joke, and you need to just get your shit together when stripping these models so I took precautions.
I’m in love with a stripper.
Left to right: Deadly stripper, spongy bits, box of diecast car hulls in plastic box above brush and chopsticks, empty jar and lid, plastic basket filled with layers of newspaper and finally gloves at the bottom.
I don’t really love the stripper to any real extent, but it was a clever title and the product worked… mostly.
I basically held the car with gloves, and in my other hand grabbed a sponge hunk and dipped it into the stripper and blobbed it all over the diecast chassis and laid the chassis down in the basket to the right to sizzle.
After about 5 or so minutes I didn’t see much of a change, but the colored stripes on cars went right away.
After another 15 or so minutes the weaker among them started to falter. Notice the bubbling. This is a tell tale sign that the process is working and that you shall soon know peace.
After the full thirty minutes and more, and some scratching and reapplication on the more stubborn cars with the sponge I got this. Most were receptive. Next phase.
Feeling wishy washy about it.
You can see the melted husk of a sponge in the lid under those chopsticks.
Next stage was to wash them off and see if I couldn’t clean em up. I brought out an old toothbrush i use to clean the drain spouts and decided to just use some water in that plastic container. I filled it halfway with water, put the cars in and gave em a good brush.
After brushing this was what I was left with.
So a few of the cars took to it realy well and few more were fighters and a few more still were not interested in my chemical applications or my brushing. Despite laughing about it at the time I was steadily realizing what some youtube people were saying when they mentioned that orange or yellow were tougher to strip from diecast. I presume it is a result of the opposite of applying such colors that are bright. Yellows, oranges, and bright reds are tricky to do well and they need many thin layers (Respect be to Duncan) to show properly. I am guessing it is similar here and those layers make the work for paint stripper a bit tougher.
Still, I got most of the cars into a position which was pretty decent and they were pretty much good to go. But the tooth brush wasn’t enough.
Point of improvement one: I need a wire brush, maybe a few of them in various sizes to really get this paint off. Either that, or I let the models soak in there for quite a bit before pulling them out instead of just sponging it on. (The kill my problems with extra glue principle.)
Go ‘head and brush, that, paint off your mini.
Cheap dremel for the win! Comes in clutch time after time.
So I was happy with how the above models turned out since they were in a better position than the first car I tried to make and I figured I could work with them. But this was a learning experience as much as it was a quest for workable models so I took a step further and began to hit em with the wire mesh. I spent some time on them and eventually this is what I ended up with.
Better. But I learned my dremel was weak, and I think a wire brush would have been better.
Not bad at all. These all have more than enough bare metal to work with and I thought they would be good to go. I called em done, which is to say, stripped of their paint to a level I could handle. I would have preferred a hard wire brush and the dexterity of my hands and fingers for some of this since my dremel is a knock off and doesn’t have the RPMs or torque needed to really get in there. Honestly, the more analog this process is the better since I work at strange hours and silence is more valuable than convenience for me recently. But what of the other cars which were not as… cooperative?
Give em the dip.
Not that dip? No, STRONGER!
For real though, I was imagining that I was Judge Doom himself when I embarked on my next stage where I decided that cars which didn’t listen get the dip. (Yeah I googled his name just for that reference).
If this image isn’t burned into your brain in a scary place, then we had vastly different childhoods. I can HEAR that image.
And thus I became a cartoon villain.
Give em the dip boss.
Well, I just dipped the car bodies into the stripper directly, shook em around a bit, and yanked them out and placed them in that glass jar I brought along. Stacked em in there and put the lid on to keep the juices in there.
I saw that the orange and yellow cars were starting to peel in the recesses where the stripper pooled so I knew that it would work eventually, but how much of my expensive stripper sauce would it take and how much time? So I experimented with a dip, a shake, and about 30 minutes.
After following the same process as above: Tooth brushing/Rinsing, then dremel attention, this was what I was left with.
Almost all of them bent to my will, but some continued to fight.
Again, I wished for the wire brush. The ones in the bottom left are the ones that fought the hardest and will be dipped again when I build a bunch of gaslands cars. Of course they are the super cool looking cars damnit. Haha. But three or so more made some good progress and I was happy with the results. I think a proper dip and hitting them with a wire brush will save me a lot of time in the future when I do the next wave in the future.
So who’s next?
The answer was the tiny red car!
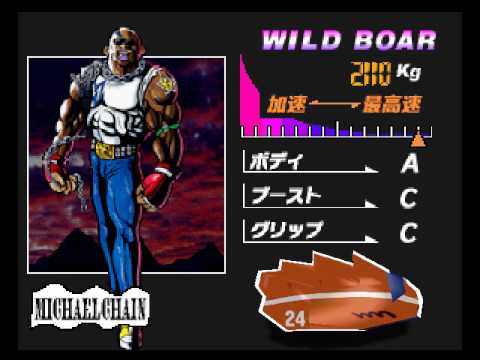
SO I liked the shape of it and wanted to keep going with the backwards flow and get some spikes going in there. I was getting some inspiration from Michael Chain and the Wild boar for this one.
I love F-zero like nobody’s business. I also used this vehicle all the time. Mike got it. Perhaps my latent enjoyment of death races in F-Zero on the 64 led me to gaslands? All paths lead to gaslands, Red magician. Don’t be silly.
I was happy with this new vehicle quite a bit. I think its got more personality than the previous one already and will look good with some paint and rust on it.
I am not going to do it in orange since its too close to rust for my tastes and I imagine that this vehicle is pretty well protected and managed to survive fairly well. I also intend on calling it the hedgehog for obvious reasons and will paint it blue because one must proceed at great speeds. But that will be another blog post in the future perhaps.
This game is a near mandatory pit stop as far as I can tell for any connoisseur of one of the best tropes in all media… The death race. And seeing what people put out online and how they convert diecast cars into beautiful beasts of gasoline and death is something any mini enthusiast can appreciate.
And thus… The bug bit me too. I had had my eye on the game for some time, but for some reason it got to me recently. Maybe it was realizing all my munda terrain would be perfect for it and vice versa, my future gaslands cars would make excellent scatter terrain for munda as well. Maybe it was me being a little tired of translating blood bowl into Japanese (Which I need to get back on! I am making goo progress!)… Perhaps it was excitement in the upcoming munda campaign I am joining in!
I can say for sure that all those things were a factor and in general I just had a long overdo desire to make and convert up a gaslands car. I wanted to learn another rule set and break it down since my preparation for the new blood bowl season and necromunda campaign had been all but completed. I was walking through the dollar store and saw a few cars that caught my eye and made me awaken a new set of set of lenses for the preying eyes of the junk-loving hobbyist within. Now having read the rules my next trip to the dollar store will not see me leaving empty handed that is for sure.
Flea market app to the rescue
I am a very cheap person. It’s worse than ‘thrifty’, I’m a cheapskate of the highest caliber and will suffer great pains to save negligible amounts of money. Blessing and a curse I suppose depending on who you ask.
So I checked wish and aliexpress and was actually fairly disappointed in the selection on hand there. Best they had was like 5 or 6 cars for around 5 or 6 bucks of what I was interested in and felt annoyed at that. I had figured cars would be cheap manufacturing bread and butter and it turns out there was more butter than I had bargained for. I ended up finding some nice sneaky batch lots on a flea market app I sell Warhammer stuff and other junk on and scored the cars above for about ten bucks. 50 cents a car is about where I am at until I build a desire to get single specific cars in which case I’d gladly pay one or two dollars per car but that is far down the line and only after my conversion monster within gets a free romp around the wastelands.
After reading the rules I learned that I need a couple buggies and have none, but have already begun thinking how I could convert one up nice and easy. The beast shall romp and romp readily.
Excellent gas mileage and safe to boot.
First victim.
This is the BB. No literally it is a van like hatchback model by Toyota. And no longer will it be ferrying friendly Japanese to and from the malls on weekends. Soon it will be a vehicle bathed in blood and bearing witness.
Built in movable hatch… How to capitalize?
New acidic territory – stripping diecast.
I suppose it isn’t too far from stripping pewter, but all the youtube and Google seems to indicate the glossy paint used on die cast cars is made of tougher stuff and needs tougher chemicals for a proper strip. I wouldn’t have even bothered to consider stripping if it weren’t for the craffsmans video showing me how shittily acrylic paint went on over the die cast paints. I could just rough it up with steel wool and sand paper? But so just said whatever and decided to attempt to strip it.
So, besides my other hobby interests I am actually an avid camper. That is, I aspire to be when I have the time to get out. I have been busy as of late with recent additions to the family and a pandemic dissuading a lot of trips away from home in general, although I think camping is one of the more safer activities one can do despite the viral concerns on earth. Anyway.
I have been reading a lot about bushcraft and been practicing tying knots and reorganizing my camping supplies and cutting down on needless redundancies while getting a few other various bits of gear and just doing all the ‘pre-camping’ stuff despite not having a trip planned anytime soon.
I came across the concept of waxcloth, AKA tincloth, as a way to waterproof and toughen up clothing for inclement weather in the ‘olden days’ so to speak. Mostly for tarps and stuff, but also used on jackets, pants, gloves, etc. I was intrigued by the concept and began to graduate my study from the book to youtube and imagine all the bearded fellows I found. It was a great many.
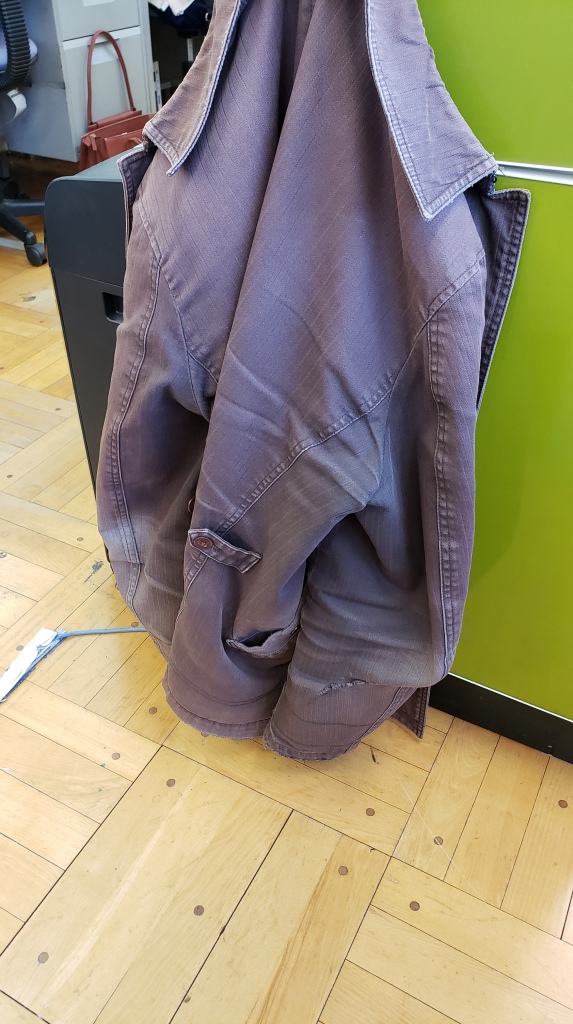
So I have an old jacket which I really like, but its beat up, torn in a bunch of places, and missing buttons too.
Ol’ trusty. I took it off only to take this photo! Its 98% cotton
I love this jacket. But since it is so old and cruddy (Although beloved) I figured that it would be a good guinea pig for this process which appears quite simple, but also might render the jacket not really wearable in certain contexts. But from what I saw online it would toughen the fabric, make it fairly waterproof, and also prevent wear and tear. I figured why not, and if it became my ‘adventure jacket’ and I couldn’t wear it in public without looking ridiculous, so be it.
Cloth wax is hella expensive.
Maybe not ALL cloth wax, but most of it is pretty pricey and you get so little for what you are paying. The internet is on its hands and knees for otter wax and they seem to have the ‘high end clothing wax’ market cornered. I wonder who tricked the rich into throwing their money at them so seriously. I don’t have the time or interest to find out. They want like 40+ dollars for a bar of wax that is only about 65 grams. I mean, they want 100 dollars for a damn wooden stick to apply the wax. They got these fools begging on hands and knees for it. I don’t have 50 bucks for a tiny bar of wax.
Of course, amazon is there in the clutch to suggest to me cheap alternatives. THe Greenland Wax by Fjall Raven appears to be the same thing generally and you only have to pay about 16 bucks for 100 grams of it. Not terrible when your alternative is selling your soul for barely a palmful of otter’s blessing. Get real.
My research continued and while greenland wax was an option, I still figured I’d need more wax that that for my jacket and while 30 bucks isn’t horrendous for 200g of specially made cloth wax built for the job, everyone online was making their own for next to nothing.
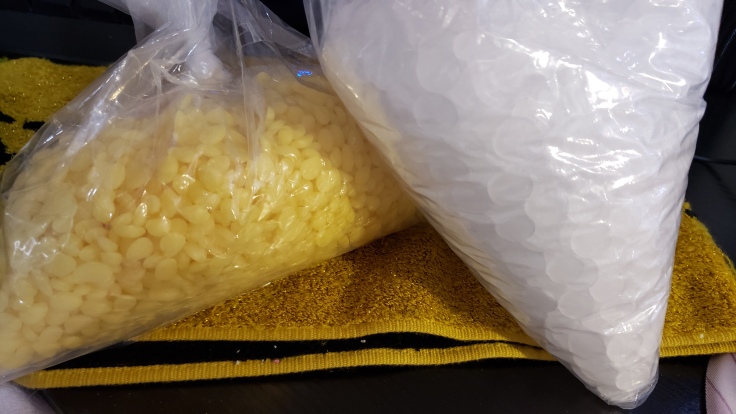
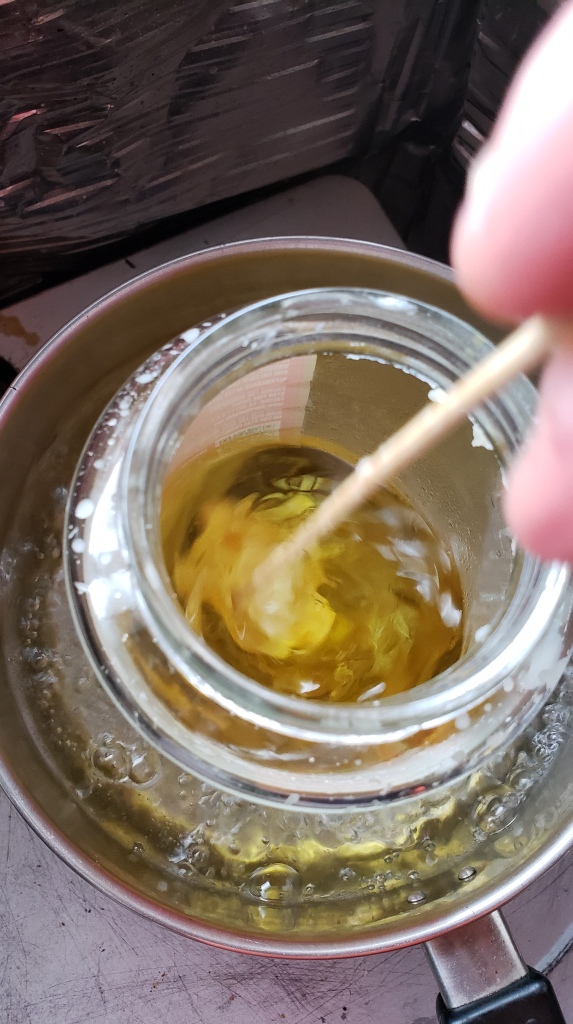
Daddy got wax.
While doing a bit of shopping with the family, we went to the hobby super center which has some of the more obscure hobbies covered, in this case candlemaking, and picked up some wax. Almost all recipes call for a 1 to 1 mix of parafin wax and beeswax. 1KG of parafin was about 6 bucks and 500 G (1/2 a KG) of beeswax was about 15 dollars. 21 bucks for 1500 G of wax. Now scroll back up and see how much otter wax is charging for 60 grams. God they really know what they are doing. Good on them, but damn I will not be fooled to that extent. Also, raw beeswax pellets smell really nice. I hope my jacket smells that nice too, but not so nice it attracts creatures to consume me.
Anyway, onto the project in earnest – making cloth wax.
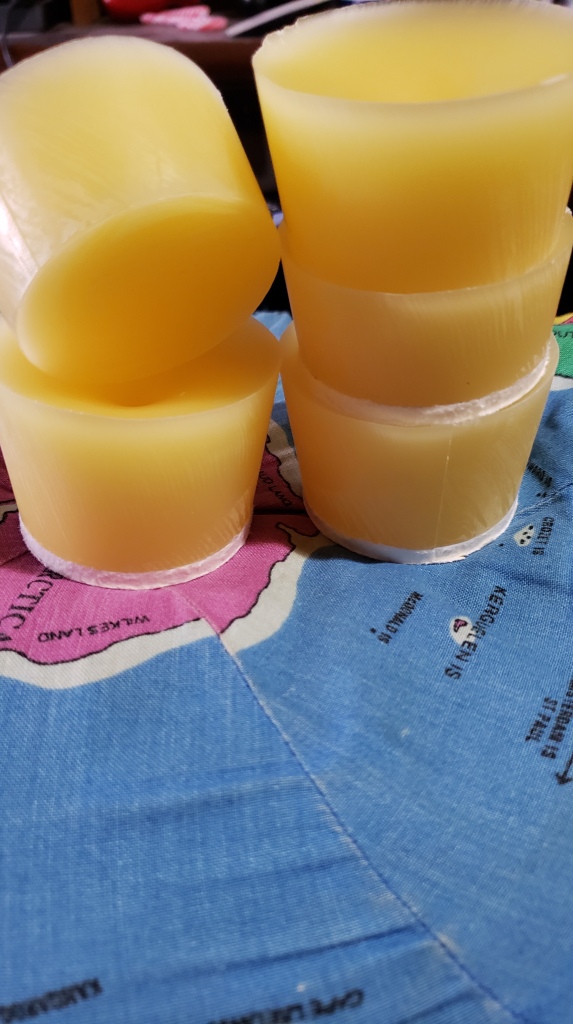
Making cloth wax pucks.
Wax in a jar!
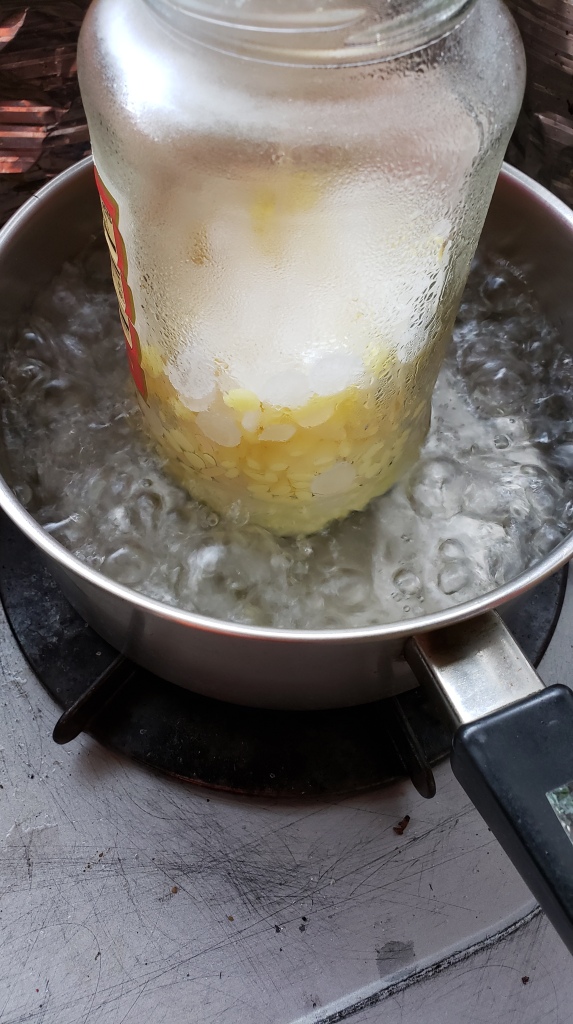
So I didn’t want to use it all , but figured more then 100 grams would be needed so I settled on a mix of 150g of bees to 150g of parafin using an electric scale. And I put it in a spare jar I had since I didn’t want to wax up my pan since I use it for cooking and cleaning wax in great amounts of a tremendous pain in the ass. Most online dudes just melted it straight in a pot of some kind, but I wasn’t in a position to do that and improvised.
Melt that wax
So I set up my double boiler system by putting the jar in a pot of boiling water, preserving the pan for regular use and still getting the job done, albeit a little slower than I could have. It did the job no problem at all.
I’d say it took about 10 ~20 minutes
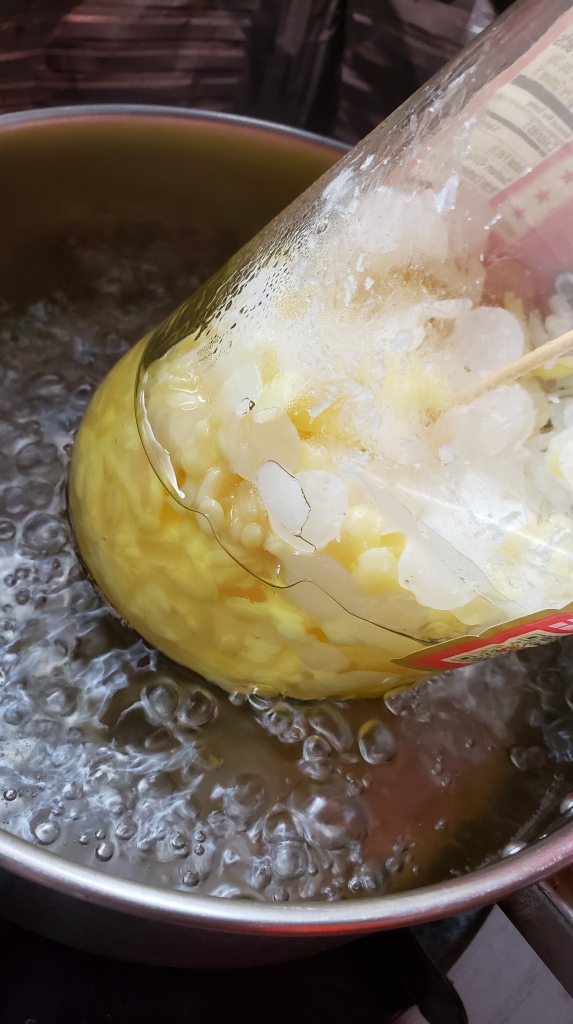
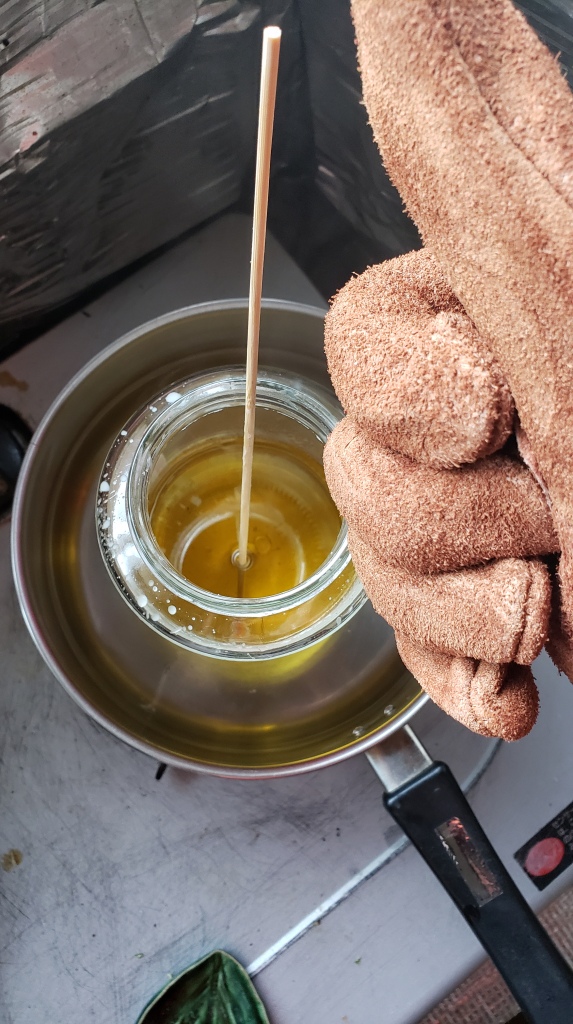
I used a kebab skewer to stir it, but could have used a chop stick or whatever else on hand. Just wanted to avoid using things I eat with regularly to save me clean up later.
It all melted down nicely and mixed well. Smelled great too. This is also the first time that I am using my new leather gloves! I used cheap gloves when doing more heavy duty camp stuff, but it was time and as I mentioned before, I was in a ‘pre-camp’ prep fever and this was one of the purchases made. Only 5 bucks! not bad. But that way I could pour the wax from the jar with more confidence than using pot holders or a damp towel.
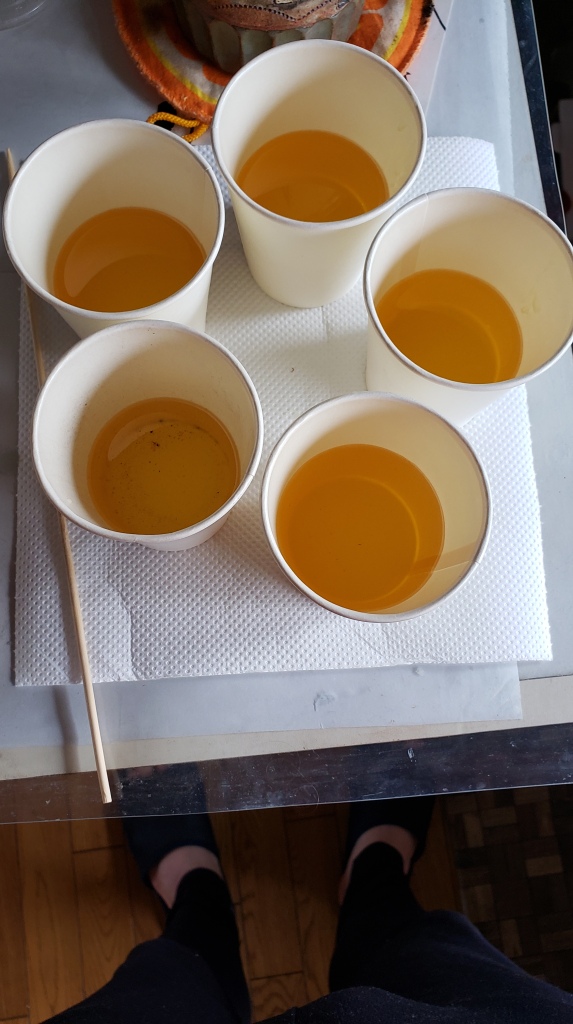
Wax in
How does one make pucks of wax? Most dudes online used paper or plastic cups and I had a bunch of these little medium sized dixie cups which were perfect. I even put down a paper towel like an adult in case I spilled. I didn’t. The 300g of cloth wax ended up filled about 5 cups close to halfway which essentially makes 5 60 gram pucks for my personal use. Something that the Otter wax company would charge close to 200 dollars for, and greenland wax almost 50. Nobody is knocking them, but just pointing out the reality of what I am seeing here. I spent 20 and could make 15~20 pucks no problem and only need to get more beeswax when I run out of that. I digress. (I also am saving some serious money!)
Forbidden caramel
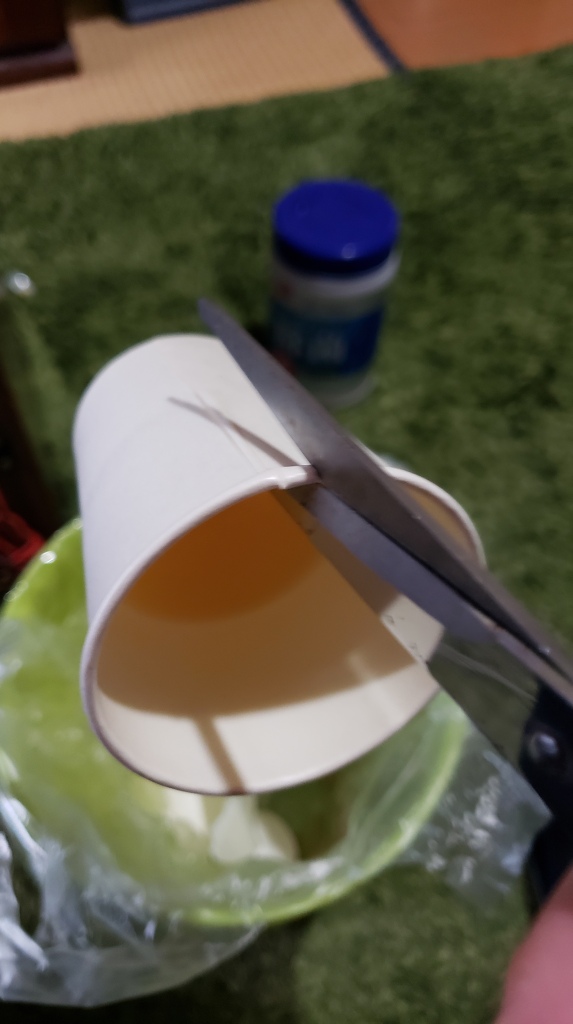
After a little while in my cold af house they cooled off enough that they sounded hard when tapped upon. So I sat down, cut along the natural seam of the cup and then pulled it off. Besides the bottoms of the cups, they came off very easily and the shape was perfect as well. At this stage I knew that I was in luck and had a potential serious success on my hands.
Please don’t look too long at my mangled thumbnail.
So besides the bottom bit, it came off clean. Look at how nicely it hardened and dried. I am slowly getting interested in pouring resin and this actually made me quite interested to keep up with preparing and studying for that endeavor. I had no trouble pulling the bottom part of the cup off when I took little tugs at it going in a circle and it came off easy.
*Insert Daft Punk’s around the world*
So I left a few cup bottoms on figuring it might be a nice base to hold onto or something. Maybe if I get the wax down to the bitter end having it attached to something will allow me to get those last extra grams out of it. Otherwise I will toss it back into the wax bag to melt again. Or perhaps just eat it. Yeah I ate some. Deal with it.
So the puck making process was a great success. Great value, and all in all only took about an hour not counting cooling time. I needed to be by the stove and stirring which sped that process up, but otherwise it could be done at a very very leisurely pace in my opinion.
The next phase will be waxing up the jacket, and exposing it to heat to seal it and combine the wax and cloth together to form what will become I am hoping my brand new jacket and an heirloom for times to come. I have read lots of good things and watched videos of people expressing the same as well. I am looking forward to it.
I actually managed to get a camping trip sorted out and because I am a magician with great ties to the element of fire, want to make sure that I am not using a hair dryer or press on iron or anything and that I am using proper camp fire to hopefully seal in some camp fire juices and smokey flavor into this jacket as well. That is actually in a week or two from posting this and I am very excited to see how she goes.
We shall see in the latter half of this post on making a tincloth jacket from scratch. Although the jacket is not made from scratch, I am making the wax and going through the process by scratch for the most part so don’t bother me with semantics.
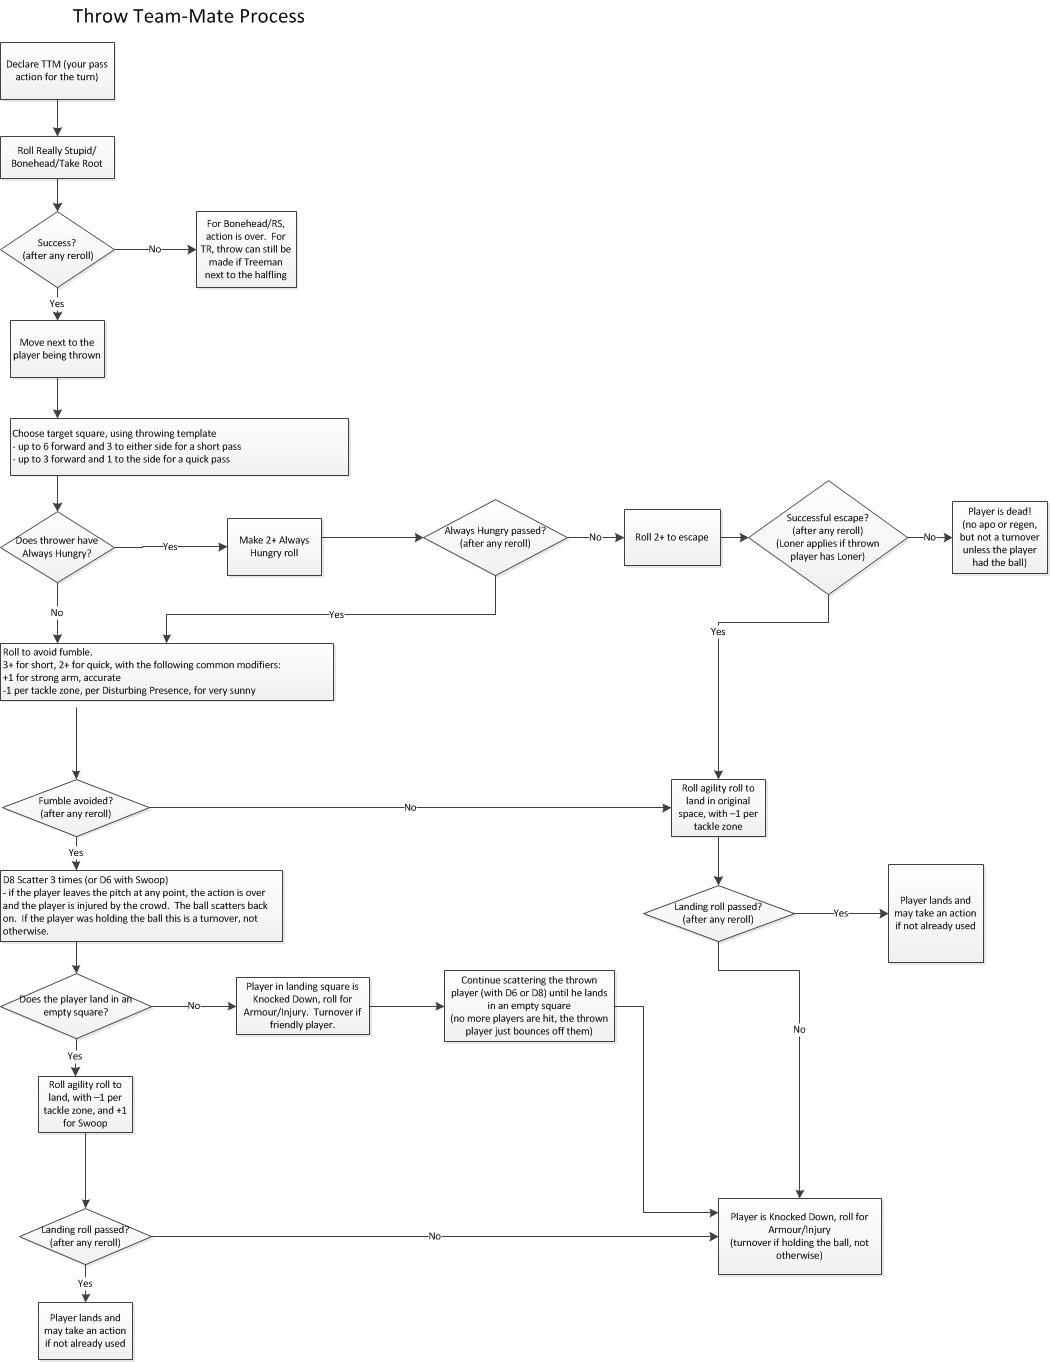
Blood bowl is one of the coolest games I have ever played and I am completely enamoured by it. As my progress on translating the rules continues to slowly plow forward, I have come across the reality that the throw team mate action has changed somewhat…
Why throw balls when you can throw players holding balls?
Well, for one reason, it is a tremendous pain in the ass to sort through the throw team mate action if you don’t know what you are getting yourself into. So much so that I remember being almost too intimidated to attempt the action just assuming it would be too complicated to be worth it stealing precious time from my already pressed schedule.
Then I came across this glorious flow chart (Available on the NAF website in their rules clarifications section. A goldmine of its own accord.):
After seeing this ridiculous flow chart I was convinced that throw team mate was out of control. I still had to try it. After going through a few throws, laughing the whole time as traveling down each path and finding my answers and getting ever closer to the truth that is Nuffle’s grace, I loved it. This flow chart saved my bacon more times than I’d care to count and I refer to it every time without fail. Thank you from the bottom of my heart, nameless(?) chart creator.
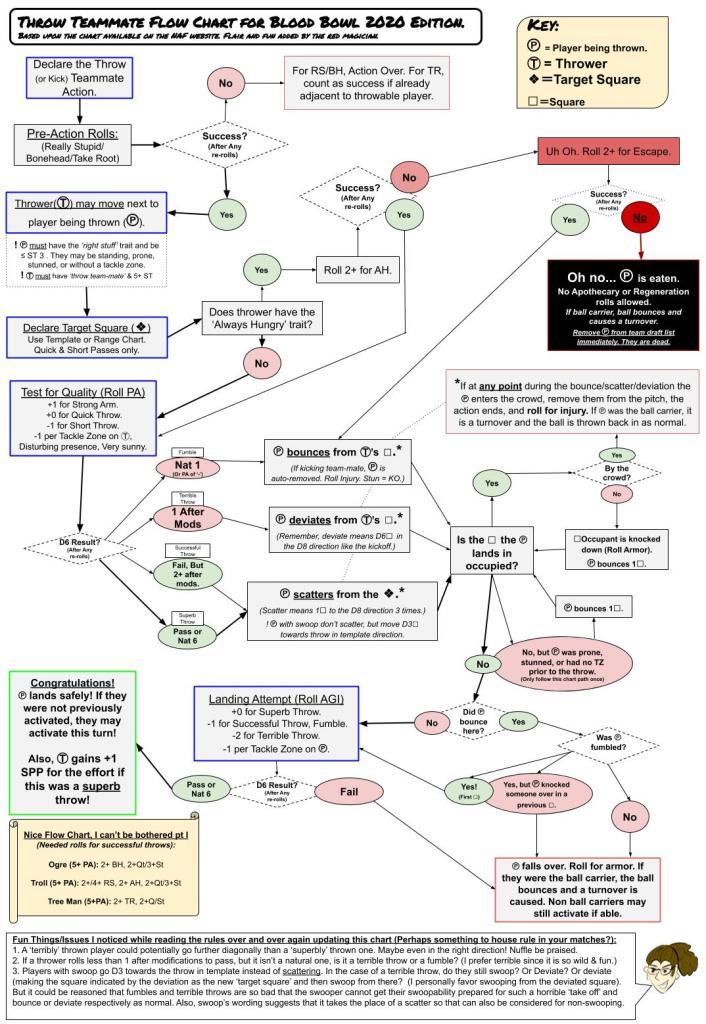
New Rules, Updated Action, Updated…Chart?
The translation project has me reading and thinking about rules in great depth. That is part of translating rules for board games and wargames similar to blood bowl. You need to be very very careful about language. While I consider myself to be a very ‘rule of cool’ style player and tend to give plenty of leeway with the rules if it keeps the game going smoothly and smiles on the faces of friends and opponents, then who cares. Let the dice fly, let’s keep this wagon train rolling and play some pretend plastic football mans. But, I will admit that I am a classically trained rules lawyer, if only for the purpose of arguing on the internet and a desire to understand the processes intended by any game’s creator. This is a skill which has come in very handy for me while translating and making handouts for myself and my gaming group.
I wanted to make a new chart and add my own personal flair to it somewhat. I made version one, got some feedback from the internet, and made a second version and the ‘OCD Friendly’ version of that. I like how open and clear the chart for BB16 was, but there was so much open space and I wanted something that could be neatly printed on an A4 of B5 size sheet. I typically have the TTM chart on the back of my league play aids, alongside other things like skill lists, modifier charts, inducements and prices, etc. So I prefer when my content is more compact.
Blood Bowl 2020 Throw Team Mate Flow Chart! V2.0
Here is version 2.0Here is V 2.0 OCD Friendly
Throw Team Mate Questions
The new flow chart has garnered primarily positive response from about 50 people which may not be much, but what can you do. I made a few tweaks to it. There are still a few small things that could be done, but I will deal with that after the rules are released and there are a lot more ‘official’ eyes on the product and I also get the real book in my own hands.
But looking over the rules I came across two main issues, one of which has been brought up in the context of passing the ball as well.
1. Throws modified to 0 or less. A natural one will always fumble. A throw that becomes 1 after modifiers is considered a terrible throw (Something I am greatly looking forward to seeing in action on the pitch.) What about 0 or less? A crappy roll and a few tackle zones are all it takes to bring that value to less than 1. Are we talking a terrible throw? Does less than one after modifiers count as a fumble? I haven’t found anything noteworthy in the rules detailing modifiers that go to 0 or negatives so there is only speculation.
Personally. I think a fumble is a kind gesture compared to the potential disaster of a terrible throw. The throw player deviates from the thrower’s square (Behaves like the kickoff ball) instead of fumbling a single square. I think the potential for chaos is much higher with such a result than a simple fumble, bouncing the player a single square. Although even a bounce is more deadly than the previous scenario where they return to the square they started in allowing for potential of falling and knocking down their own nearby teammates adjacent to the big guy making the throw. But the majesty of failing so hard into the negatives that you manage to throw the stunty FURTHER than you could have (diagonally, if you roll a 5 or 6 that is.) potentially in the general direction you were hoping to send the player brings a tear to my eye. Of course, the potential for throwing them into the crowd or even back to your own goal line is also a very real possibility.
Until an official ruling comes out, I would decide it at the table or just say that that 0 or less results count as terrible throws. A terrible throw also has a -2 to the landing roll, while a fumble only has a -1. Speaking of landing, the second issue that came up involved that dastardly glider gobbo and the swoop skill.
2. Swoop in context of fumbles and terrible throws. If a player is thrown superbly or successfully, the reach the target square, and then scatter. Scatter means roll a D8 three times and move them in the scatter template’s direction that many times. Swoop effectively replaces the scatter by allowing the controlling player to move the gobbo D3 squares in the direction of the throw in template. This almost guarantees a landing slightly closer to their goal destination or perhaps out of harms way to some extent. Fun fact, swoop doesn’t give a +1 to landing anymore from what I read.
But how does swoop factor in to terrible throws and fumbles? If we take the language from the skill ‘If the player is thrown by a team mate as described on pg 52, they do not scatter before landing as they normally would”. This sentence is all we have to go on. If I were strict, I would say that fumbles and terrible throws don’t count towards such a skill usage. First off, terrible throws aren’t mention on pg 52 at all. Fumbles are mention in this light, “A throw team mate action that is not fumbled, will always scatter before landing.”. I think that also clearly explains that a fumbled swooper won’t be able to use their swoopy goodness. But the terrible throw is in limbo, either that or I cannot seem to get the idea about a halfling deviating a great distance out of my mind.
I would guess that the Superb and successful throw would allow a goblin glider to effectively use their gliding equipment and gain those extra squares since they weren’t chucked willy nilly. Whereas a fumble isn’t really enough distance to warrant the ability to put the equipment to use. But a terrible throw can consider a great distance. Is it enough for them to unfurl their gear, catch a little wind, and swoop at the end of the terrible throw from the new target square? Or is a terrible throw so terrible that any such gear was destroyed or tangled and that poor gobbo is going to be eating turf for lunch? I can see a case for both and the rules (And my instinct) lean towards swoop being usable for superb and successful throws only.
But it is still a question I have and a clarification that I will wait for in the future. Until then, let’s hope nobody uses the crappy glider goblin and gets into a scenario where they are thrown terribly! (Nuffle is no doubt already plotting such an occurrance to happen at least 11 times.)
Thanks for reading and hopefully my throw team mate chart and discussion of the questions brought up by my research can aid you in your blood bowl play in the future. Feel free to drop a comment or question if you would like.
Believe it or not, I live in Japan! I love Japan and living here has been excellent for a great number of reasons. Although the player base where I live (Not Tokyo) isn’t gigantic, I still get a fair amount of games in which balances well with my life. Do I want to play more? Of course, who doesn’t? But I also don’t want to live in a giant city like Tokyo for a number of reasons I won’t get into here, pandemic or not!
To that extent, I want to talk a little bit about my journey to find the rules for blood bowl in Japanese. A short google search yielded just about everything I needed, so the story isn’t that exciting, but I still want to tell it.
I am starting a league and want to attract the attention of more Japanese players since mustering the 4 native English speaking players for the first season was quite the challenge in itself. We managed to finish the season and the fires of blood bowl are still lit in my heart and the local Japanese wargaming club does have a few players who I was hoping to court into joining the league. Also, in order to grow the hobby in general, I wanted to gather all the Japanese resources I have found into one location and ideally some day become the source of Japanese blood bowl in Japan! Maybe even court the eyes of companies who like the cut of my jib and hire me as a rules translator? ぜひ、お雇ください!ルール翻訳大好きです! Don’t mind that! So I have been looking for the rules and there have been a number of sources online which have been helpful for introducing the game and what its about to new players, and the actual rules themselves. I mostly want to translate the play aids that I have made to make games smooth and also to help with ‘non-human’ translation by having identical documents for all players to use so players who speak less English or less Japanese can still play a game and use the common documents while point at each others’ in their native language.
Also, many of the new rules and things from death zone vol 1 and 2 haven’t been translated as far as I understand and many of the skills still remain un-translated as well. Call it a labor of love, or call it summoning GW’s lawyers to my doorstep for my thankless desire to spread the game across the seas in the language of the people! Regardless, I want to document my process as well as share it with the world.
First, three websites: 1. Sentui. せんてぅいさんのサイトはかなり古いんですが、結構いい情報が入っています。完全訳ではありません。 http://sentui.com/SinWiki/pukiwiki.php?Blood%20Bowl The Sentui site has basic rules translations for a lot of wargames and has been a really helpful guide as I try to see how many proper nouns were given new names or just turned into cognates, or ‘katakana English’ when referring specifically to Japanese. It was also the first site I found and the rules are a translation of an older edition of blood bowl, and also incomplete. Regardless, I salute you Sentui san.
3. ‘New’ Blood bowl Wiki in Japanese。「新」ブラッドボウルのウイキサイトです。完成してありますが、うしおさんの訳のほうが新しいです。このページは便利けれど。 https://w.atwiki.jp/bble/pages/29.html I was pointed to this by Ushio san’s translations and it seems to be quite the complete translation as well based partially on (1) Sentui’s work as well as the translation for the blood bowl 1 PC game on the site below. Still seems mostly based on the video game.
4. ‘Old’ Blood bowl Wiki for BB1。上のページのウイキの元々あったやつ。古いんですが、情報がいいです。 https://w.atwiki.jp/youge_wiki/ Site 3. essentially is an updated version of this site, but this site still has some merits of its own. I think its a bit easier to read than the current blood bowl wiki, but both are great resources. They are basically the same site, but one is for the older edition.
5. Gozaru’s site talking up blood bowl。ござるさんのサイトは一番古いんですけど、子供のころの初めて作ったサイトを思い出すし、入門ガイドはストライトだし、そして面白いです。ござるさんのページをより深くチェックすると、チーム紹介などをして結構おもしろいです。 http://www.516.gozaru.jp/miniature/bb/what.htm Gozaru has a neat little site and I am guessing it is one of the oldest sites in my list of links since they last updated in 2008 and in general it reminds me of the sites I had when I was just getting started in my online journey. But they put things in a fun perspective and if you backtrack to their main page and check out the links there, you can see all of their blood bowl teams. They made little profiles for almost all the orcs and goblins and reading them is quite fun. This dude gets it.
So these are the main sites that I have come across in my googling journey and they are the primary sources for blood bowl information in Japanese and generally form a fairly complete picture of the rules. None of them are easily downloadable and I have taken scroll captures of most of them for posterity and plan on re writing much of what I have seen and going over it with a fine tooth comb and seeing if I cant find the differences between some of the skills (Since table top blood bowl and BB2 have some small differences with a few skills) and also pretty it up a bit.
Not to mention translate a little bit of the newer stuff as I need it. When I complete my work I will share it up here for folks to enjoy. 上のサイトをベースにして、新しい訳を作りたいと思います。皆の動力をちょっと借りてPC反ではなく、ちゃんとテーブルゲームのバージョンを完成したいです。ちょっとすつできたら、ここにアップしたいと思います!
Here is the before and after image with 8 or 9 years or so in between. The honorable Goen “Gwen” Kamekichi and “Zeno” Zenogame .
Believe it or not, this blog about terrain building and other hobby sundry does indeed expand to my love of aquariums. Believe it or not the original idea was to make a terrarium. I loved the idea of a terrarium and wanted a little waterfall action in there as well. Eventually the thought of the waterfall ending into a small pond… and then…maybe a fish or two inside as well? That line of thinking began the research of keeping aquariums and fish, when next thing I know I was doing research about keeping turtles! And then I got a pair of them! Mississippi Musk Turtles. Aquatic by nature and generally keep to a manageable smallish size, unlike their cousins the red-eared slider (Often sold dramatically cheaply for a couple bucks to the typically unprepared turtle owner-to-be) which end up being as large as a dinner plate or more.
I found that after a few months of keeping my turtles that the small tank I got for them wasn’t nearly good enough and the “filter” if you want to call it that, which came with them was not nearly up to the task. Turtles are known for being messy, musk turtles and other sand/silt/mud loving reptiles like them especially so and this was the case sooner rather than later. Filters are turned to molten turtle poo laden slag under the pressure of dealing with their needs and fail often.
I was employed, but not rich. I also have a penchant for DIY if you haven’t noticed and making a filter didn’t seem too difficult. I found a couple of excellent videos by Urau Joey, later (and currently still) to be known as the ‘King of DIY’ as far as youtube and aquarists are concerned. I liked his methods, point of view and attitude about the hobby, and spartan and utilitarian style. Get the job done, get it done well, and get it done cheaply if need be.
This is the original video I used as a basis for my overflow filter.
And this is the video I watched to make the 3-tier sump wet/dry filter below my tank.
I made the Overflow and Wet/Dry Filters!
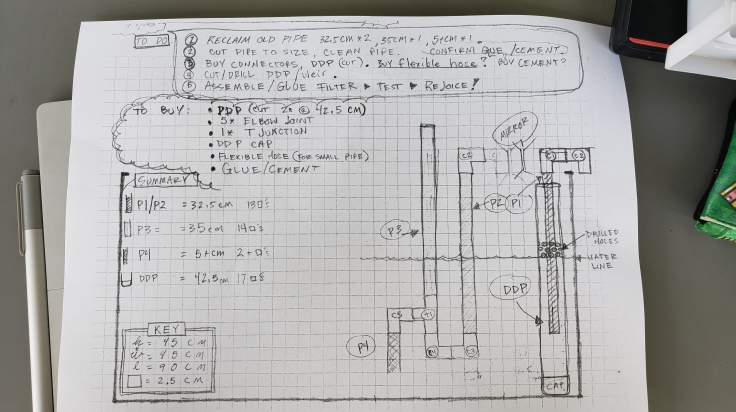
This is the original plan that I drew up for my Overflow. Jenky and scribbled like runes of a mad one, but it worked well for a long time.
It was actually as easy as I figured it would be and once I finally got the thing working it worked like a dream for quite a while. And for only 20 ~ 30 bucks for both projects including a few extra bits I needed they lasted a hell of a long time. The Wet/dry in fact is still perfectly fine and just needs to be cleaned out, while the two overflow filters I made are not quite defunct, but like an old car or a happy days juke box, they need that special touch/kick/punch/wiggle/freak out at odd hours of the evening/morning/as soon as I get home in order to keep functioning.
Any and all errors are completely my own fault and I made a mistake with drilling the check valve on the overflow and long story short I had been dealing with an air leak in both pipes for ages. When I moved the tank from one room to the other, I just chucked one of the overflows into my closet because I didn’t want to trash it (The Power of Junk Compels me) and managed with a single filter which ran well enough on its own freeing up some space in the tank too.
Here is a picture of the remaining filter which has been working long and hard for close to 6 or 7 years now. You can see the unreasonable amount of silicone glue I plastered in an attempt to seal the leak around the check valve and on a good day it works like a charm.
My Aquarium has fallen into disrepair
I originally got turtles because they seemed so hands off and these days I only feed them once every two or three days and have some guppies in there so if they are feeling peckish, they can find their own meal. It has worked well and in general they have been getting along fine.
I ran the filter full time and gave it breaks when it lost pressure. Sometimes leaving the filter off for a few days at a time and then running it later to keep things fresh. It worked well enough and the turtles and fish don’t seem any worse for the few days when the filter is off as long as I keep the water fresh. But I realized (I always knew in all honesty) that I needed to do something about the filter. I had built the old one so long ago and had been wrestling with it on and off for years that I sort of had a feeling of helplessness in my situation and started to feel bad for my turtles and knew I needed to take action.
My tank isn’t in great condition and I stopped taking pictures of them since I was ashamed of my tank. They are glorious dinosauric creatures which roam the depths of their realm in glory and I was not doing them the justice that they deserved to say the least so I began my research again.
Apparently no less than a couple years after I had built his overflow, he made an updated version of it!
Hope sprang anew.
In my research I went right back to Urau Joey and went to check on the old video I watched ages ago and saw the new one. Improvements across the board! What a revelation! I had started writing for this blog and been cranking out terrain and painting up gangs for necromunda all while still putting in good time for the family (Since my hobby time is generally in the wee hours after all have slept or the moments of respite between this and that). So it appears my fire of motivation had been lit and just like back then, Joey had set me straight and given me a path to building a newer, better filter which seemed a lot more effective than the old one and didn’t need a check valve (Necessarily) either which appealed to me greatly since I am pretty sure that is where I went wrong with my first build.
I set out to draw the plans right away, and even dug up my old ones which saved me the time and trouble of re-measuring everything. It even gave me the dimensions of…the…old…filter… hmm…. perhaps this “junk”… could find new life??
New plans were much clearer and better written than the old one in my opinion. I surprise myself with how tight and compact I can do these things at times. Still much to improve upon, but if I could see it in my mind, had the tools and materials available, then into reality I shall summon it.
The new plans looked decent and I got to thinking I could potentially use my old overflow for the straight pipe sections saving me the hassle of having to buy another 2/3 meters of pipe (Since that is how they sell it at the local home center) which is a tremendous waste/will live in my closet for another 8 years (*Spoilers* I have plans for that old pipe and terrain builders will know where I am going with this)
Anyway, I did a few measurements and compared to the old filter plans it seemed like I wouldn’t need to buy ANY of the smaller diameter pipe since I could harvest most if not all of what I needed from the old filter. Imagine the joy of the Red Magician, whose love of junk and the thrown away shone through as they grinned in the starlight of infinity nodding their head knowingly. “This is why we keep all that junk, of course..”
Say that to my closet(s) of shame! But I digress, for that argument is skub at its finest (And worst really).
Behold the old shaman whose efforts were NEVER in vain.
Time to cut!
So I pulled out the ol’ saw and went to sawing! (After googling if I could actually reuse the elbows and t-junction fittings and found that you can go crazy and spend tons of time drilling the cemented (Melted together) pieces and MAYBE get a usable piece so I determined that buying new ones would be the way to go.)
So I sawed while the water filled up in the tub for my baby’s evening bath and made quick work of the job shearing the joints from the straight pipe. There was little to know junk in the pipes either which was contrary to my imagination during all the times they worked like garbage in the twilight of their effectiveness.
Behold my handiwork.
There are the pieces of reclaimed pipe lined up next to my 30 cm ruler, as well as the legendary section of remaining pipe from the time I built them three eras ago. For those following along at home, those black dot marks on my ruler remained from my foray into square measuring and drawing when I was making Necromunda tiles.
Needless to say, I had more than enough pipe to make my overflow, but now I needed to go shopping to get a few knick knacks to complete the job.
Building the Filter
New pipes purchased, old cut to size, and all laid out.
So after making a few purchases, amending the plan, and getting everything ready to go. I laid out all my parts and started to glue bits here and there. The only things that deviated from my plan thus far were that after a deep dive into the comments section of Joey’s video, it was recommended that I install a ball valve towards the outlet of the filter to ease the process of priming it and also as a means to cut noise and control the water flow rate.
The gluing process was largely painless since I had done it before and one thing that bears noting is that I didn’t glue EVERYTHING in place completely. I glued the parts I knew wouldn’t need to move at all (Elbow to elbow connections, a majority of the outlet pipe section), but left a few bits free to move since I needed to plan how I wanted it to hang in the tank and what angles and such to make it easy to work with. Having it in a huge straight line like this is not ideal for most people to I did a dry fitting, wiggled it back and forth how I wanted it in the end, and drew nice easy marks where I wanted the pipe sections to fit and hold.
I also used some silicone caulk I had and put that on the outside of EVERY connection since air leaks are the #1 killer of pipe pressure and I was extremely wary of this as it was my big problem with my old filters. I wasn’t taking any chances and also wanted this filter to work well, and ideally work for a long time. If my old filters managed to get the job done long enough with the slip shod attempt I put in back then, this should be a prim and proper job well done.
Holy Moment
Why don’t I have a hand drill or a reasonably sized bit for my dremel?
So I had glued it all together and it sat outside for about 16 hours or so. I was happy with it. Everything was glued, siliconed, and ready to go. I decided to not cement the ball valve since it was expensive (More than I thought! Almost 600 yen in Japan. Damn.) and at that point in the piping I didn’t expect air pressure to matter as much.
That evening while on a video chat with friends I was hand drilling the holes I marked out the large pipe which would be my inlet and function as a weir. (A Weir is a fancy way of saying a form of grating/means of blocking some water into getting into the pipe) The weir holes were kind of small and I kind of wish they were bigger and there were more of them, but that is something easily sorted at a later date when I get some decent drill bits for my dremel too. I got a blister torquing that hand drill, but it all worked out in the end so whatever. I was also a bit tipsy while doing it so it didn’t hurt.
Behold my new filter installed and running like a champ.
Prime Time Live
With the overflow installed and set up in my tank, lower exit pipe running down below to my sump set up, it was time for the moment of truth, priming the beast for the first time. My old filter was still in there for the time being to do some backup work and buy time for the new filter to kick in before the tank filled too high. Also I didn’t want to yank it out in case the new pump didn’t work.
Here is a photo of the comment on Joey’s video. Thank you for being concise and clear Lazy Peon.
So yeah I actually took a picture of a comment on a video so I could check it later. While in Joey’s video he shows the process nice and quick, as he is want to do since he’s gotta keep those video times down and keep them quick to remain interesting, not to mention he already showed the whole process in depth in a previous video, I needed some help. In fact a lot of people in the comments section had a hell of a time priming their pumps. Comments about placement of the T-valve, capping, uncapping, etc. were many. It was a hot day, and my turtle tank room has no AC and I was wet from playing in the tank, setting everything up, etc. so I was hot and sweating like a beast. Living hell. And I could not get the damn thing primed and was getting frustrated. All my time and efforts wasted, blood boiling, arms and hands smelling like stanky tank water because my old filter was crappy and I was not being a good turtle father and even my attempts at fixing the issue with a new filter would be in VAIN AND AHGUIRABLRFNLNEDfaefra. Was basically how things were looking.
So the baby starts crying, I clean up and help her out. Feed her and rock her and put her to bed. I cool off. (Baby zone gets A/C so it was a welcome respite) I was checking a few other videos on you tube and googling how to prime the overflow filter and found where I may have made a mistake.
How I got the Filter primed and working.
What I did, in order(almost identical as above) and primed my filter immediately.
1. Close exit of overflow (Ball Valve was crucial and not having it would have required me having three arms or something.) If I didn’t have the valve I would have tried to pinch it closed or maybe shove something into the outlet pipe which would have been a nightmare.
2. Fill the air intake pipe (Tallest one on the back with open top) with water. I needed a small funnel and just used tank water.
3. Cap the air intake pipe you just filled with water. (You will be wanting to check the water output or messing with other stuff, so make sure you have a proper cap instead of just putting your hand on there. Although I could probably use my hand/finger easy enough in the future now that my rig is set up and priming not a problem.
4. Open Outlet (AKA open the Ball valve)
5. Wait for a few minutes (This is where I was having my problem. Lazy Peon said ten seconds, Joey did it almost immediately in his video. (While other folks online would leave it going with the cap on for a few hours before attempting to remove it) I originally waited only a few seconds, or my finger would slip from the tube, or even when waiting for a 10~20 seconds it was no good.
– I switched to a proper cap to seal it after pouring the water in. Huge help. Hands were free and accessing the ball valve was easier without a finger sticking into a pipe at the same time.
– After I opened the valve, I let it run for a few minutes until the flow settled and seemed steady. I didn’t give it enough time before and it needed a bit more time I determined.
6. Slowly and gently remove the cap over the intake.
I took it off quickly once or twice and think I ‘startled’ the flow and it lost prime once, but when I took it off a little bit, to transition from the siphon filter (What this contraption is with the cap on) to the overflow filter (What it is with the cap off) in a more gentle fashion it worked like a charm. Decent suction, and if it weren’t for the crappy little holes I drilled, I would get far better surface skimming (And water flow), although my skim game is adequate for the time being and I am not too worried about it as is. As I removed the cap there was some gurgling as air and water sorted itself out, but the flow remained strong and my filter was working.
I should have read Lazy Peon’s comment more carefully, but I was in a frustrated mood, hot, and covered in tank water while worrying when my baby would wake up any moment. Needless to say, I was in a tense moment and under duress so I panicked a little bit, but after a cool down was able to get it working. What a relief.
Game Plan going forward
With my filtration situation under control, I am a happy camper. I played around with the ball valve and the water pump which returns the filtered water to the top tank to get a decent balance. Before my old filter would be ‘overloaded’ with the slightest trickle of water from the pump in the sump, but now I almost have it open at full blast.
Now that I have another old overflow filter laying around, I think I will cannibalize it and make another one of these filters. I have enough of the large pipe to make another and it was painless (Besides my ordeal trying to prime it). And if I get back to having two filters in the tank it will be crystal clear in no time at all. I plan on making the new one the main pipe for skimming duties and cut the weir appropriately for that.
Also, the sand in my tank has gotten pretty bad so I need to take it all out and get some new sand for my turts. I think the lack of proper filtration for so long took a toll on it and its time to get some new stuff. I also will consider perhaps getting some other newer piping from the outlet of the filters into my wet dry filter as well. Then work on decorations and such so my turts have some new digs to properly enjoy. I am sure that they are much happier now than they have been for a long time. Their temperament towards each other has not been the best and that is natural for musks at their age and I do not have the facilities to run two tanks at the size that they need so I separate them within the same tank using bricks and other tank structures to some success. I think with better environments they will be in a better mood and turn their aggression on each other less I am hoping.
I seek to reclaim my honor as a turtle owner and see this new filter as the beginning on that path. I hope that you enjoyed reading about my turtle tank build!
Basically all any game comes down to – pretend dudes fighting each other on tables of stuff.
The Hook
I got started as many, walking around the mall or hobby shop and seeing the displays or game boards or people playing with these miniatures, rolling dice, and generally (seemingly) having a grand ol time.
There was a hobby shop or two with some wargaming tables, but back then cardboard was my weapon of choice and the plastic was still far enough away.
It wasn’t until a friend and I caught a glimpse of a GW battle bunker, dedicated to the hobby and filled with people who were all too eager to show the ropes to the next generation. I played a small sample game and thanked them and went on my way.
Later on my friend picked up the starter set, with space marines and the ancient dark eldar and we got going from there. Long story short, I made the rounds through a great number of wargames and other table top hobby since then and I write about it in great detail in the article about my personal gaming history. I have ended up playing a few skirmish games mostly, while still have my 40k army and intend on playing a few crusade matches with my friend who plays as well.
Skirmish is King
10 gangers are all you need to play in essence.
I have landed at skirmish games and think it really is the best. Particularly Blood bowl and Necromunda are my current fancy and I like them both for similar reasons.
Low model count– This is a key factor because it means that someone can get into the hobby with very little initial financial investment if that is a throttle. Also, hobby-wise, it isn’t an unreasonable amount of models to build and paint either. And for people who have been through the grinder that is 40k batch painting, it is a breeze to knock out a blood bowl team or necromunda gang or kill team or the like. Check out my Escher Gang.
Consequences and Rewards– One of the big factors that put a serious nail in the coffin of 40k for me after my friends and I started playing blood bowl, was the fact that 40k battles were, for lack of a better term, meaningless. Of course its fun and rolling the dice and testing mettle and strategic wiles is great, but win or lose, both of you put the plastic back into the box and there is no lasting impact other than the damage to someone’s psyche and the raised heart rate over losing or how the winner/loser handled themselves if it wasn’t perfectly friendly and gracious.
With Blood bowl, the idea of a player leveling up was a new concept for us (My gaming group and I) on the table top outside of D&D. Going out of your way to create opportunities on the blood bowl pitch for a player to get ONE MORE star player point so you could roll an advancement instead of making a more obvious and perhaps otherwise strategic choice gives a player more to consider when making decisions and also makes those decisions matter more as well. Ultimately one of the biggest factors in determining whether ANY game is more or less complex and in some ways good or not is how many decisions you have to make and how much your decisions matter after making them.
Meaningful Choices and lasting impact.
These are some of the charts for temporary and permanent injuries as well as examples of means of improvement in blood bowl and necromunda
The above charts are some of my favorites to look at. (Yikes, I should just go back and play old editions of D&D with that attitude! – I have, and loved it.) Yeah, seeing charts with a little bit of random, but also some control as well is a nice balance for me and it makes improvement and advancement exciting, a little random but also more natural as well. Being in 100% control of ALL advancement has its place and makes for more control (And to some players more “fair”), but it can take away from the narrative at times and also take away from the agency of the fighters and models themselves. (Have I just assigned personal agency to the plastic models on the table? Yes I have. The dice speak for them and through them, this I know.)
When games have lasting impact both positive and negative, besides stats and injuries and improvement in game, also memories remain as well. I remember who caused a permanent injury to one of my star players in blood bowl and would go out of my way to put more blockers than necessary on them in order to return the favor when we played again. When a particularly lucky/deadly ganger of mine goes on a small rampage sending my enemies out of action, I have more then half a mind to play them a bit more conservative in case revenge is waiting for them around the corner.
The excitement and stakes rise dramatically as characters in game start to get stronger, have a higher value, and become more important to the team/gang. Also the fear lurking in the back of your mind and the anxiety that goes with it that at any moment all that could be taken away with careless play or a lucky dice roll… Those are the reasons that make these games so fun as a player.
That green fella is going to have to roll on no less than two charts to sort that out. Talk about IMPACT!
Expanding and Enhancing the Team/Gang/League
Now this is a gang firing on all cylinders. So much equipment and so many members…
Not just the players get stronger, but the teams/gangs/etc. get stronger as well. Often times there is an opportunity to hire on valuable support staff, purchase new equipment and weapons, and plenty more.
This is one of the coolest parts of skirmish games and Necromunda in particular just unleashes the floodgates of customization when you introduce the trading post into a campaign. It also allows gangs who don’t start with certain weapons or types of weapons to dip their toes into those waters, or to purchase armor, eq, and shielding to overcome many of those troubles. Blood bowl has cheer leaders, asst. coaches, apothecaries and any number of mercenary and star players which are similar in that respect.
This ability to tailor your team to exploit weakness in opponents and capitalize on strengths while minimizing your blind spots adds a nice level of customization that a lot of games don’t afford to players because the factions and their options are set. If you want to enjoy luxuries in those games you need to play the factions with those luxuries, as in you need to buy the plastic for those factions, etc. etc. all they want is our money, etc. Either way, the ability to customize, grow, and expand your team and gang is another way to have an impact on the game and also a way to recover from consequences as well.
The Narrative (And sidebar on Focusing on the Game and not the players.)
Impact and consequences lead to emergent elements of great narrative import, which is to say that a story unfolds as you play just because some crafty play and a few lucky dice end up leaving ‘lasting memories’ and now you form rivalries. Or if players in blood bowl score every game, they become undoubted champions of the league.
The narrative element of tabletop war gaming is indispensable. If you don’t have some kind of underlying story element, over arching campaign, or even any kind of interest in the game outside of its mechanics I think so much potential is lost. I don’t think people need to write pages and pages of fluff to justify the game, but playing skirmish games and not even naming your dudes is such a heart breaker to me. I’d sooner forgive unpainted minis with all proxy weapons (The first handful of times) before letting someone slide by without at least naming their gang/blood bowl team.
There is such a low bar for starting narration in any skirmish game and it immediately makes things so much more interesting. For example, instead of ‘Cultist 4 KO’s Ganger 2’ you can create something more memorable like ‘Slither tongue the cultist KO’s Rude Wanda the ganger with his blunderbuss’. It isn’t that much of a change, but now we add names, a little bit more flavor, and most likely a few more memories to Rude Wanda and Slither Tongue. If the lasting injuries on Wanda end up being particularly serious now we have a name to set to the figure who dealt the blow.
Side bar regarding this topic. (This ends up roller-coastering off the rails a bit so hang in there.)
I previously mentioned that all you were left with after a 40k game is a the feeling of psychological damage even in the best of situations. That is because (in mostly matched play) 40k is more of a battle between two players using the pieces as their method of mastering another person. You get the same in any war game to some extent, but the larger scale wargames turn into a wager of percentages and minimizing the random factor while maximizing what is possible within the extent of the rules.
Few if any people I know bother naming their armies, let alone each squad and only giving a name to their characters on occasion. I think this is important because when you are thinking more on the level of ‘Rude Wanda and Slither Tongue the Cultist’ you are thinking less about ‘Me and my opponent’. It is partly an immersion thing (Into the story and setting of the game) and also a means to ‘blame’ ‘lucky dice’ or ‘strong play’ on the models and the dice instead of cursing your opponent, another human being across from you.
Players are going to do their best in games typically and in the world of war gaming, people get mad when they lose or the dice suck for them or their opponent rolls uncharacteristically well. I knew I was getting tired of 40k when my opponents would comment on dice rolls in terms of statistical commentary instead of something like ‘Oh that is a good roll!’. “Hmm, 5 hits, that is a little under average for the 13 hit dice I rolled” with a furrowed brow indicating out loud that ‘this was contrary to expectations and the laws of statistics and if the game of numbers in their head (which they already won) doesn’t play out to the averages (Which they are planning for and deserve) that the game can be considered a throw away because ‘dice’. It can be treated that way statistical mind or not, but all I am saying is if that is how you are looking at the dice, go take a competitive math test or something because that is weak… BUT! I am digressing from my digression.
What I mean to say is by having named models and attributing luck, good play, cruel actions, etc. to the figures. and their predilections (Even though we ALL know that the players are controlling the plastic little toys) it is easier to separate what is happening in the game world from the real world. Nobody wants to be mad at their friend because they got their butt whooped in a game of pretend with rules. If we can ‘blame’ (I use the term blame here because there are emotions and feelings which must be directed somewhere) the models and figures and their personas in game instead of our friends, the whole gaming process goes much more smoothly in total from my experience and becomes something that we want to keep playing.
For me and my friends, on top of the time investment, plastic investment, and need for lots of space, terrain, tools, etc. the result would often end up with someone disappointed at how their models performed and are they blaming themselves? The other person? Luck of the dice? It changes every match, but the person who loses (or even wins in many cases) in games like those has a lot of unresolved feelings in many cases where their opponent didn’t have as good a time as them or vice versa. Gracious and friendly players aside (The exception rather than the rule), this is often the case.
If you know this fella, this is what happens when the cycle of anger and sadness falls into the hands of narrative creators. This marine isn’t angry about anything in-setting though, no sir. They are angry at themself.
The Models ‘have agency’ and they ‘make choices’ which keeps the cross hairs of rage off of our loved ones.
To summarize some of the narrative ideas I have talked about so far (And make a brazen attempt to keep this train on the tracks) would be: Naming gangs/players brings the game to life. Mechanics/decisions that have great Impact & Consequences help to create strong memories and begin to show emergent story elements like rivalries, fears, anxieties, and hopes. Expanding & Enhancing the team allows a player to grow and strengthen in a custom direction as well as mitigate consequences and weaknesses (often at a cost). By having this narrative Focus on the Game and not the Players we can keep (the sometimes) stronger negative emotions focused on the plastic and not the people, which can ultimately (In best case scenarios) fuel in-game motivation to settle the score instead of leaving nerds (Of which I am one!) with a cluster of unwieldy psychological emotions that they can’t readily deal with (Which I have in no short amount. You should know that if you have read this far!).
Giving the models ‘agency’ (Which is to say letting the dice have a say in things once and a while) adds a fair amount to the whole experience in a few ways. I listen to a few podcasts and one group plays blood bowl in a league where ALL skills are almost completely randomly chosen. (Choose a skill set, then pick 6 of the available skills and roll off for which one you get) Otherwise people all just pick the “best” skills every time and you see a lot of repeat gameplay, and then start counting dice odds since that becomes the only choice you have in the hobby since the ‘meta’ has determined the ‘right’ choices to make…
When games have mechanics to partially randomize leveling up and in particular how skills are gained, it makes characters become unique instantly. Even if the skill isn’t the ‘best’ choice, it is a new tool available and with that tool in (proverbial) hand, you start to look at ways to solve problems or take advantage of that. This creates emergent strategy and game play. Normally a character can’t climb well, but after rolling a skill up and getting a skill removing all penalties from climbing, now you are thinking about the terrain and play area with a brand new set of eyes. This is one of the best aspects of random skill ups.
Even if the skill up is less than ideal, or nearly useless even when putting them into situations to put their new skills to use, at the very least you have a new lease on life through them and they can now perform very risky gambits and gamble their lives more often. Why? Because they need to die, and I need to rehire a new champion who has a half decent skill! As a (sinister, but efficient) blood bowl halfling coach once said, “Halflings who level up get placed on the line of scrimmage and things work themselves out soon enough.” This maxim being funny because halfling teams lean heavily on keeping team value low, and skilling up even once almost doubles their value, so they are placed DIRECTLY in the way of danger until they ‘retire’ the big permanent ‘retirement’ so to speak. This concept can apply to other games as well if the ‘fun and random’ skill ups get a bit too fun and random for all but the true narrative players who subsist on IV drips of pure immersion to get by. I don’t blame them. I like winning and playing a hard game, and I also like random interesting skills and abilities on characters with narrative and story undertones, but if your physically weak fighter with the sniper rifle gets skills which provoke enemies to attack them and gain bonuses to morale checks or something, then something might need to be done there.
Losers Win
Neither of you is the dude with the scales. Those are the dice offering scant justice between each player. You get very little, even when you think you have won.
Maybe not in the case above with the terrible skill ups, but one of the most important parts of why skirmish games that I am describing above are great are for the plain and simple reason that losers win. As in nobody loses, completely, more often than not.
How can this be? Typically these games offer rewards, bonuses, and advantages to teams who are in a weaker position by a large margin and even when they lose, everyone gets some kind of reward.
Munda offers bonus tactics cards (One shot ‘gotcha’ style abilities to gain an edge) per 100 credits of difference between the two gang’s ratings. Even more power cards for every 200 cr of difference. I suppose this represents the desperate tactics and moves that a gang feels they need to go through when they are so out matched and against it. Blood bowl offers the inducement system essentially giving the ‘underdog’ an equivalent amount of spending money to bring the two team values into equilibrium to use how they wish before the match. In both cases, teams which are clearly at a disadvantage get a little bit of a boost to keep them in the fight, or at the very least, give them more of a chance to stab back before they are ultimately pummeled.
In regards to post loss, and thanks to the XP systems and scaling objectives or winnings, even the losing team gains something from the loss. The few places things went right earn their players XP, potentially skilling them up to bring the pain to bear in the future. Otherwise, most missions offer an amount of credits, reputation, experience for participation even if you have lost. Every fighter in a mission in necromunda gains an xp for going on the mission. Every Blood bowl team gains a minimum of 10k gold pieces at the end of the match.
It may not be much, but instead of walking away from the table with nothing to show for it, maybe a few fun memories of the battle perhaps, Each player’s team/gang gains an amount of experience, reward, and some form of progress one way or another. Losses are still steps forward, although they are smaller compared to if they had won, they are still steps forward. In the previous example, maybe, MAYBE if you and people like you all lose enough then the people who write the rules of the game will throw you a points reduction or perhaps finally nerf the ‘broken’ offending models.
This is huge, and is one of the main factors that prevents feel bads from poisoning what was supposed to be a good time with a like minded hobby enthusiast. Even though winners obviously win and gain the most, losers are not just left broken and beaten. They get a little something for their trouble, and may have left a few marks on their enemy as well sending key warriors/players into the recovery box giving them a better shot next time.
The Future and the Crusade
It is almost a war of religious proportions, and a fight over a ‘bible’ of sorts…
The new edition of 40k (‘#new40k, 9th edition, 8.5, what have you) is on the horizon and when I saw the previews I got excited! Believe it or not, despite how much I rag on 40k, I still enjoy it very much. It is a time sink and a slog and players I can stomach playing have gotten fewer and fewer around me so opportunities have grown fewer as well, but I still enjoy the game. And I also love to read rule books and see how things are changing since I had mentally checked out of 8th when the rules for my dudes were split across so many books and I didn’t have the will to hunt them all down, matome them, and print out my own ‘codex supplement’ to make them easy to access. So I am excited by all the news. And in particular the idea behind the ‘crusade’ system.
GW seems to have gotten the memo and realizes that there are people out there who want something more than matched play and refuse to participate in the main group events because matched play draws out some of the worst of the fanbase and you only need to play against rules lawyers and people who play to win at all costs a few times to have a bad taste in your mouth and not feel the desire to give them another chance. That is kind of my situation. I have looked over the old ‘narrative’ ‘campaign’ rules stuff that they had for the last few editions, but it never seemed fleshed out and always shunted in as a pittance.
Any form of narrative campaign offering thus far.
Crusade looks good. Starting with smaller patrol-sized armies and limited choices for unit composition, then earning resources to gain more units, more choices, and hopefully have more fun. The requisition point system which seems to be in place to ‘buy’ units each battle, and to spend on unit upgrades seems excellent.
Treating each unit like one would treat a single ganger or player in munda and blood bowl is a great way to do it. They gain scars, weakening them after particularly bad losses and gain accolades and abilities for their accomplishments and success on the field of battle.
I only saw what GW has been sharing on their community site and stole a ‘tiny’ glance at the leaks, but I like what I am seeing and my friend and I are looking forward to getting a few games in and try out the new crusade system.
A lot of what is being implemented falls right in line with a lot of the things that I think is good in tabletop and wargaming. That is a very encouraging thought! I appreciate the ability to choose and ‘control’ the game, but I also like the randomness of the dice. I like the concept and implications of luck, both good and bad for a number of reasons you can listen to my podcast to hear about. The ability to control the game in certain aspects is the same as making choices in those games. The choices we make in games shape the direction and also reflect on us as players, our skills, and ability to read and react to situations. But having dice decide the fate of fighters and characters in game as well as how they grow and suffer, that is the exciting part which is another fun and interesting surprise that needs to be considered when making further decisions, and also an impetus that helps to guide the narrative as players attempt to make sense of why such things would even be possible.